
This is a step by step process showing how I take a blank piece of leather and create a floral carving on it. In this particular case it is a simple flower but the same techniques work for any kind of carving in leather.
For this leather carving tutorial I’m just going to carve and tool a simple flower with seven petals. The picture above shows the piece of leather with the flower outline already carved into it with my swivel knife. I’ll go step by step over each tooling step that I make to get the final flower. Feel free to grab a small piece of vegtan leather and follow along. Though it looks like there are a lot of steps and details here, it really doesn’t take too long to do each of these. Stay with me through this whole post and I guarantee you will pick up something useful!
A note on tools: It’s more than likely you won’t have all of the tools that I show here. For the most part I’m staying away from very specialized tools as much as possible but for doing traditional floral carving there are a couple of fairly specialized tools that are used to get very specific effects (like a center shader.) If you don’t have all these tools don’t worry. Where possible I’ll point out alternate tools you could use. In almost every case these tools are available at your local brick and mortar leather shop or online at your favorite tool maker. It’s sometimes possible to find these tools used from reputable online sources for very reasonable costs.
Leather Carving Tutorial: Step by Step
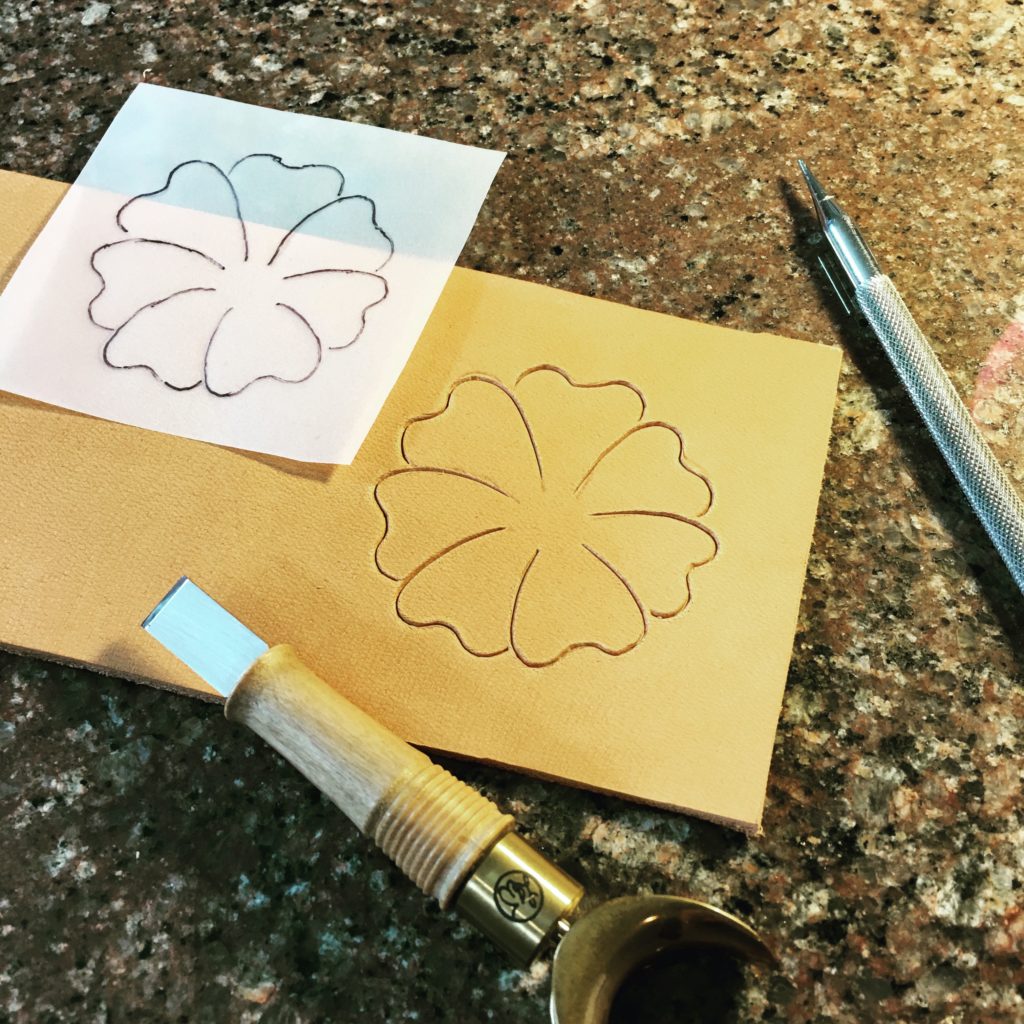
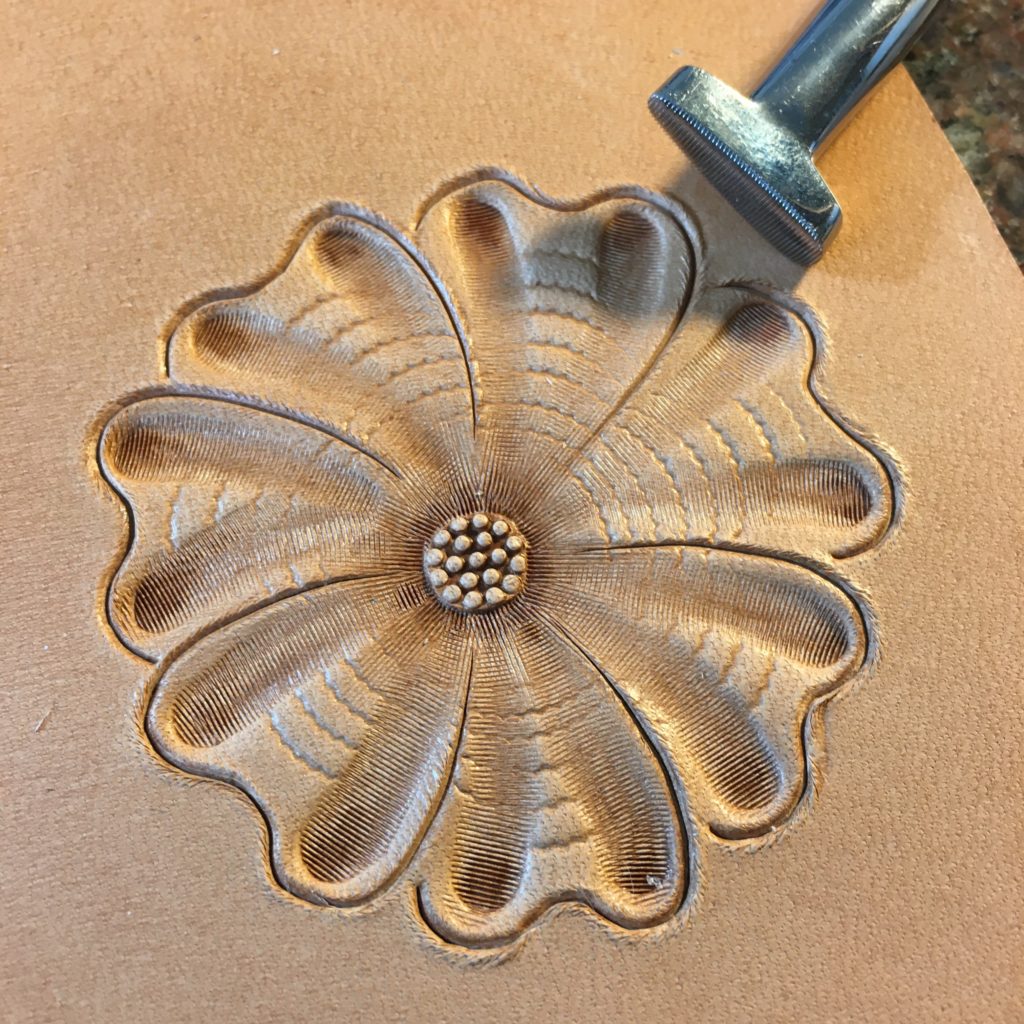
Step 1: Trace the flower outline onto your leather and carve it with your swivel knife. The picture at the beginning of this leather carving tutorial shows this step. I transfer my carvings to tracing paper but I’ve also taken the paper drawing and traced it directly to the damp leather by putting a layer of kitchen plastic wrap over the leather to protect my paper. Also, this first picture shows the design carved in with the swivel knife.
Step 2: Work from the foreground to the background! There are a lot of good reasons for this but the main one is to keep from having to redo any areas you have already tooled.
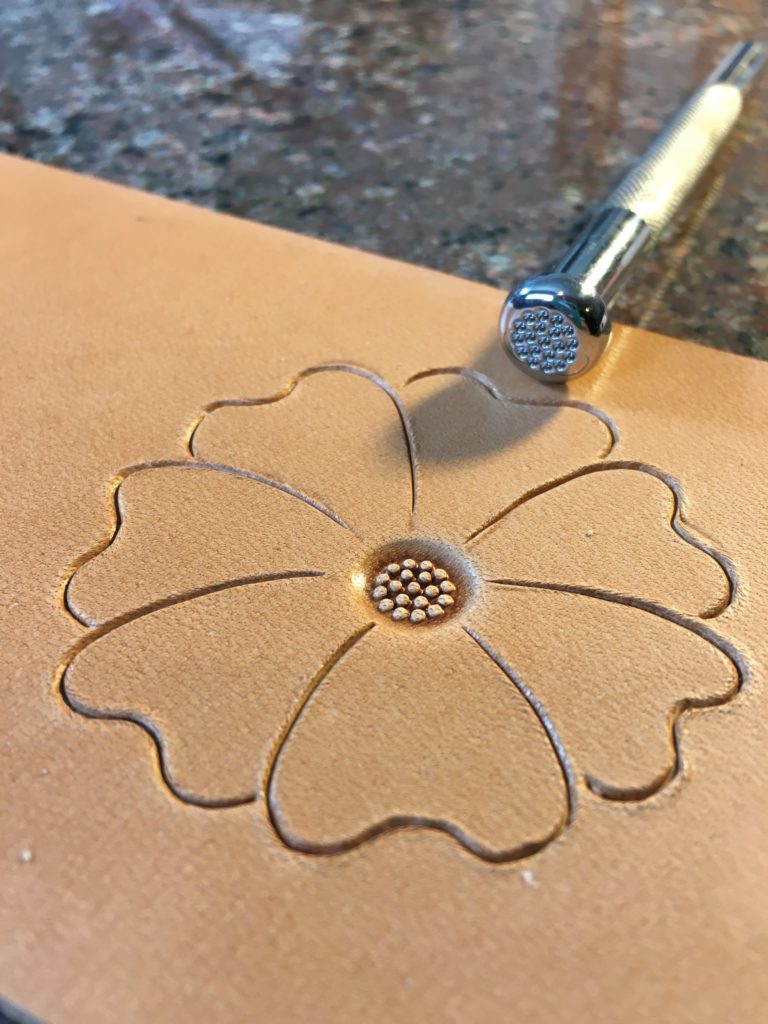
When looking at a flower like this, we treat the center as the closest part to the viewer and stamp that first. It also helps to guide the beveling of the flower petals that will come next. We want the impression that the petals (or more correctly their edges) come down to the flower center.
My flower center in this case is a stamp, but you can do something similar if you have a seeder and can stamp the seeds in a small circular area. In one of the later tutorials we’ll actually use a seeder to make a more complex flower center.
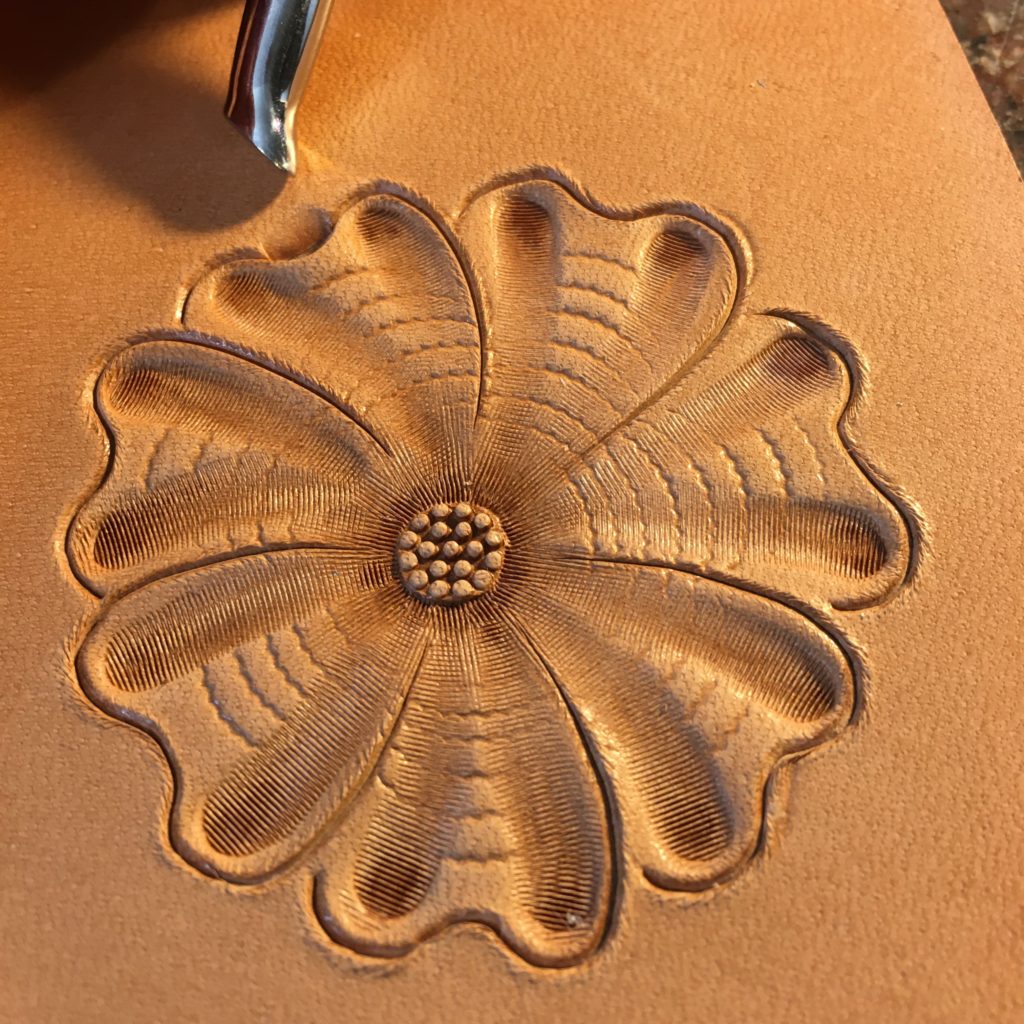
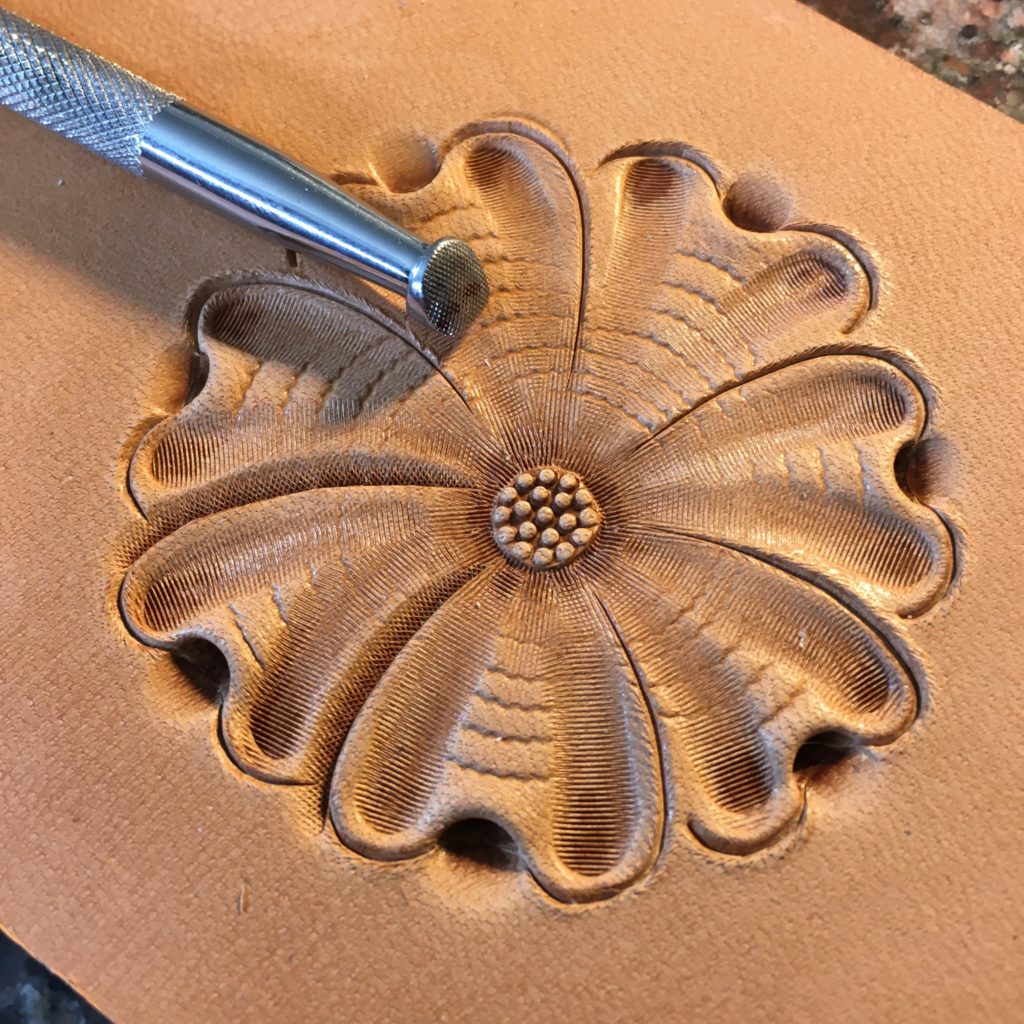
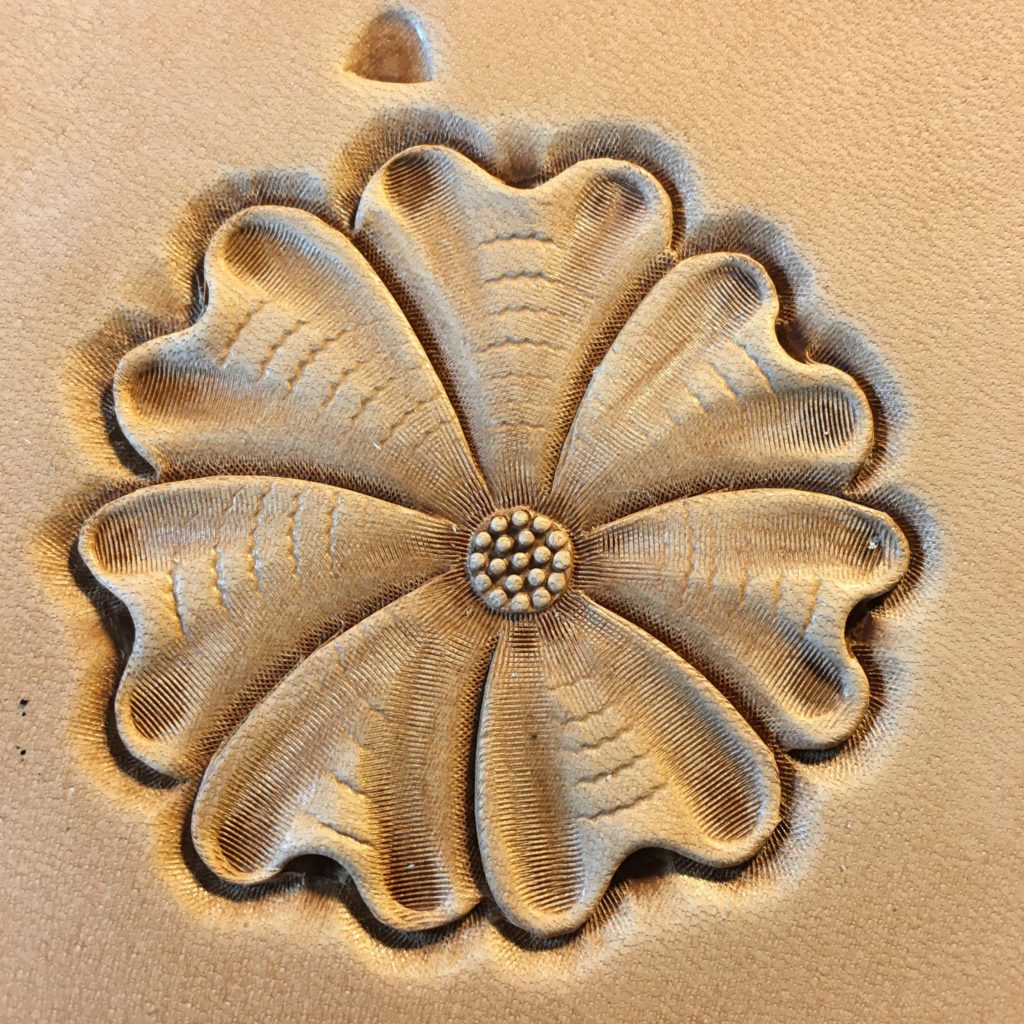
Step 3: Center shading. This was one of the first ‘Sheridan Style’ tools I got once I could get more professional tools. When I saw how this tool changes the look of the flower center I had to have one.

It’s a lined tool designed to work around the flower center stamp and matte it down, making it look like a cone shape. It really enhances the depth the flower center has and makes it look like center is deep down in the center of a real flower. You can’t really tell from the picture but this stamp has a slightly curved heel to help it fit around the center stamp and press the leather down right up to the edge of the center. The lines on the stamp help to enhance the illusion of depth and will capture antique later (if you antique the piece.)
If you don’t have a center shader, a small beveler used carefully around the center can get a similar effect.
Step 4: Using a veiner on the petals. Floral carvers do this to add a visual texture to the petals as well as enhance the appearance of roundness and depth in the flower.
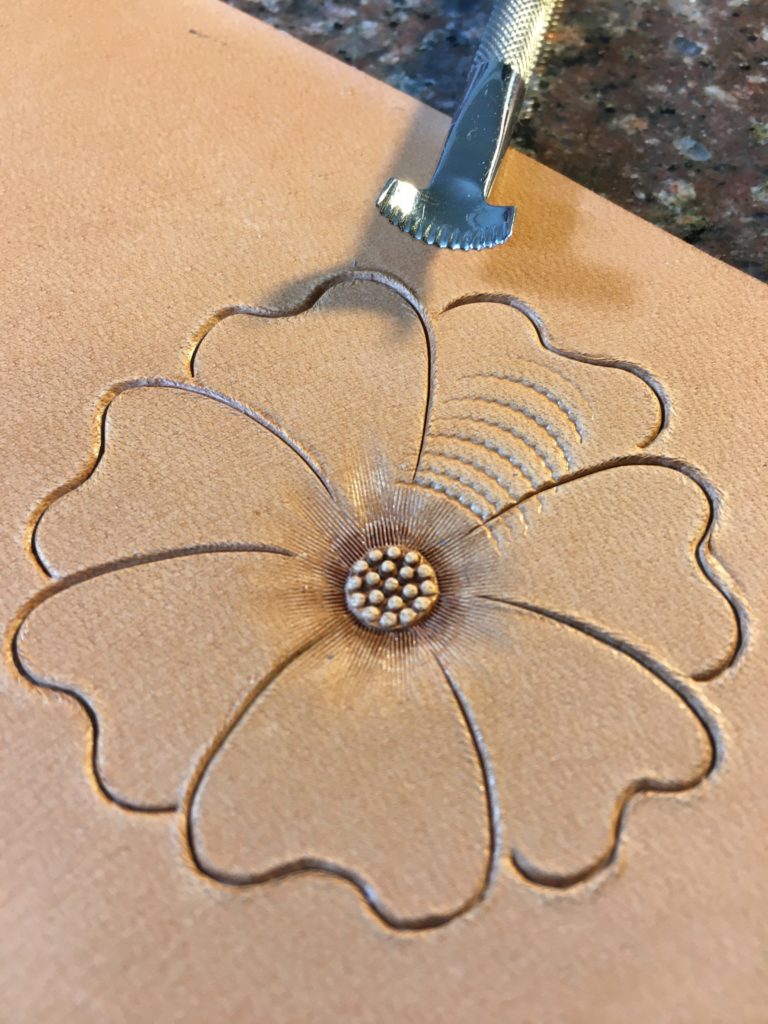
You can use either a veiner or a camouflage tool for this. Originally the camouflage tool was the tool of choice for this but as Sheridan Style developed using a veiner for this job became more common. It’s a matter or your preference and style as to which you prefer. I usually use a small veiner like the one shown here.
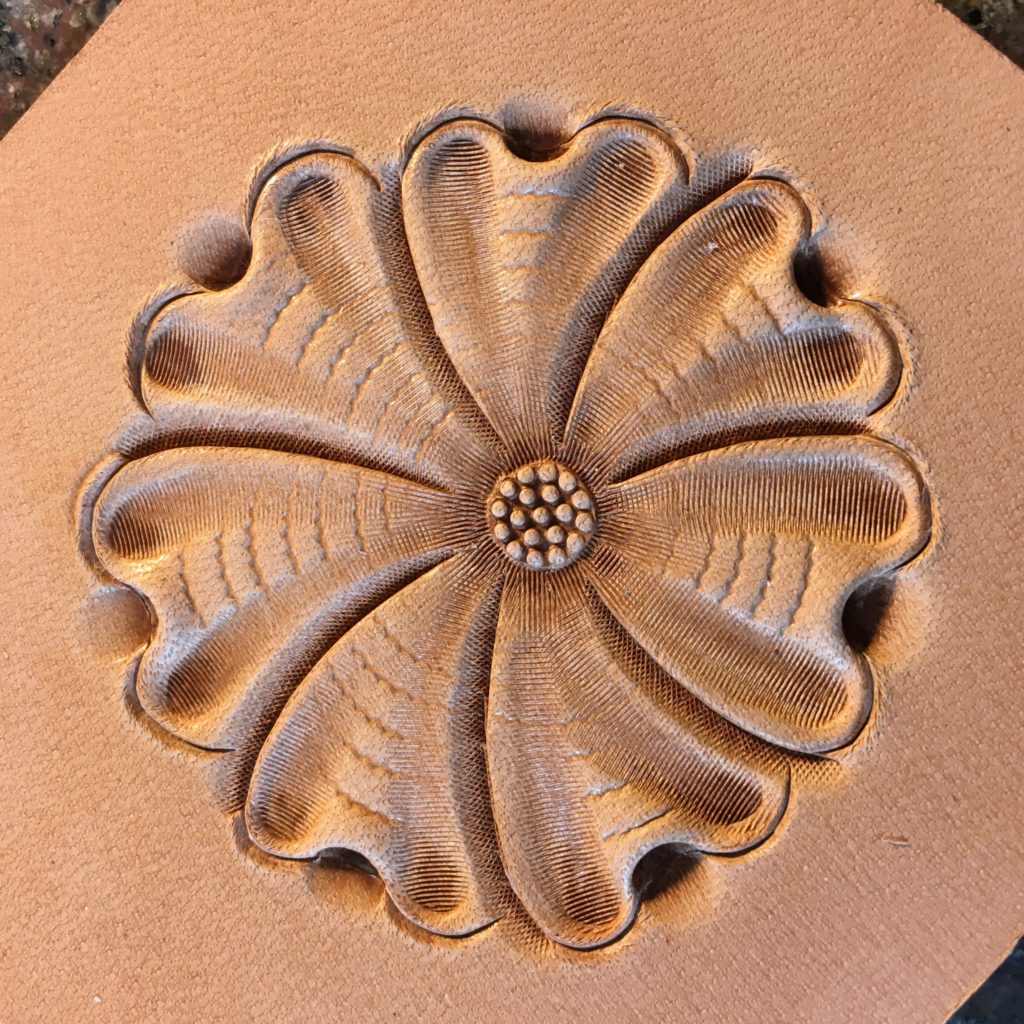
Step 4A: Petals after all the veiner lines have been stamped. I usually try to have my veiner marks line up around each petal though I’m not very precise about this.
Also, I try to put the marks a little closer together near the center and have them gradually space farther apart as I get closer to the edge. I think this enhances the visual illusion that you are looking at a 3D cone shape that gradually opens up and flattens out as you get close to the petal tips.
Step 5: Thumbprint or pear shader on the petal tips. This is one of the steps that is very stylized for floral carving and doesn’t really represent a feature in a real flower. We do it to give texture to the petals and more visual impact.
This tool goes by several names. Typically in Tandy Craftool catalogs it is referred to as a Pear Shader. Most Sheridan Style carvers will call this a thumbprint, and the two do have some differences. Pear Shaders are actually ‘pear’ or teardrop shaped and often smooth. Thumbprints are usually longer, shaped more like a loaf of French bread and they are usually lined. Thumbprints also are designed so that the inner end is narrower that the outer end, giving the user two sizes of thumbprint in one tool. That is a nice benefit!
This particular tool is a thumbprint. Notice how I start at the outer edge of the petal and walk it back toward the center, hitting it a little lighter as I go.
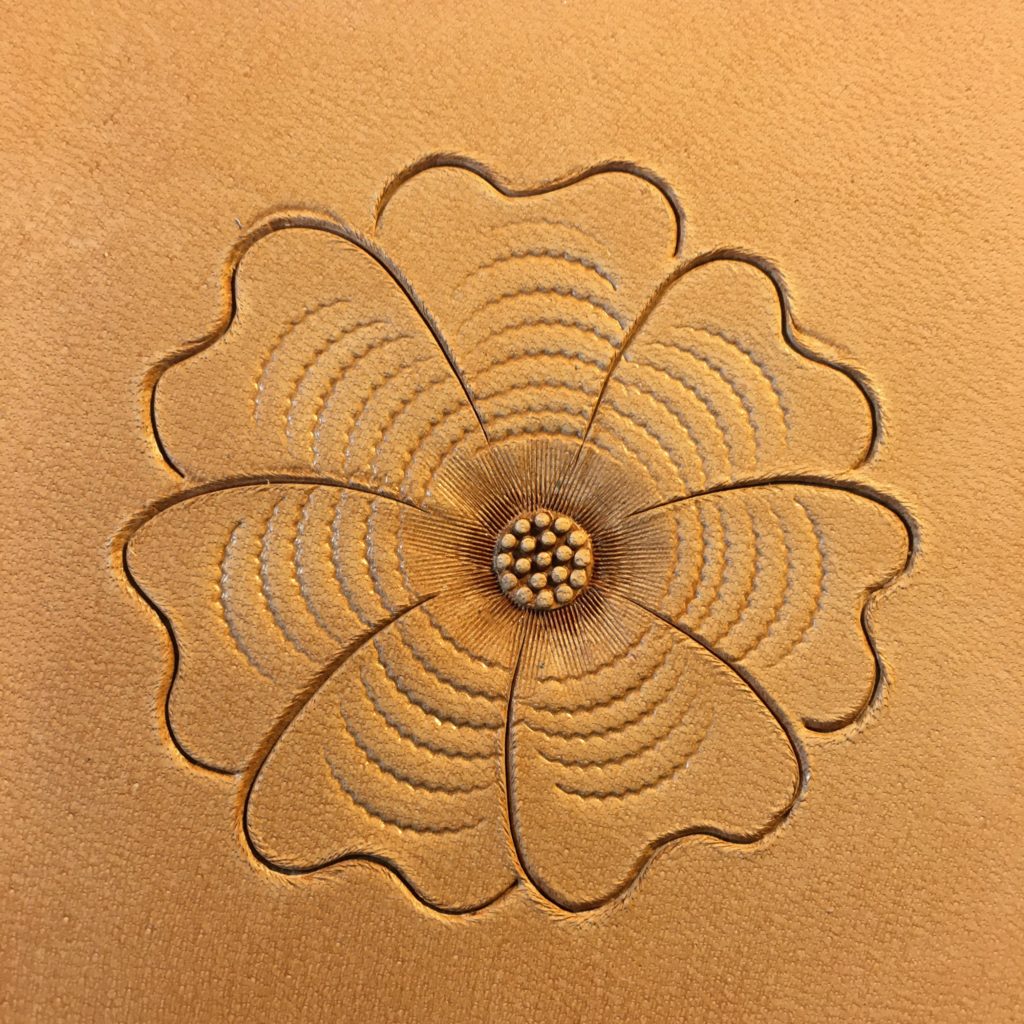
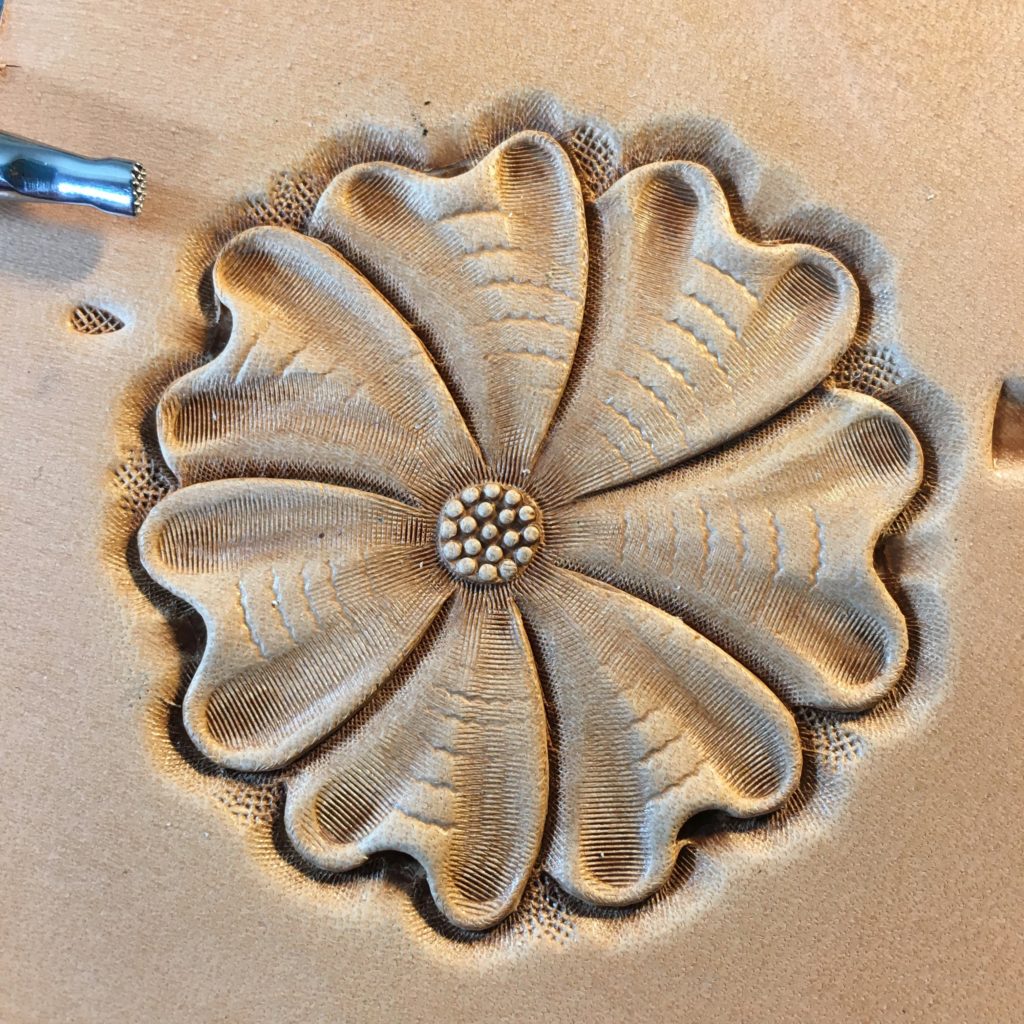
Step 6: The undercut or undershot beveler. This tool makes it easy to bevel those round concave areas on the flower petal. Also, because of the way it is shaped, it pushes the leather up above the cut line, giving a lift to that part of the petal. That is why these tools are often called ‘petal lifters.’ This was another one of those floral carving tools that I had to have once I saw how it was used. To me this was the key tool that made professional carver’s work stand out.
I’ll use this tool inside the slight inward curve on each flower petal to lift that part of the tip up. Compared to the areas on either side of the lifted area where I’ve already used the thumbprint, that center part of the petal will really look like it’s standing up above the leather surface.
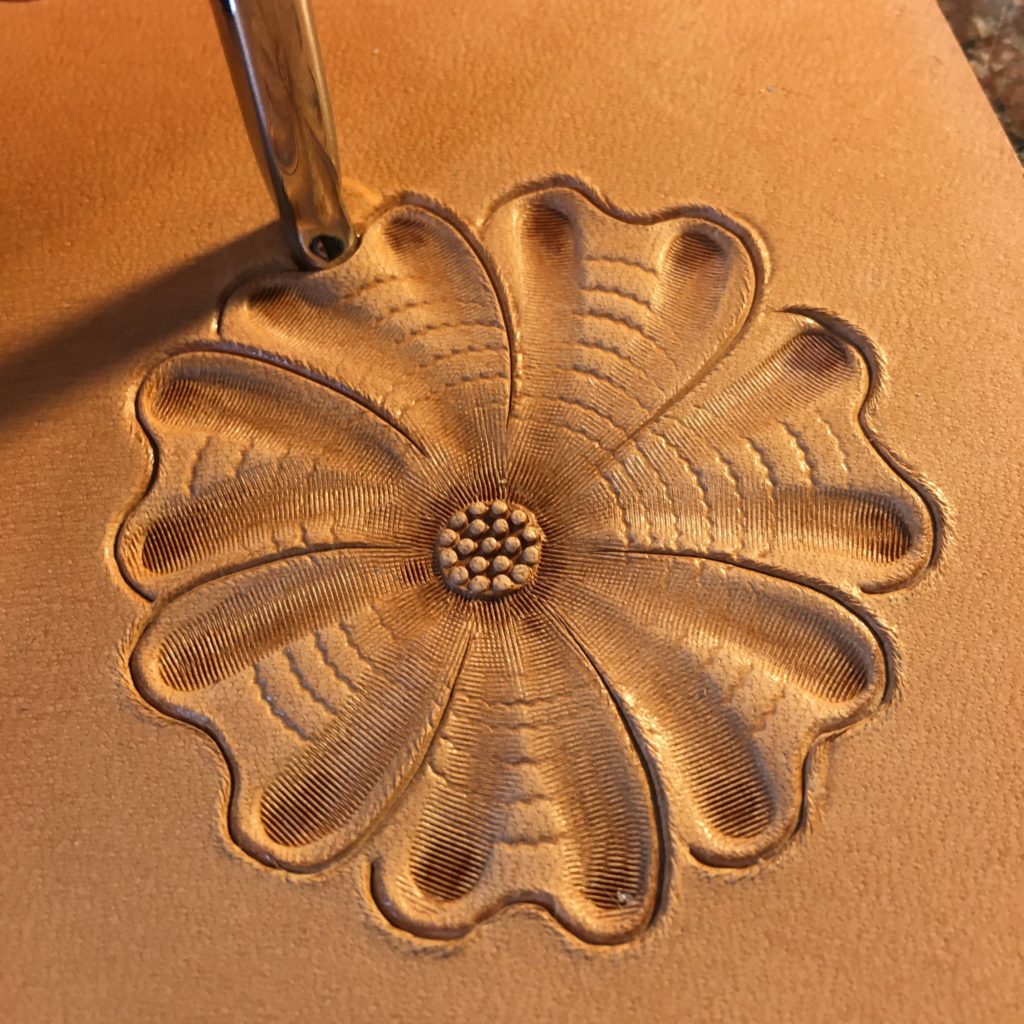
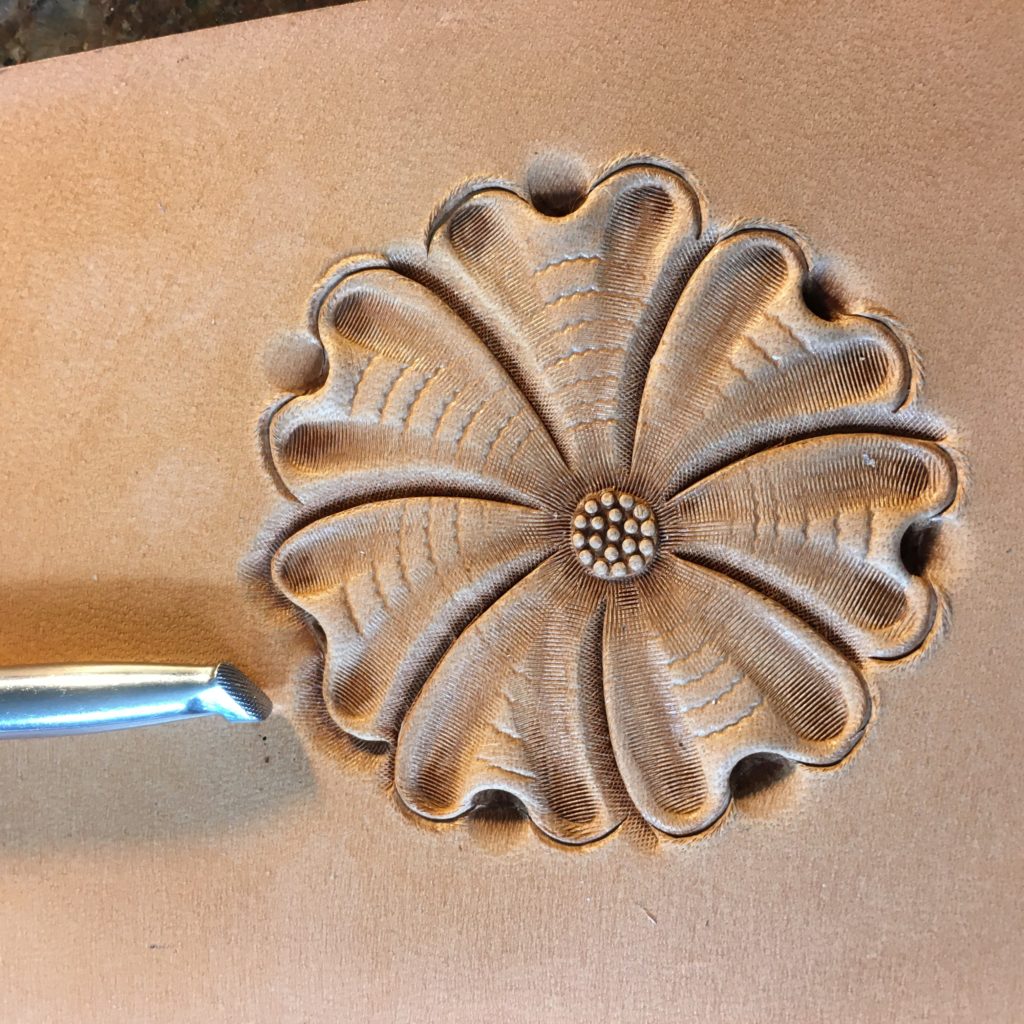
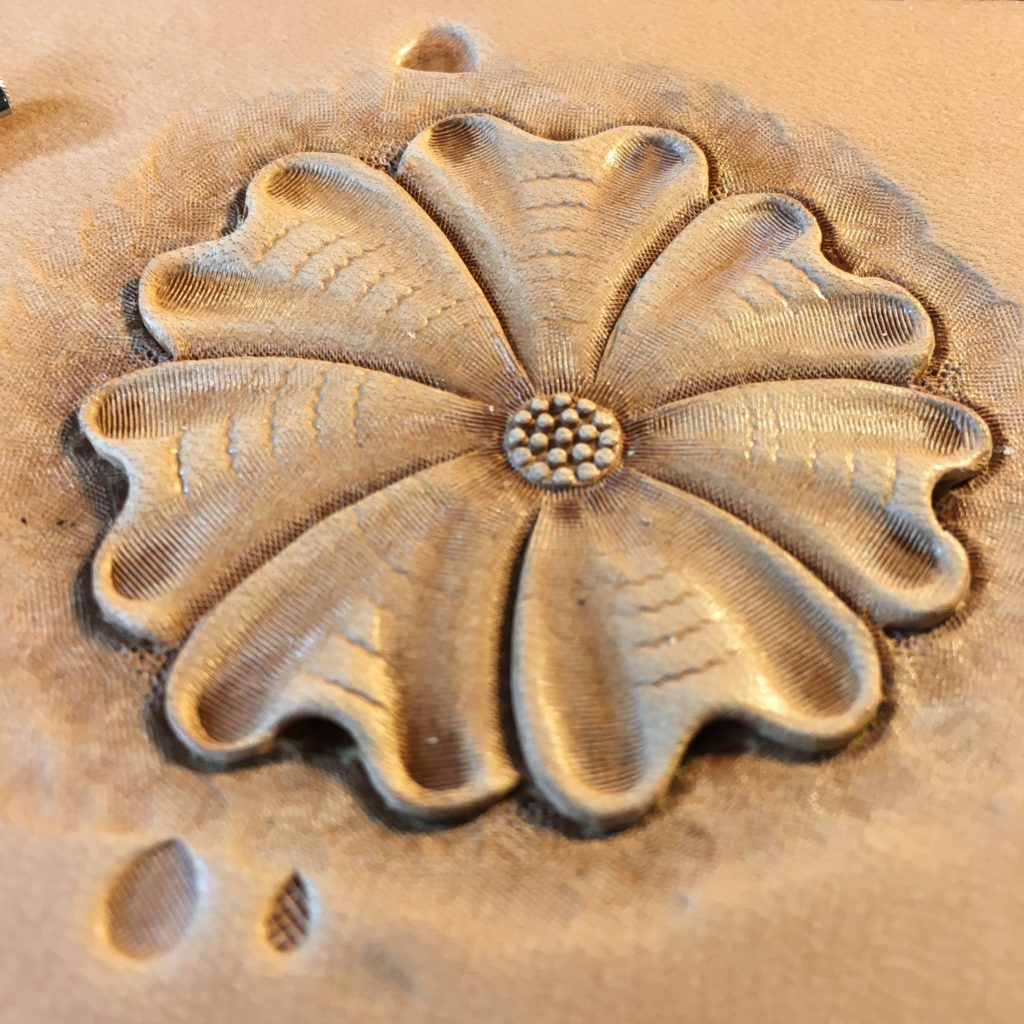
Step 6A: After stamping in all the scalloped areas of the petals. I do this as the first step in the beveling process.
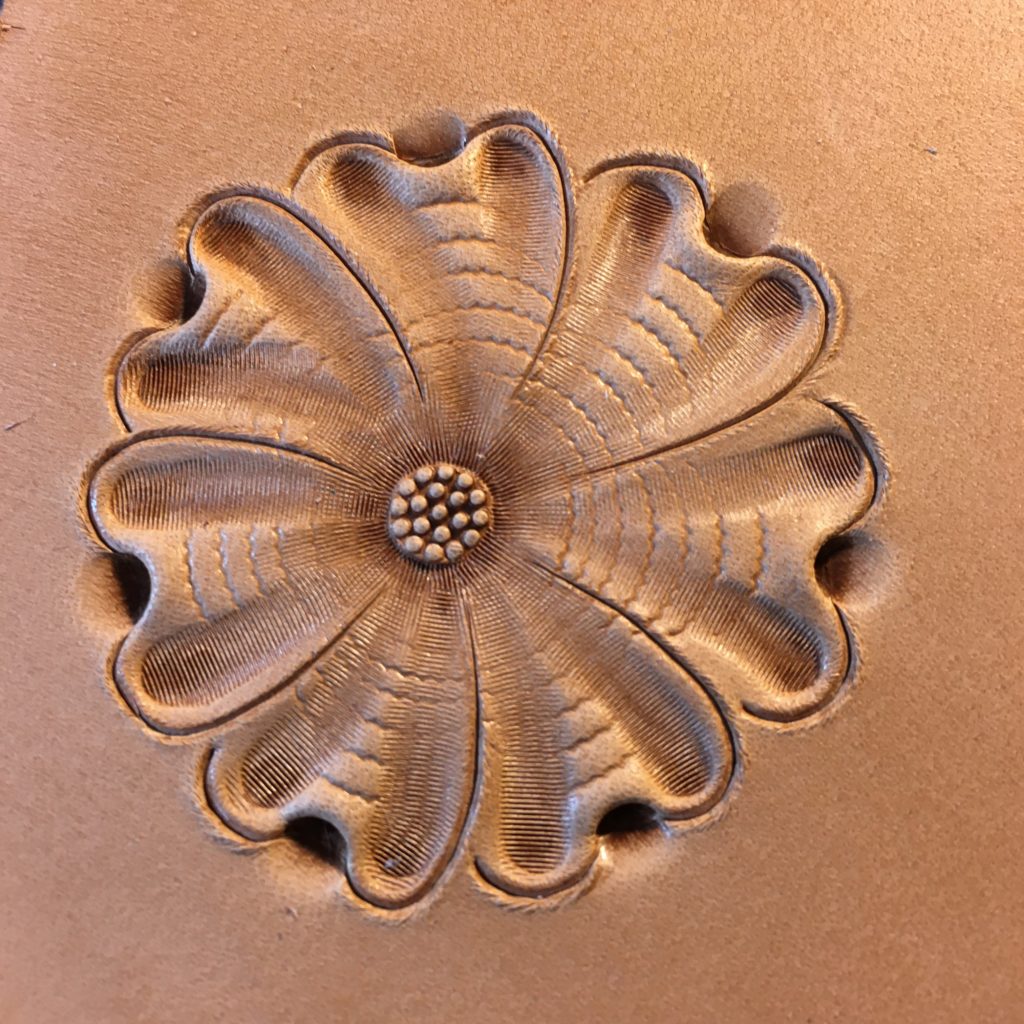
Step 7: Beveling the petals. First I focus on the long cuts to the flower center. I use a wider beveller for this because you get smoother beveling when you can use a wide beveller. The smaller the width of your tool the easier it gets to have uneven beveling and to leave undesirable tool marks. You always want to use the widest tool you can. The beveller in this picture is a ¼ inch wide.
Step 8: Beveling around the petal tips. To do the more rounded petal tips my larger beveler is too big to easily do the job, so I switch to a 1/8 wide beveller. This makes it easier to go around the curves but you do have to take more care to use an even amount of force so you get an even and smooth beveling line.
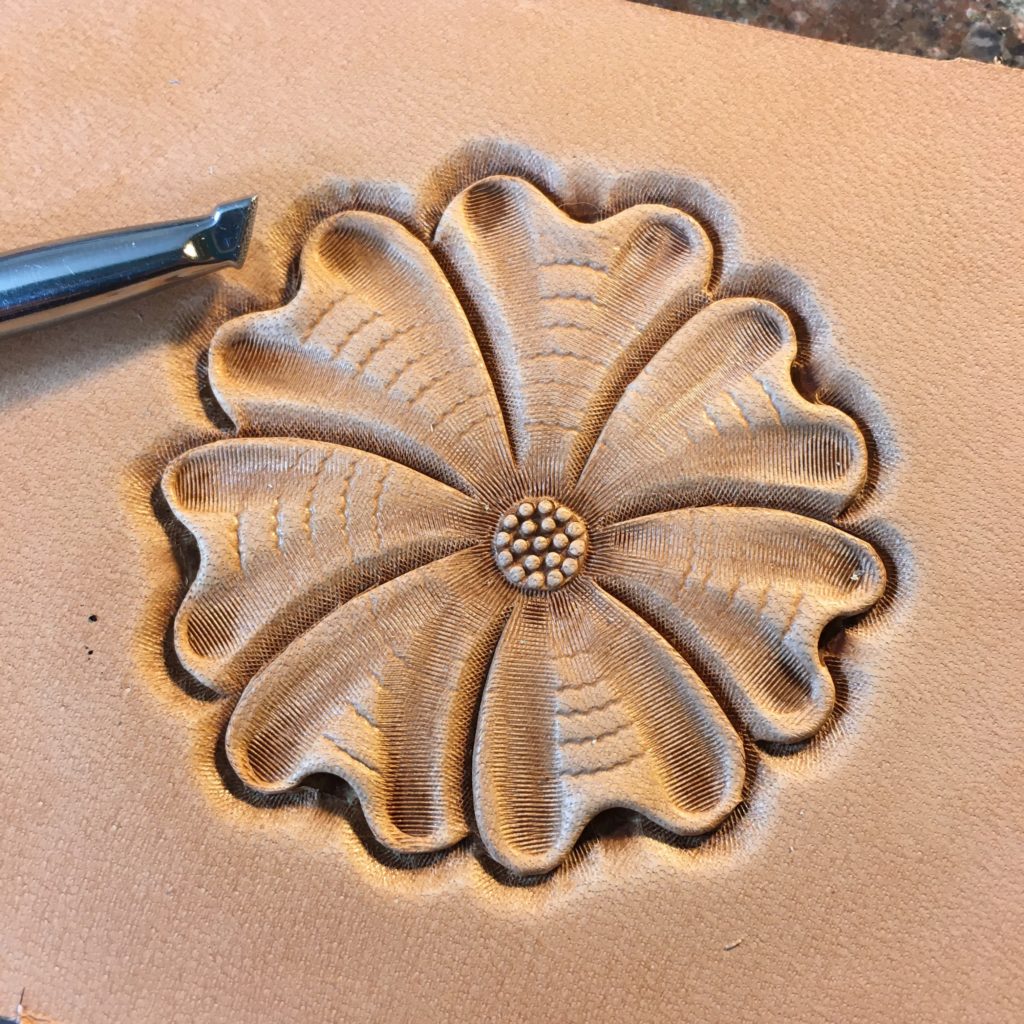
Step 8A: Petal beveling complete! The flower is almost done at this point.
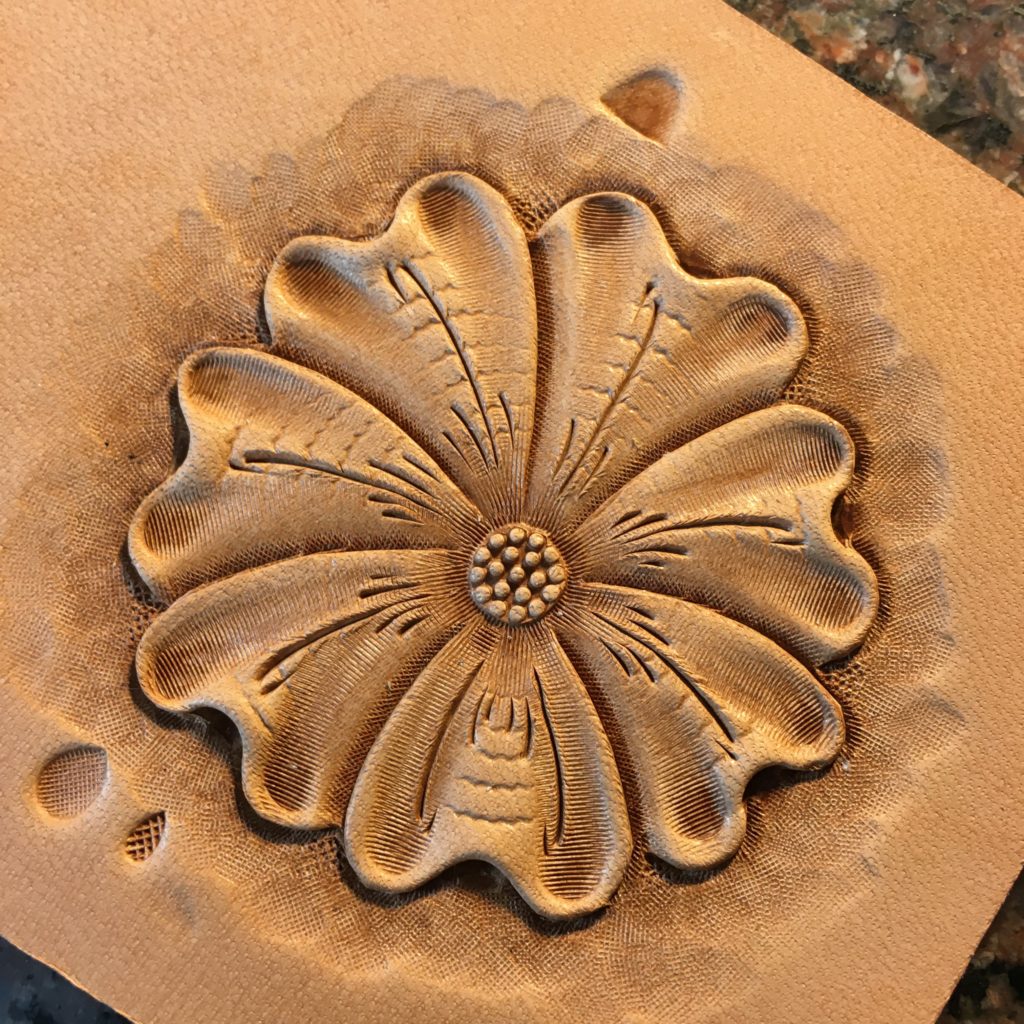
Step 9: Matting down the beveling ridges. Notice that there is a very pronounced ridge on the flower petals where I beveled the petal edges that lead down to the flower center. I want to smooth out that ridge so the petals look more flat and I’m going to use the figure beveller at the top of the picture to do it.
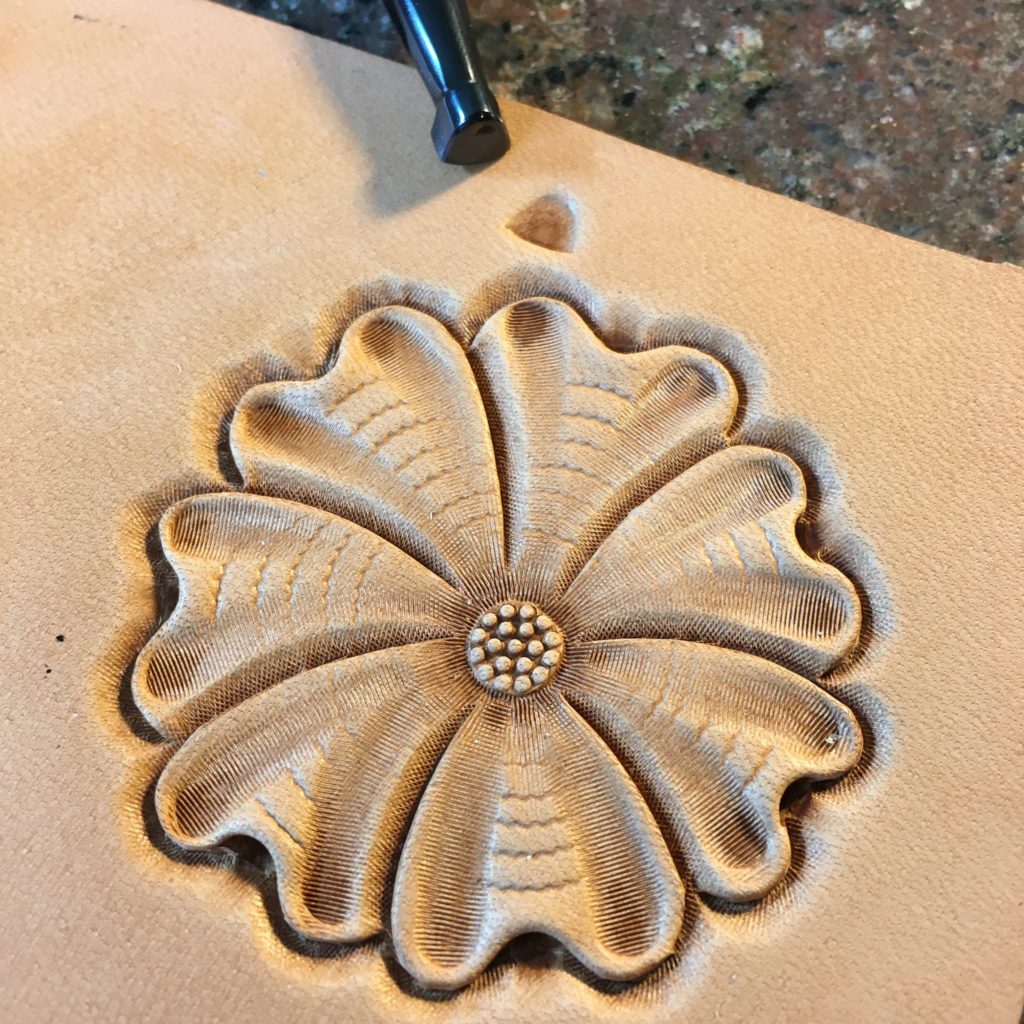
Figure bevellers were specifically designed to matte down leather in figure carving and are great at removing ridges like this. I stamped an impression of the tool next to it so you could clearly see the shape of the tool. If you don’t have one of these tools a modeling spoon will do the same job for you. Really any smooth rounded tool could be used like a modeling spoon to smooth the leather out.
Step 9A: Everything smoothed down. The petals now have a much smoother and more natural looking surface.
Step 10: The same kind of ridge exists around the outer edge of the flower thanks to our beveller and the carving will look better if we matte that down too. Since this will be the background of the flower, we usually want this surface to be textured to make the flower stand out from it. The texturing will capture antique when you antique your piece making it much darker than the flower, but even if you don’t antique your work the texture itself will separate the background from the floral carving.
First, I’m going to start with a small pointed checkered backgrounder to matte down the small pointed areas between the petals. For this carving I’m going to use a checkered backgrounding tool. You can see an impression of the mark this backgrounder leaves next to the tool. It is true that some floral carving experts will say that the only ‘professional’ backgrounding tool for floral work is a bargrounder but I say use whatever you are comfortable with. I’ll have an example using bargrounders in a later tutorial.
Step 11: Once I matte down the tight spaces I’ll switch to a larger tool so I can cover more area. I stamped the larger tool next to the smaller one for comparison and I’ve started matting down the area along the top of the flower so you could see the difference.

Step 11A: Here I’ve matted all the way around the flower. Please note for this leather caring tutorial I wasn’t taking the time to do my best to matte this area down evenly and fade the edge out as smoothly as I could. As a result, the matting on this background looks choppy. If this was something I was making for a customer I would spend more time making the matting look smooth.
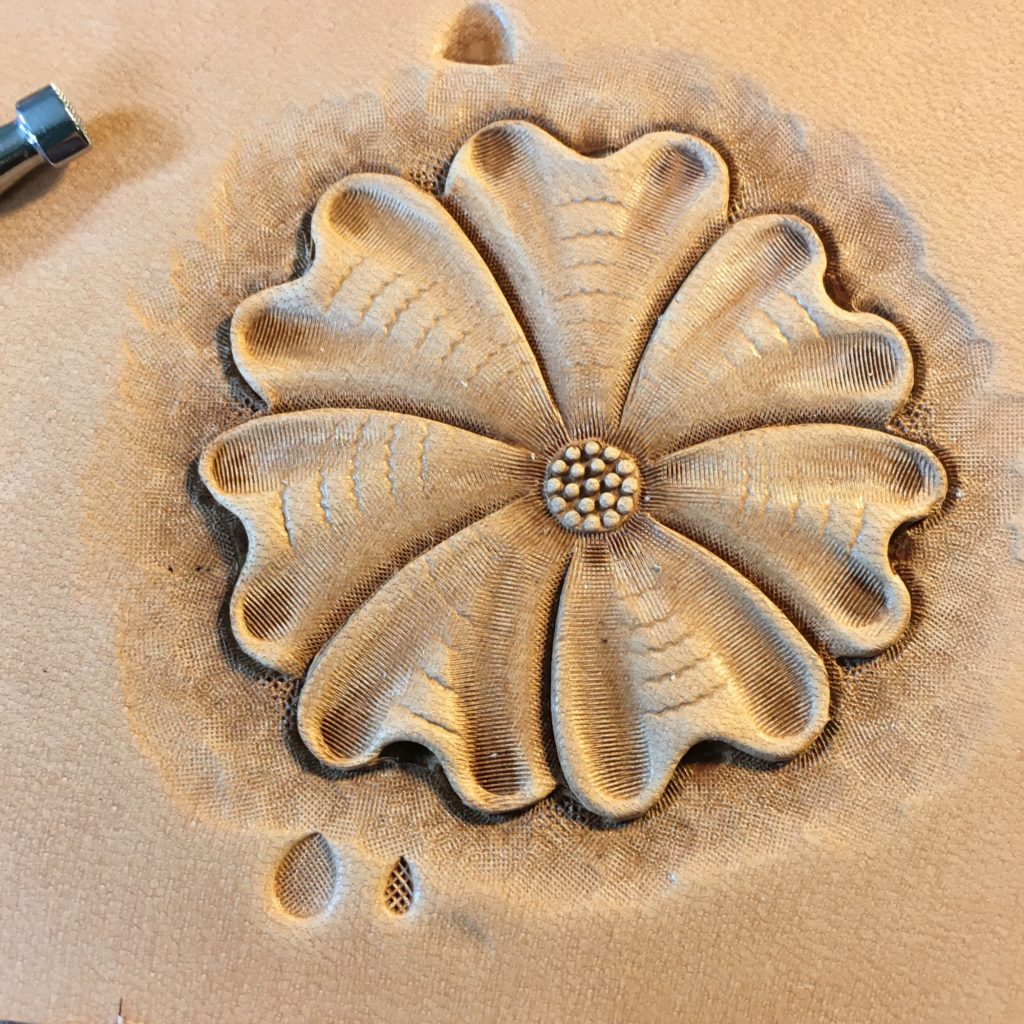
Note how the backgrounding makes the flower stand out, like it’s actually above or separate from the leather. Because of the texturing in the background if you antique this leather it will make the flower stand out even more.
Step 12: Decorative cuts. Typically this is the last step in the project. I usually finish all the carving before I come back and do this step. Decorative or ‘dress’ cuts are intended to give extra detail to the flower and are another stylized effect for floral carving that doesn’t quite match a part on a real flower. I for one think the flower looks much better with the cuts than without.
There are lots of different styles and ways to do these cuts. Each carver usually find one that he likes and can do well and sticks with them. I’ve never felt I was very good with these cuts and I stick to these basic ones most of the time.
That’s the whole thing! Any questions?
I’m extremely pleased to uncover this website. I want to to thank you for your time just for this fantastic read!!
I definitely loved every little bit of it and i
also have you saved as a favorite to check out new stuff in your blog.
Thank you for this page!
You are welcome!
I want to thank you for your assistance and this post. It’s been great.