What Goes Into Making a Custom Leather Belt?

The Artists Method (for Custom Leather Belts Anyway)

So you’re in the market for a custom leather belt?  Wondering why they cost so much more than a belt from the department store?  Read on.

Hand carved leather belt with floral design and silver and turquoise buckle

Having a belt custom made to your specification takes a surprising amount of work.  This is especially true for the carved or stamped belts that I make.  

Usually the process starts off with a question about making a belt with a specific kind of design.  Maybe it’s a basket weave design or maybe something more complex like a floral carving.  One of the first important questions is what length the belt has to be.  There is a specific process I follow to make sure the belt is the right length for your waist and it goes beyond just knowing what size jeans you wear.  People are usually surprised to find out their belt length is longer than their pants waist size!

Once we work out the belt dimensions it’s then a matter of determining the design.  Sometimes this is easy as the customer is ordering a standard design from my shop such as one of my standard floral designs or a particular geometric design.  But sometimes they are looking for something more custom.  I’ve had a request for a grape vine design from someone that owned a vineyard.  Or someone might want me to make a design that matches something else I’ve made for them like a carved notebook or wallet.  In those cases I need to draw a belt design that will work on the size of belt they want and that matches their request.

A custom belt design including carving artwork and belt templates.
Custom belt being designed on my bench.

The width of the belt is a consideration too.  Some people like wider belts and some like narrow belts.  Or maybe they want something that is mostly wide but is tapered around the belt buckle.  We can do that too, and those changes in width may need to be taken into account when designing the artwork for it.

And do they want it personalized?  Maybe they want their name on the back or initials on the billet?  Maybe they want their brand on the belt?  These are all considerations when working with a customer to develop a custom belt for them.

So there are a lot of design steps and things to consider.  This is what you are paying for when you work with a professional leather crafter who is making you a custom belt, and it is reflected in the price.  But the end result should be a belt that will last you many years and that you will be happy to show off.

If you want your own custom leather belt, contact us now to get the process started!  We would be happy to work with you!

Just back from the Rocky Mountain Leather Trade Show!

Mid May is a special time of year for us leather workers, especially those living near enough to Wyoming that we can easily travel to the Rocky Mountain Leather Trade show in Sheridan, WY.

The Premier Leather Trade Show in the US

A view of the show floor at the 2023 Rocky Mountain Leather Trade Show.
A view of the trade show floor.

Every May some of the best suppliers of tools, equipment, hardware and of course leather gather in Sheridan for a week long event that includes classes and a leather artwork show that usually attracts some of the best artisans from around the world.  As a leather worker this is an excellent chance to see the work of some of the best leather workers, purchase specialized tools and get some of the most unique leathers on the planet all in one place.  It’s also a great chance to learn from others and improve our skills.

This has been an event where in the past I’ve taken classes to improve my skills and where I’ve met some amazing people.  The leather worker community in the US is really a very friendly and supportive group as a whole and the leather workers at the Sheridan show really exemplify that.  They are a community that will support each other and freely share their knowledge.  A great example of this is a free class taught on Saturday afternoon to kids to introduce them to leather work.  Master leather craftsman Jim Linnel of Elk Track Studios has given his time for many years to introduce this art to the next generation and to further its traditions.  It’s this kind of openness and community that make this show such a special event in my life and the lives of many other leather workers around the country.

I came back inspired by the amazing work I saw at the World Leather Debut, an art exhibit that is part of the show, as well as the amazing friends I’ve made over the years who are real leaders in this art form.  Now I’m back with a few new tools, a few new ideas and some beautiful leather.  

Timeless Leather Decor for your Home

Remember Leather Decor?

I remember a long time ago traveling for work and staying in a small motel in central Kansas.  The motel had a western / cattle drive theme and I distinctly remember the room having carved leather artwork and picture frames along with other kinds of western themed decor.  I really liked the place and since I had to visit this customer several times I always made a point of staying at that same motel.


Carved leather picture frame with floral carving design and a brand.
Hand Carved Leather Picture Frame

“Leather decor items are a timeless form of decoration for the home and they aren’t limited to western themes.”

This was all long before I knew anything about working with or carving leather.  But it shows how I was interested in the western design motif and leather carving in general.  As a fan of western history it all points to my eventually becoming a leather craftsman and my focus on western floral patterns.

So when I got a chance to make a leather decor item I jumped at it!  A few year’s ago a customer requested a carved picture frame as a wedding gift.  She was looking for a floral design with the happy couple’s brand centered on it.  The final result is shown here and they were all thrilled with it.

It was a fun project and I’ve wanted to make more things like it.  I have an end table in my house that needs the top redone and I want to make an all leather top for it with a carved design.  One of these days I’m going to make the time to do this for myself.

Leather decor items are a timeless form of decoration for the home and they aren’t limited to western themes.  When I was young it was more common to see leather decor items in homes.  Usually they were not western themed though it make sense for the motel I was visiting.  Often they were just meant to signify luxury.  While I like western floral designs myself, there is no reason these designs can’t be Celtic, Victorian or any other theme you prefer for your decorating style.

If you have any ideas for a custom leather decor item you would like for your home, let me know.  I’m always happy to work in a  different style and I would be thrilled to make more items like this picture frame or a leather table runner.  Just contact me and let me know what you have in mind.  Together I think we can make a really cool family heirloom!

PS:  Looking for a unique western motel?

Speaking of motels with a unique western history, try checking out Loveland Heights Cottages,  These unique cabins are located along the Big Thompson River near Estes Part, CO.  They have one, two, and three-bedroom cottages with fully equipped kitchens and many with decks that are right on the river. They are one of the best vacation values in the Rocky Mountains and I’m happy to have them as sponsors.  Give them a call today to book your summer getaway!

Historic Western Saddles at The Don King Saddle Museum

Rows of historic western saddles at the King Museum in Sheridan, WY
Historic western saddles at the King Saddlery Museum in Sheridan, WY
Al Stohlman's leather work bench at the Don King Museum, Sheridan, WY
Al Stohlman’s leather work bench at the Don King Museum, Sheridan, WY

The Don King Museum

Hidden away in northern Wyoming is a treasure of a museum dedicated to the art of leather work and western saddle making. The Don King Museum in Sheridan, WY is home to one of the best collections of historic western saddles in the US and is a tribute to the art of carving leather.


Started by noted saddle maker and leather artist Don King, the museum is the result of a lifetime of collecting saddles from the past to study both the construction and carving artwork made by saddle makers of the past.  The collection goes beyond just saddles and includes western memorabilia, firearms and old leather tools.


The historic western saddles, some of which are over a 100 years old, are an inspiration for a leather craftsman like me.  Not only can I see how they made things but also the carving and stamping designs they used back then are a great source of ideas for me as a leather artist.  The techniques they used back then can still inspire someone and their own creations a century later.  It’s definitely a place that I can spend hours in looking at the works of past western artists.


The museum also includes a section dedicated to Ann and Al Stohlman, pioneers in both the art of leatherwork and in teaching the craft to others.  Al Stohlman partnered with the Tandy Leather Company in the 1950’s to bring out many books on leather work as well as tool designs for refining the art of carving leather.  His ideas were revolutionary at the time and he and his wife Ann introduced leather carving to a much wider audience.  Al Stohlman made an indelible mark on the art and craft of leather work that is still felt to this day.  At the museum you can see some of his original creations, artwork that became the books he would publish and even his entire workbench and tools are on display.


As a leather craftsman walking through the museum is an inspiration.  I’m not a saddle maker but I know enough to be able to appreciate the craftsmanship that went into these saddles and the different approaches to the artwork on them always gives me new ideas.  It also is amazing to think that these works of art were also working cowboy gear that spent many years on the back of a horse in all kinds of weather riding the range.  Oh the stories these saddles could tell!


You can find our more about the museum or the saddlery and rope shops by visiting their website www.kingssaddlery.com


Saddle seat and cantle from an old saddle at the Don King Museum, Sheridan, WY
Saddle seat and cantle
Saddle bags from a historic leather saddle at the Don King Museum, Sheridan WY
Saddle bags from a historic western saddle.


Outstanding Custom Leather Belts

Making Outstanding Custom Leather Belts


Leather belts can be a very personal part of your wardrobe.  They can range from a plain but elegant dress belt to something carved and personalized with your name, and anything in between. 

Here at C and B Leather, while we can make a plain dress belt for you our specialty is a more personalized and artistic approach.  Our custom leather belts are made of Full Grain leather and usually have a design stamped or carved onto the belt.  The leather we use is tanned by a specific process that allows us to make carving designs on the surface of the belt that have depth and will show off the artwork extremely well.  It’s also leather that will last for many year’s of service.

Many of the belts that you get at departments stores or big box general merchandise stores are made with lower quality leathers.  They will be marked as Genuine Leather, which is actually a very low grade of leather.  It is also usually just a thin leather outer layer and the bulk of the inside may be a fabric or even cardboard! See my recent blog post about the different kinds of leather that you will find in most retail stores.  Genuine Leather doesn’t wear well and it cracks and breaks after only a little while of use.  It is an inexpensive product but its also not something that will last.

The Full Grain leather we use has all the strength and durability that leather is known for.  Each belt is made to fit your waist.  We tailor it to your measurements.  After carving or stamping your custom design into the leather, we treat it with multiple finish steps, each applied by hand, to enhance the artwork while conditioning and protecting the leather.  This allows your belt to have many years of looking good and serving you well.


Quality Custom Leather Belts are available now!

If you are ready for a quality custom made leather belt, tailored to your waist and that fits your style, we are glad to help.  Contact us with your ideas so we can get the process started.

Hand carved leather belt with floral design and silver and turquoise buckle


Quality Handmade Leatherwork

The Quality of Consumer Products


Recently I was reading an article on Vox about why consumer products that are made now are not holding up to the quality of just a few years ago.  The author of the article makes very good points about why consumer companies from clothing to tech products are driven to reduce quality and make manufacturing easier in order to maintain a certain price.  The point of the article is that cost of materials and cost of labor have constantly been increasing (this last year especially so!) and to maintain prices that consumers are used to, the quality of the materials and the way they are assembled has to be sacrificed.


This made me think about the quality of handmade leatherwork like what I make here at C and B Leather.  The items that I make are not only intended to last for many years of service, but ideally they can be passed down to the next generation and still be useable.  


So much in our culture is looked at now as disposable or as being useful for a period of time but then cast aside as newer and improved versions come about.  We don’t expect our clothing, furniture or appliances to last for years.  With electronic tech we even will replace something because we want the newer model even if your existing model still works fine.


When I make quality handmade leatherwork I want the finished product to rise above those expectations.  I want it to be something that will last for a long time and that you will keep using for a long time.  It should also reflect something about you or your personality.  It should be something that fits your personality uniquely.  It’s going to cost more than the disposable version, but it will also have more VALUE!


There are craftsmen and women making really high quality items all across the U.S.  These people make the things they make because they have a true love of their craft.  Each item, be it wood working, sculpting, painting or working with leather, is made with love and care.  It’s their goal to make something that is a unique expression of themselves as well as the best quality they can make it. It’s also usually a unique expression of the end user.  That is what I’m doing with my leather work,  I’m striving to make the best quality handmade leatherwork I possibly can, and if I can make it unique to you I will do that too.


If you are ready to invest in quality for yourself, let me know.  If you are looking for a custom made leather notebook, a custom belt, wallet or handbag made just for you contact me to get the process started!

Carved Leather wallet with Sunflower design
Minimalist wallet with sunflower design.

Handmade by a craftsman produces quality that cannot be equaled by today’s mass market consumer items.


Improving your leather carving skills – One Simple Technique

One question I am frequently asked is how to improve your leather carving skills. People who are just starting out wonder if there is some magic technique that can make your carving stand out. The answer is that there is nothing magical about it. It’s just a matter of practice!

Veg tan leather carving
Floral carving in leather.

It turns out you don’t need to sell your soul to the devil or perform any magical rites. You also don’t need to possess any superhuman strengths or skills. An average person can improve their carving skills and become really good with one simple technique: Focused Practice.

Focused Practice

Focused practice is concentrating on one aspect of your leatherwork and repeating it again and again with the goal of improving your work each time. In this case it’s working on your carving skills and self-critiquing your work each time.  This was a tip given to me by one of my mentors, noted saddle maker and Hollywood holster reproduction specialist Dusty Johnson.  Dusty was a great guy with years and years of experience and he really helped me out when I was starting off.  

He made the suggestion that in order to make my leather carving skills better I should take a particular small carving design and repeatedly carve it.  So I make this same suggestion to you:  Find a small simple design.  In my case I found a Tandy Craftaid (something like this) and carved it repeatedly.  Dusty recommended carving it five times and after each attempt, take a step back and take a good look at what you have made.  Note the parts that you like about it.  Note the things that you don’t like so much.  Think about those parts and decide what you can do to improve those.  Then try the same design again.  After you have finished that one critique it again.  

Practice pieces for my leather carving skills improvement.
Practice pieces

The image above shows the fourth and fifth versions of the floral design I carved back then.  They look pretty rough to me these days but I carved these over fifteen years ago!  At the time these did represent a significant improvement in my leather carving skills, but over the years I’ve put a lot more effort into my skills and it shows.  

Improving your leather carving skills

If you try this exercise I guarantee that by the time you finish the fifth piece if you place it next to your first attempt you are going to see some improvement. You will probably see a lot of improvement!  Try it again with a different design. The more you do this the more improvement you will see.  This is the core of focused practice.  Concentrating on one part of your skills and working on them again and again to improve them.   And you don’t have to be repeating a practice piece to make this technique work.  Every time you carve something in leather, critique it afterwards to see what you liked and didn’t like and try to improve the stuff you didn’t like next time.  This sort of honest critique will quickly improve your skills.

Basket Weave Leather Stamping Tutorial

Basket weave leather stamping is really intimidating to many people but it doesn’t have to be difficult.  I have been working on a way to explain the techniques I use in my basket stamping (and really any stamping with a basket weave or geometric stamp) and I’ve come up with this tutorial as a starting point.  I decided to begin with the simplest form of basket stamping where you are stamping in a straight line across the leather.  Later I’ll write up a tutorial on angled basket weave stamping, which is more complicated but what I use most of the time.

Step 1:

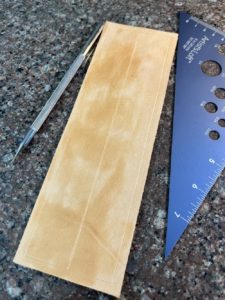
Here is the cased leather I’ll be using for this tutorial.  It’s a money clip wallet back and I’m going to place a straight line of basket weave stamping down the length of it.

NOTE: I am right handed so all the descriptions and directions are what works for me.  If you are left handed most likely you will do everything in the opposite direction from what I’m writing here.  

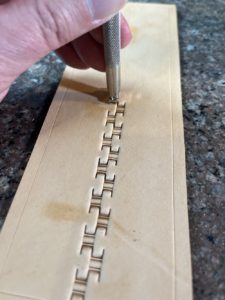
I start out by making a faint line across the middle of the leather.  This will be my guide line for the first row of stamps.   Note that I made this line very bold for this picture.  Normally I would try to make this a faint mark but in this case the stamp will always be placed over the line so no part of the guideline will be left once I’ve stamped the whole piece.

I’ve also marked the border on the piece because later I will need to make sure I don’t stamp past the border lines.

Step 2:

Basket stamp on leather

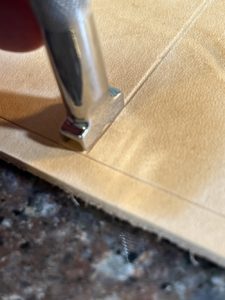
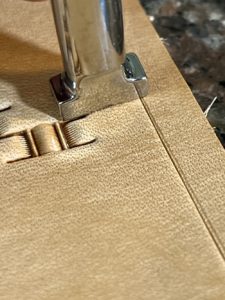
I start by placing the basket stamp with one side right on the line and with the back edge right up against the border.  Take your time and line this up carefully.  This first row is the base for all the stamping on the rest of the project and any problems here will lead to more problems across the rest of the project.


Step 3:

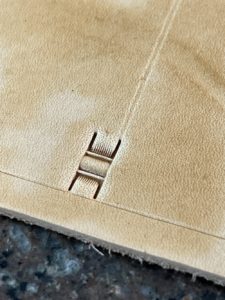
Here is the first stamp impression.  Note the legs of the basket stamp are right on the line I marked on the leather.  You want to keep the stamp aligned straight with the guide line as much as possible.


Step 4:

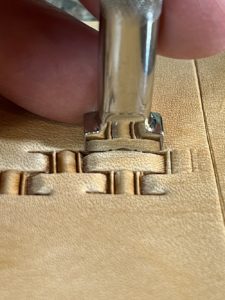
Time for the next stamp impression.  Move the tool so you are making an impression with the other side of the stamp on the guideline as shown in the picture.  The next impression will still be along the guideline but with the back leg of the basket stamp overlapping the first impression.  The leg of the second impression should drop in perfectly to the leg of the first impression.  As long as the side of the stamp is lined up along the guide line, you will keep your stamps going in a straight line.

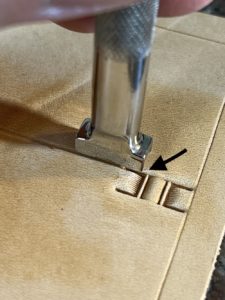
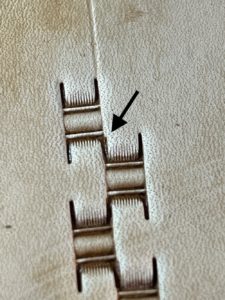
Here is main secret to how I stamp and keep the whole project straight and uniform.  Note the black arrow in the picture pointing at where the back of the stamp is sitting.  There is a slight gap between the back of the stamp and the center bar in the first stamp impression.  This is very intentional and it’s about the width of the leg of the stamp.  This extra space is a bit of play we will keep between all of the impressions.  As things get a bit off or crooked, this amount of play will allow us to adjust and keep things from getting far off.  If we stamped the impression right against the center bar there would be no room for error in the stamps around it and eventually you would end up with stamps crowding each other and the overall project would be crooked.


Step 5:

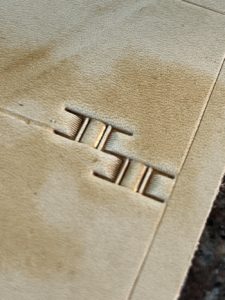
Here is the second impression.  It’s on the other side of the guide line but still has its legs lined up with the guideline.  Again, take you time making each of these first impressions and make sure they line up.  The time and patience you show here at the start will pay off in the end.


Step 6:

Now it’s time to repeat back on the other side of the line.  Again place the legs of the stamp in the last impression and make sure you have the same small gap between the back leg of the stamp and the center bar of the last impression.  It’s important to try and be as consistent with each impression as possible and to try and keep that slight gap the same for each impression.  Again your patience will be rewarded.

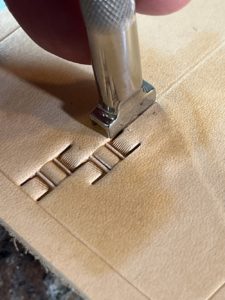
Also note that while I’m stamping this first row this is basically my view.  I’m always looking from the side to see how well it lines up with the guide line.  Once I finish this first row I’ll change how I look at the leather but for now I want to focus on making sure each impression lines up along the line and has the right spacing.
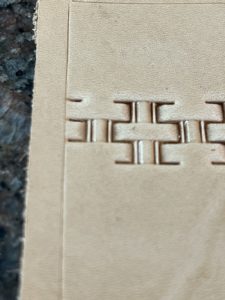
Step 6A:

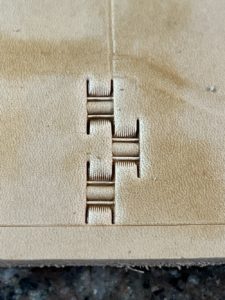
First three impressions made.  About a few hundred to go.
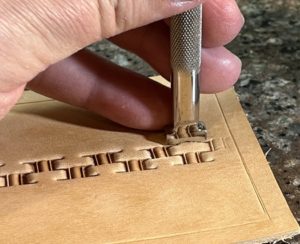
 

Step 7:

This view shows more stamps running along the line as I continue to work my way across the piece of leather.  Again, keep the legs of the stamp on the guideline and try to make the space consistent between each impression.  


Step 8:

This pictures shows how even when you are trying to carefully line things up slight accidents will still happen.  The black arrow is pointing to where the previous impression was slightly off the line and you can see it is not quite lining up with the next impression.  We are all human so slight errors like this are UNAVOIDABLE.  This slight error causes the row next to it to be slightly off.  As you expand the stamping the errors like this compound which is why we tend to start off nicely but end up with our basket stamping being all over the place by the time we finish.  It’s that slight gap between the back of the stamp and the center bar that allows us the freedom to correct this kind of problem as we go along.


Step 9:

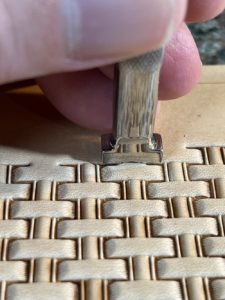
Once we reach the other side most of the time the stamp isn’t going to line up with the border.  In this case I tip the tool on end so I’m just making a partial impression.  I line up the legs just as before but tilt it up slightly so that when I strike the tool I only make an impression inside my border. 

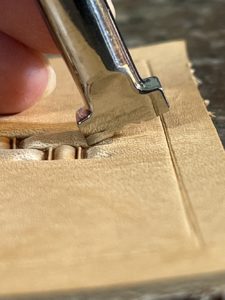
The second picture here shows the tilt from the side and I’ve exaggerated how much I tip it, but you do need to tip it more than you think.  If you don’t you’ll end up accidentally making faint marks on the other side of the border.

Step 9A:

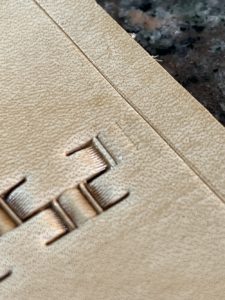
Here’s the impression of the tipped stamp.  Don’t worry that there is a pretty large gap between the partial stamp impression and the border.  We’ll fill that in with a border stamp later.


Step 10:

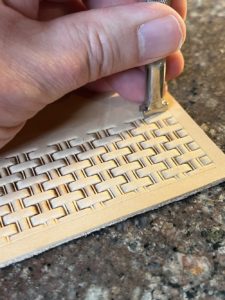
Now that I have my baseline across the project, I start stamping the area to one side of it. To do this I’m going to reverse the direction I’m adding new stamps.  I now will be stamping from right to left (I’m right handed but you are left handed you will most likely reverse this) I start by lining up the legs of stamp inside the two stamps that are already on the leather.  Note that I’ve rotated the project about 90 degrees and this is how I view the project in these two views.  This way I can most clearly see where the stamp sits in the existing impressions.

Here is another key trick I use to keep things straight and neat.  In the closeup picture you can see I’ve lined the stamp up with equal amounts of extra space on either side of the stamp.  This is where having that small gap between the stamps pays off.  From now on whenever you make an impression always try to keep the extra space on either side of the stamp equal, or stated another way keep the stamp centered between the two existing impressions.  Also try to keep the stamp running in a straight line with the existing impressions.  If you do these two things each time you stamp a new impression, it will help average out any slight errors we’ve made already and keep the stamp impressions form crowding each other.  Paying attention to these two key details will go a long way to improving your basket stamping.


Step 11:

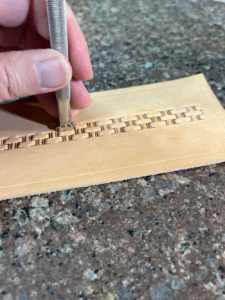
This shows several impressions I’ve made as I follow along my existing row of stamps, working from right to left.  On each one I try to center the stamp between the two existing stamps and keep the stamp aligned with the existing stamps.   This stamping will go faster than the initial row.


Step 12:

I’ve reached the end of the line again and again the stamp is running over the border.  Just like before I tilt the stamp so I only make a partial impression.  The second picture shows I only get an impression of the legs of the basket weave, but that leg impression is what I’ll use to line up the next row.


Step 13:

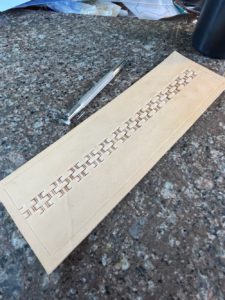
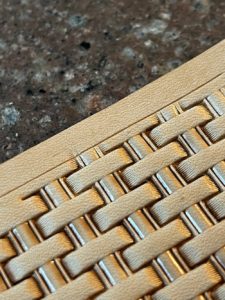
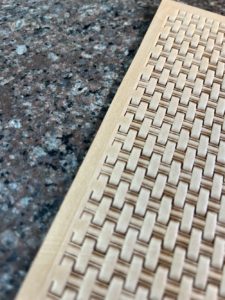
Here’s where we are at this point.  We stamped a straight line across the project from left to right and then stamped one row of stamps back across from right to left.  For the next row I’ll go back to the right and stamp another new row, tilting the stamp up at each end as necessary.  I’ll keep doing that until I have filled up that side of the project and it looks something like…


Step 14:

Here I’ve added all the full rows I can on one side of the project and I’m bumping up against the border.  For each stamp I’ve followed my process of making sure each new impression is centered between the two existing stamps and I check to make sure I’m keeping the stamp aligned straight with the existing rows.  Fortunately it has come out pretty even with the border.


Step 15:

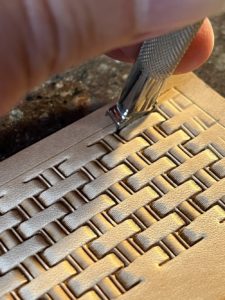
Now I am working on stamping as close to the border as possible by tilting the stamp towards me and making partial impressions.  I still make sure to place the stamp centered between the two existing impressions and keep the stamp straight with the other impressions.  I just want to be careful to leave as few marks as possible in the border area.

This closeup shows the partial stamp impressions and if you look carefully you’ll see I left a slight impression of one of the legs in the border.  You can get rid of this by using a modeling spoon to gently rub the mark out.


Step 16:

Now I flip the whole project around and repeat the process on the other side.  Again I start on the right and add impressions moving toward the left.

Just like before I center the stamp between the two impressions and keep the side of the stamp aligned straight with the existing impressions.
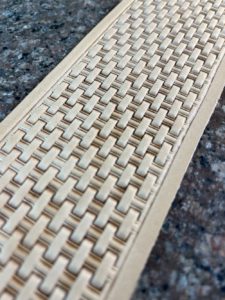
 

Step 17:

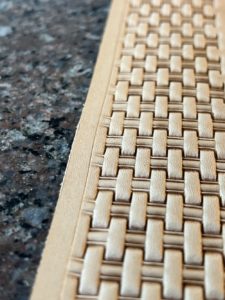
The other side is filled with impressions just like we did on the other side.


Step 18:

This time the whole stamp impressions came out pretty close to the border.  I could probably get by without stamping any more but I’m going to go ahead and stamp partial impressions along the border by tilting the tool.  I always try to get my stamps as close to the border as possible.
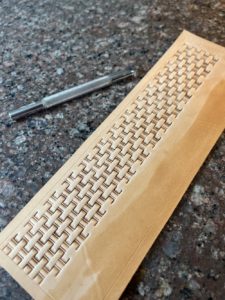
Step 18:

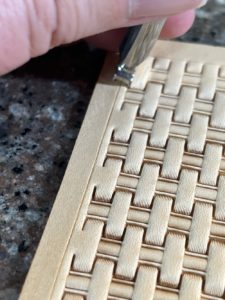
The basket stamping part is finished.  Now to finish things up I bevel the border all around the edges of the basket stamped area.  

Step 19:

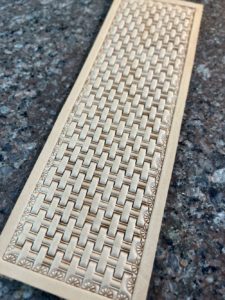
Finally, pick a border stamp and stamp it around all the edges.

That is all the steps I go through,  Yes there are a lot of details to keep track of and at first things go pretty slowly but after a little practice doing these steps becomes routine and it goes much quicker and 

Jazz Up Your Wardrobe with Leather Money Clips!

Money Clips are an old idea.  Historians say that the original idea for the money clip dates back to 323 BCE in ancient Mesopotamia where a clip was used to keep track of notes that described amounts of grain.  These notes could be traded as a form of currency based in grain.  The idea for holding the notes with a clip of some kind spread to other cultures and we’ve had variations on the money clip idea ever since.

Leather money clip with cash.

The kind of money clip I specialize in is a kind of hybrid money clip and wallet combination. The clip for holding the bank notes is attached to a minimalist leather wallet that can hold several credit cards and an ID. But just because the wallet is minimalist doesn’t mean that it can’t have style or flair! Money clips like this can be made to show off any personality or style. From Celtic knots to sports teams, monograms or fantasy themes, money clips like this can be customized to almost any interest.

Carved leather money clip wallet with Celtic knot design
Money clip with Celtic knot design

Custom Leather Money Clips

I make many kinds of leather money clips and I’m happy to customize them to whatever fits your interests. From special artwork to monograms to inlays, I strive to bring a customer’s imagination into reality.

Leather money clip with oak leaf carving
Leather money clip with oak leaf carving designs.

Not only can the artwork be made to your specification, but I can customize the money clip with your choice of interior or exterior pockets. Interior pockets can be decorated too, and even special sizes are an option. Just let me know what you are interested in.

If you have a special gift in mind for someone I can make that gift a reality. Custom designs based on your ideas are our specialty! Contact us to start making your special gift.

How To: Northwest Style Flower Carving Tutorial

This tutorial will show you step by step how to carve a traditional Northwest style four petal flower in leather. Grab some leather, your tools and follow along!

Floral carving in leather

This flower is different from the one in the first tutorial and different from the kind you normally see in Sheridan Style Carving.  Instead of using a flower center stamp the center of this flower is made with a tool called a seeder.  The center is much bigger and the flower is viewed at an angle instead of from above like we usually depict them in floral carving.  This flower comes from a different style of floral carving called the Northwest Style because it was developed in saddle shops of the US Pacific Northwest.

Be sure to go back and look through the first tutorial in this series that I published previously.  I won’t cover all the details I brought up before while discussing the tools this time around but you can find all those details by clicking here.

A note on tools:  As I said in the first tutorial it’s more than likely you won’t have all the tools that I show here.  For the most part I’m staying away from very specialized tools as much as possible though for doing traditional floral carving there are a couple of fairly specialized tools used to get very specific effects (like a center shader.)  If you don’t have all these tools don’t worry.  Where possible I’ll point out alternate tools you could use.  In almost every case these tools are available at your local brick and mortar leather shop or online at your favorite tool maker.  It’s sometimes possible to find these tools used from reputable online sources for very reasonable costs.

Leather and swivel knife
Initial carving with the swivel knife

Step 1:  Tracing and carving.  Again I traced the design onto the damp leather and then carved it in with my swivel knife.  A note about how damp your leather should be:  let it dry out to the point where it almost comes back to the color it was before you dampened it.  Most people start off tooling their leather when it is far too wet and they don’t get burnishing when stamping it.  Properly cased leather should darken like a bruise when a tool strikes it hard.

Step 2:  Outlining the flower center.  Again we’ll start with the flower center even though in this case technically the bottom petal is closer to the viewer.  Think of it like you are viewing this flower on edge. 

I always start with the center and work on the petals moving out from it.  I still use the center shader to outline the flower center like I did before.  When I traced the design onto the leather I put a dotted line where the edge of the flower center would be and now I’m using the center shader to bevel that line.  Of course if you don’t have a center shader a checkered or lined beveller will work.

Step 3:  Seeding the center.  Here we introduce a new tool, the seeder.  They come in different shapes and sizes but most of them make a small round ‘seed’ that we will use to fill in the flower center.  I will stamp them in rows as neatly as I can, starting with the outer edge and working my way towards the center.

Step 3A:  After the first row I add another behind it, trying not to stamp over any of the seeds I already placed of the edge of the center.  It takes some skill to place these all in nice evenly spaced rows, a skill I am still trying to master.

Step 4:  Beveling the petal in front of the seeds.  Once I’m done with the center I start on the petal directly below the line of seeds.  This represents a petal the viewer is seeing edge on, and I’m beveling the line that runs along the base of the flower center seeds into the petals on either side of the center. 

You want to bevel this line on the side that is TOWARDS the flower center because this petal is supposed to look like it’s opening from the center.  Beveling the other side of the cut would make it look like it’s below or behind the flower center, which would just look weird.

One reason I do the center before beveling this line is because you can get some seed marks on this petal and I’ll clean them off either with the beveling or with a little work from a modeling spoon.

Step 5:  Stamping veiner marks on the petals.  Next I’m ready to add texture to the petals with the veiner. 

See the first tutorial for more details on this.  I’m doing the same thing here that I did on that flower.  The only differences on this one is that the long narrow petal just below the seeds doesn’t get any veiner marks.  Also I did put them on the petal at the very bottom, but I added them after I took this picture.  But you can see them in the next step.

Step 6:  Shading the petals.  Just like the last flower I am using my thumbprint or pear shader tool along the petal edges to add relief to the petals.  I start at the tips and walk the tool back toward the center making lighter impressions as I go.. 

Notice on this flower I started the thumbprint right at the very edge of the petal.  I’m actually extending the tip of the tool just a bit past my knife cut.  This is another part of the Northwest style of carving.  The shader goes all the way to the edge of the petal.  Traditionally in Sheridan Style carving (which is the most common style these days) the shader or thumbprint mark stops just short of the edge of the petal.  Take a look at the flower in the first tutorial to see an example of the Sheridan style. 

Step 7:  Starting to bevel the petals.  First I’m going to bevel the bottom of that petal we’re seeing on edge.  This time we want to bevel the side of the cut line that is away from the flower center.

Step 8:  Next I’m going to use my undercut beveller in all the small scallops on these petals.  There are a lot more of these scalloped areas on this flower and it will end up with a lot more depth and movement than the flower in the first tutorial.  

Step 8A:  All of the places I needed to lift up with the undercut beveller have been tooled now.  You are beginning to see the ripple effect along the edge that this flower is going to develop.

Step 9:  Beveling the tips of the bottom petal.  Now I’ve switched to my small standard beveller (see step 8 in the first flower carving tutorial) to bevel the small rounded tips of the petal. 

It takes small movements of the beveller to follow the tight curve here and not leave tool marks in the leather and get a smooth bevel.

Step 10:  Looking at the bottom petal I thought it looked kind of plain where it met the petal above it, so I decided to come back with my thumbprint tool and add some shading from the center towards the thumbprint marks I had already made on the petal tips.  I made the new marks so they lined up with the ones from the tips.

Step 10A:  This shows what the marks I added look like on the petal.

Step 11:  Now to bevel the two petals on either side of the flower center.  I did this the same way as the bottom petal using my small beveller.  

Step 12:  Beveling the edge of the top petal.  Since it is the ‘farthest’ part from the viewer and parts of it lie behind the two side petals it gets beveled last.

Step 13:  Decorative cuts.  I finished the flower off with some decorative cuts on the petals.

Floral carving in leather

Note I actually skipped a few steps on this one.  I didn’t matte down the beveling ridges on the flower petals like I did in step 9 of the first flower carving tutorial, and I didn’t background around the flower either.  This was mostly because I got in a hurry and forgot.  But if you want to see those steps done properly, check out the first tutorial.

Northwest Style Flower Carving Tutorial – In a nutshell.

There you have it! Another complete and simple flower carving tutorial. Feel free to ask questions and I will do my best to answer all of them.