Happy National Leathercraft Day!

Did you know that August 15th is National Leathercraft Day?  It is a celebration founded in 2018 by Tandy Leather to celebrate the rich history, artistry, and skills of leathercrafting.

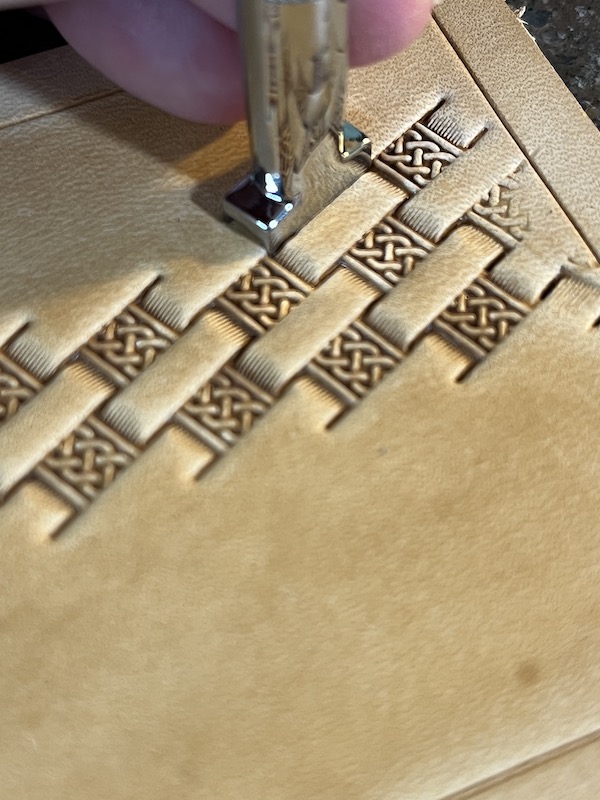
Stamping a basket stamp design on a leather wallet.
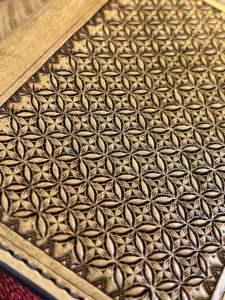
Stamping a basket weave design into leather.

So how to celebrate this day that is so important to what I do?  For starters if you have a Tandy Leather store near you, try stoping in to find a cool kit to build, discover some really cool leather,  or discover the rich world of leather crafting if your just getting started.  They also have a large sale going on this weekend to promote Leathercraft Day.  There are also on line leather suppliers like Springfield Leather that are having massive sales for National Leathercraft Day to promote this day dedicated to the leather craft.

Also, check out the resources section of my website for tutorials and tips on leather crafting.  You can also follow me on social media (on Instagram @bobbleacandbleather or on Facebook @C and B Leather) to see more tips, techniques or just to follow my work.  I’m also open to any questions you may have.

Creating in leather can be a very rewarding hobby or even a side business.  Making leather and creating things out of leather is probably one of the oldest skills known to man but despite that fact crafting items in leather is still as important today as it has ever been.  Leather is also an up cycled material.  Cow hides are a byproduct of the meat industry and if they were not made into leather they would end up as a waste product in a landfill.  So by creating in leather you are putting an age old product to good use, and you just might be making a work of art.

If there is anything I can craft for you from leather contact me and we can come up with a way to make your vision a reality!

Leatherworking Resources

If you are a leather worker or want to be a leather worker, this is just a reminder that I have some tutorials on leather carving and leather stamping on my website.  Just go to the Resources section and look for the tutorials there.  They are written to provide an overview to a beginner of the process steps I go through for carving floral elements in leather.

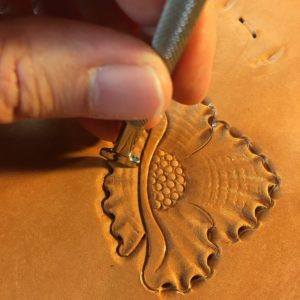
Hand tooling a flower in leather.
Process of carving a flower in leather.

I also have leatherwork tutorials on stamping basket weave designs.  These focus on the basket stamp but the techniques apply to other types of geometric stamps.  I do want to create a tutorial on geometric stamping at some point so stay tuned for that.

Let me know about any other sort of leatherwork tutorials  you would like to see here.  I’m also working on developing a YouTube channel that will have leatherwork tutorials and tips for the leather worker at all ranges of skill levels.  If there is something you would like to see or know more about how I do it, drop me a note in the comments about what you are interested in or let me know your questions.  I’ll answer it in the comments if I can and it may just be something you will see in a future tutorial or video here on this site!

Leatherwork Tutorials

Leatherwork involves a lot of diverse skills and there are many different ways you can follow your interests.  Maybe tooling and carving leather isn’t your thing.  Maybe you enjoy designing and assembling hand bags our of exotic leather more and don’t care about carving and tooling.  Maybe your interest is in leather restoration.  Whatever you area of interest is in let me know what you would like to see and if I have knowledge or information to share on it I will.  I learned because other leatherworkers were willing to share their knowledge and now I want to pay that forward and share what I know to help others.

Spring Shop Update

Spring is making it’s way to all parts of the US, so it must be time for our Spring Shop Update!

Spring is time for renewal and growth, and it’s also a time to look forward to gifts for some of those major upcoming spring and summer events.  Spring and early summer are popular times for weddings.  Mother’s Day is also just around the corner, followed by Father’s Day the next month.  All of these events are popular times to give custom handmade leather items as gifts.

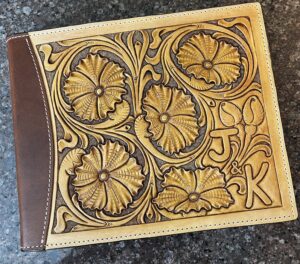
Custom Leather Wedding Guest book with floral carved design
A hand carved leather wedding guest book personalized for the couple.

Last year I was honored to make a couple of custom designed wedding guest books for the couple’s special day.  These were very satisfying projects and my customers were really wowed by how I could create the perfect guest books that brought their designs into reality.  If this is something you would like now is the time to order!  Since my order’s list is currently running out about a month out, letting me know as soon as possible is a good idea so we can have time to make your wedding guest book a reality!

It’s a good time to think about Mother’s Day too!  Custom leather wallets or handbags make excellent Mother’s Day gifts.  They can be personalized for your Mom and will be one of a kind gifts.  Again, these take a while to make.  Hand crafted quality is not quick and my order lead times are about a month out, so now is the time to get your gift order started.

A soft leather handbag with a carved front flap.
Cross Body Bag

And let’s not forget about Father’s Day.  It’s a month beyond Mother’s Day but it’s not too early to think about gift ideas for it too.  Does Dad need a new custom leather belt?  Or a new wallet personalized for him?  Contact us to talk about options and to get your personalized leather gift started.


Happy National Leathercraft Day August 15th!

National Leathercraft Day was created in 2018 by Tandy Leather as a way of celebrating the art and craft of working with leather.

Hand Sewing Leather
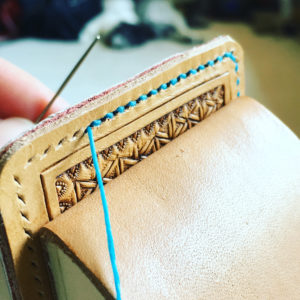
Hand Stitching a Leather Wallet with a traditional saddle stitch.

Leather has a long history going back to the stone age.  Leather was probably one of the first materials mankind learned to work and take advantage of, and it’s been a major part of all our lives ever since.  As time has moved along leather work has developed from being utilitarian to being an art form and form of expression.

Leathercraft is still a viable craft practiced by people all over the world.  For some of us it is even a business and profession.  But it’s also a hobby that is open to all ages and skill levels.  4H has classes for kids to start working with leather as do Boy and Girl Scouts.  There are also leather supply stores like Tandy or Standing Bear’s Trading Post that have regular in person classes for people to try their hand at various skills.  There are Leather Guilds across the US and the world dedicated to expanding the art form and that have regular classes or meetings with the purpose of educating people who are interested in the hobby.  And of course there are many online resources like videos and tutorials, including several here on my site.

So today in honor of National Leathercraft Day I invite you to try out leathercraft for the first time or work on improving some skill. Maybe you would like to make yourself a belt.  Maybe you want to make a sheath for a knife you have.  Maybe you have always wanted to learn carving or stamping leather..  Give it a try!  I have tutorials here on my site and Tandy Leather sells some of the best beginners books out there. There are tons of video resources by leather suppliers.  Springfield Leather is not only a good source of supplies but they are one of the largest producers of online teaching videos.  There are a lot of resources available to everyone these days and picking up the craft is easier now than ever.

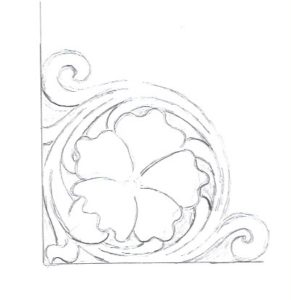
For my own little contribution to National Leathercraft Day, I’ve got a free carving design for you.  This is a corner floral design you can feel free to use however you would like.  

Floral Carving Design free to use.
Floral Corner Design

I’ve included a PDF version of the design here.  You can download the JPEG image above or the PDF version by clicking the link below:

Corner Design

Use it however you like.  And if I get enough requests I might even do my own carving tutorial video for that design.  Enjoy the day and get to the bench and make something!

Wayne Jueschke Geometric Stamps

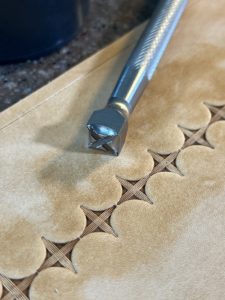
When I post my work on my Instagram or Facebook pages, one of the consistent questions I get has to do with some of the geometric stamps that I use.  People see stamps like the ones below and they send me messages asking “who makes them and where can I get them?”

Wayne Jueschke stamp on leather
Wayne Jueschke stamp and a row of it’s impressions.

I don’t blame people for really liking these stamps.  I remember the first time I saw any of these and how I fell in love with them right off the bat.  

I’ve known Wayne Jueschke for more than 10 years now.  I first met him at a Rocky Mountain Leather Trade show in Sheridan, WY where he is perennially a vendor.  I was immediately struck by the quality of the stamps and the crispness of their impressions.  Despite the fact that they are expensive, I bought a couple that year and I’ve bought a few every year since when I go to that show.

Wayne is a retired machinist and his desire for precision and quality definitely show.  I feel that Wayne Jueschke geometric stamps are some of the finest stamps in the business and he has some unique designs that no one else is making.  I’m especially fond of his box stamps but Wayne makes basket stamps (that are outstanding too, I have a couple) as well as bevelers and border stamps.  And I have a couple of his flower centers that are really nice too.

Wayne Jueschke geometric stamp on a custom leather wallet
Closeup of a Wayne Jueschke stamp on a leather wallet.

The tricky part about getting Wayne’s stamps is that he does not have a web site, doesn’t sell on line and in fact he doesn’t even take credit cards.  If you wanted some of his stamps you pretty much had to run into him at a show or call him up and place an order, and then be prepared to pay by cash or check.  It’s one of the reasons that I get so many questions when I post my work using his stamps.  They just are not that common and someone is usually going to ask me 1) who makes that stamp and 2) how do I get one?  For years all I could do was give them Wayne’s phone number or tell them look for him at the next trade show.

Fortunately now there is a website you can order some of Wayne Juescke’s stamps from.  Bruce Johnson who normally sells vintage tools on his website is now carrying some of Wayne’s new stamps and mauls for sale.  He has a dedicated page to these tools and he will take credit cards and ship internationally, so those of you who follow me overseas now finally have an option to get some of Wayne’s stamps!

If you would like to call Wayne (he’s a great guy to talk to!) to place an order you can reach him at 775-738-4885.  He’s based in Elko, NV.  Tell him Bob Blea says hi!


Just back from the Rocky Mountain Leather Trade Show!

Mid May is a special time of year for us leather workers, especially those living near enough to Wyoming that we can easily travel to the Rocky Mountain Leather Trade show in Sheridan, WY.

The Premier Leather Trade Show in the US

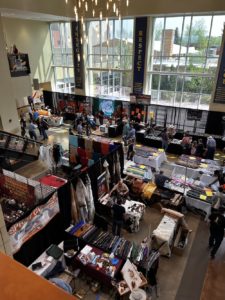
A view of the show floor at the 2023 Rocky Mountain Leather Trade Show.
A view of the trade show floor.

Every May some of the best suppliers of tools, equipment, hardware and of course leather gather in Sheridan for a week long event that includes classes and a leather artwork show that usually attracts some of the best artisans from around the world.  As a leather worker this is an excellent chance to see the work of some of the best leather workers, purchase specialized tools and get some of the most unique leathers on the planet all in one place.  It’s also a great chance to learn from others and improve our skills.

This has been an event where in the past I’ve taken classes to improve my skills and where I’ve met some amazing people.  The leather worker community in the US is really a very friendly and supportive group as a whole and the leather workers at the Sheridan show really exemplify that.  They are a community that will support each other and freely share their knowledge.  A great example of this is a free class taught on Saturday afternoon to kids to introduce them to leather work.  Master leather craftsman Jim Linnel of Elk Track Studios has given his time for many years to introduce this art to the next generation and to further its traditions.  It’s this kind of openness and community that make this show such a special event in my life and the lives of many other leather workers around the country.

I came back inspired by the amazing work I saw at the World Leather Debut, an art exhibit that is part of the show, as well as the amazing friends I’ve made over the years who are real leaders in this art form.  Now I’m back with a few new tools, a few new ideas and some beautiful leather.  

Outstanding Custom Leather Belts

Making Outstanding Custom Leather Belts


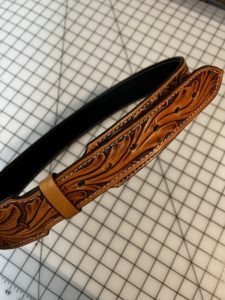
Leather belts can be a very personal part of your wardrobe.  They can range from a plain but elegant dress belt to something carved and personalized with your name, and anything in between. 

Here at C and B Leather, while we can make a plain dress belt for you our specialty is a more personalized and artistic approach.  Our custom leather belts are made of Full Grain leather and usually have a design stamped or carved onto the belt.  The leather we use is tanned by a specific process that allows us to make carving designs on the surface of the belt that have depth and will show off the artwork extremely well.  It’s also leather that will last for many year’s of service.

Many of the belts that you get at departments stores or big box general merchandise stores are made with lower quality leathers.  They will be marked as Genuine Leather, which is actually a very low grade of leather.  It is also usually just a thin leather outer layer and the bulk of the inside may be a fabric or even cardboard! See my recent blog post about the different kinds of leather that you will find in most retail stores.  Genuine Leather doesn’t wear well and it cracks and breaks after only a little while of use.  It is an inexpensive product but its also not something that will last.

The Full Grain leather we use has all the strength and durability that leather is known for.  Each belt is made to fit your waist.  We tailor it to your measurements.  After carving or stamping your custom design into the leather, we treat it with multiple finish steps, each applied by hand, to enhance the artwork while conditioning and protecting the leather.  This allows your belt to have many years of looking good and serving you well.


Quality Custom Leather Belts are available now!

If you are ready for a quality custom made leather belt, tailored to your waist and that fits your style, we are glad to help.  Contact us with your ideas so we can get the process started.

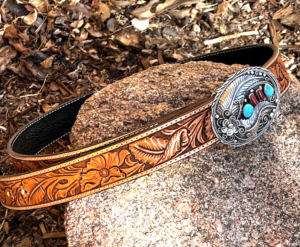
Hand carved leather belt with floral design and silver and turquoise buckle


Angled Leather Basket Stamping Tutorial. It’s Easy!

When I published my Straight Basket Weave Tutorial I said that I planned on making the same kind of thing for Angled Basket Weave, and this is it.  Angled basket stamping is actually what I use almost exclusively when doing leather basket stamping.  So if you look at my work this is the technique you will see almost anytime I’m basket stamping a project.

Leather Basket Stamping

If you’re not familiar with the term, angled leather basket stamping means you are stamping your impressions at an angle but the centers of the impressions run at a straight line to the borders of the project.  See the picture below for a visual of what I mean.

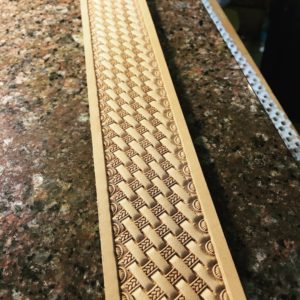
Leather belt with basket stamp design

On this belt the actual stamp impressions are at an angle but that angle is such that the basket weave design runs parallel to the length of the belt. There are a lot of ideas and techniques out there on how to do this.  Sometimes people work out the precise angle the stamp needs to be held at to achieve this effect, they make templates of the angle, etc.  Those techniques work but there is actually a very simple way to do this that works for every basket stamp and does NOT require any knowledge of trigonometry or using any special tools!  In this case there really is one simple trick to lining the stamps up correctly.

I’ve done this tutorial differently than the last one.  This time instead of a photo heavy blog post, I’ve created the tutorial as a PDF file that you can download.  You don’t need to sign up for anything, just click the link below to download the file.  Take a look at it and I think you’ll see it’s really easy to stamp angled basket weave.  Grab a piece of scrap leather and give it a try.  You’ll be stamping angled basket weaves like a pro in no time flat!

Download the tutorial here: Angled basket tutorial

As always if you have questions leave a comment here.

Basket Weave Leather Stamping Tutorial

Basket weave leather stamping is really intimidating to many people but it doesn’t have to be difficult.  I have been working on a way to explain the techniques I use in my basket stamping (and really any stamping with a basket weave or geometric stamp) and I’ve come up with this tutorial as a starting point.  I decided to begin with the simplest form of basket stamping where you are stamping in a straight line across the leather.  Later I’ll write up a tutorial on angled basket weave stamping, which is more complicated but what I use most of the time.

Step 1:

Here is the cased leather I’ll be using for this tutorial.  It’s a money clip wallet back and I’m going to place a straight line of basket weave stamping down the length of it.
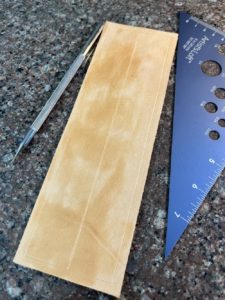
NOTE: I am right handed so all the descriptions and directions are what works for me.  If you are left handed most likely you will do everything in the opposite direction from what I’m writing here.  

I start out by making a faint line across the middle of the leather.  This will be my guide line for the first row of stamps.   Note that I made this line very bold for this picture.  Normally I would try to make this a faint mark but in this case the stamp will always be placed over the line so no part of the guideline will be left once I’ve stamped the whole piece.

I’ve also marked the border on the piece because later I will need to make sure I don’t stamp past the border lines.

Step 2:
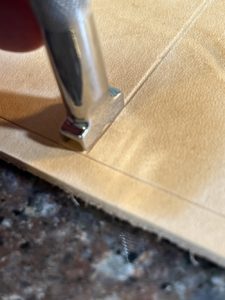
Basket stamp on leather

I start by placing the basket stamp with one side right on the line and with the back edge right up against the border.  Take your time and line this up carefully.  This first row is the base for all the stamping on the rest of the project and any problems here will lead to more problems across the rest of the project.


Step 3:
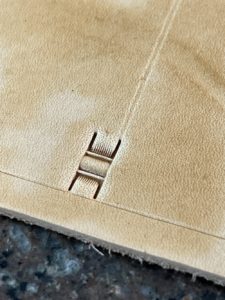
Here is the first stamp impression.  Note the legs of the basket stamp are right on the line I marked on the leather.  You want to keep the stamp aligned straight with the guide line as much as possible.


Step 4:

Time for the next stamp impression.  Move the tool so you are making an impression with the other side of the stamp on the guideline as shown in the picture.  The next impression will still be along the guideline but with the back leg of the basket stamp overlapping the first impression.  The leg of the second impression should drop in perfectly to the leg of the first impression.  As long as the side of the stamp is lined up along the guide line, you will keep your stamps going in a straight line.
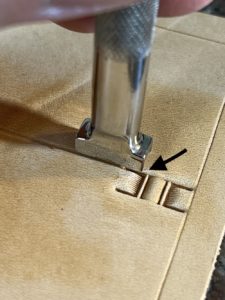
Here is main secret to how I stamp and keep the whole project straight and uniform.  Note the black arrow in the picture pointing at where the back of the stamp is sitting.  There is a slight gap between the back of the stamp and the center bar in the first stamp impression.  This is very intentional and it’s about the width of the leg of the stamp.  This extra space is a bit of play we will keep between all of the impressions.  As things get a bit off or crooked, this amount of play will allow us to adjust and keep things from getting far off.  If we stamped the impression right against the center bar there would be no room for error in the stamps around it and eventually you would end up with stamps crowding each other and the overall project would be crooked.


Step 5:
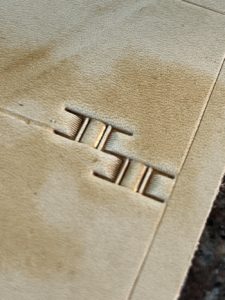
Here is the second impression.  It’s on the other side of the guide line but still has its legs lined up with the guideline.  Again, take you time making each of these first impressions and make sure they line up.  The time and patience you show here at the start will pay off in the end.


Step 6:

Now it’s time to repeat back on the other side of the line.  Again place the legs of the stamp in the last impression and make sure you have the same small gap between the back leg of the stamp and the center bar of the last impression.  It’s important to try and be as consistent with each impression as possible and to try and keep that slight gap the same for each impression.  Again your patience will be rewarded.
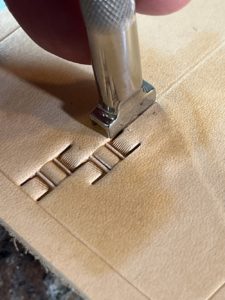
Also note that while I’m stamping this first row this is basically my view.  I’m always looking from the side to see how well it lines up with the guide line.  Once I finish this first row I’ll change how I look at the leather but for now I want to focus on making sure each impression lines up along the line and has the right spacing.

Step 6A:

First three impressions made.  About a few hundred to go.
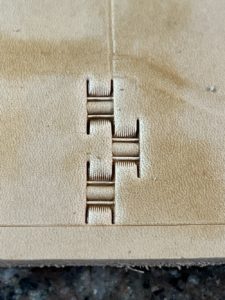
 

Step 7:

This view shows more stamps running along the line as I continue to work my way across the piece of leather.  Again, keep the legs of the stamp on the guideline and try to make the space consistent between each impression.  
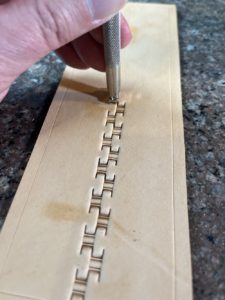
 

Step 8:
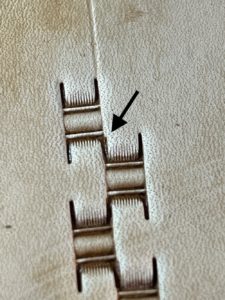
This pictures shows how even when you are trying to carefully line things up slight accidents will still happen.  The black arrow is pointing to where the previous impression was slightly off the line and you can see it is not quite lining up with the next impression.  We are all human so slight errors like this are UNAVOIDABLE.  This slight error causes the row next to it to be slightly off.  As you expand the stamping the errors like this compound which is why we tend to start off nicely but end up with our basket stamping being all over the place by the time we finish.  It’s that slight gap between the back of the stamp and the center bar that allows us the freedom to correct this kind of problem as we go along.


Step 9:
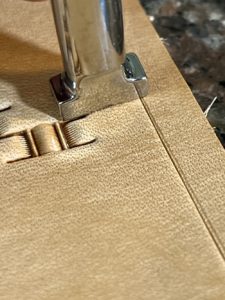
Once we reach the other side most of the time the stamp isn’t going to line up with the border.  In this case I tip the tool on end so I’m just making a partial impression.  I line up the legs just as before but tilt it up slightly so that when I strike the tool I only make an impression inside my border. 
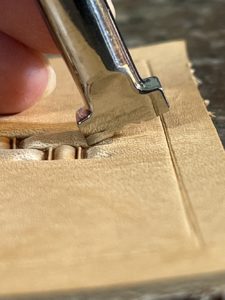
The second picture here shows the tilt from the side and I’ve exaggerated how much I tip it, but you do need to tip it more than you think.  If you don’t you’ll end up accidentally making faint marks on the other side of the border.

Step 9A:
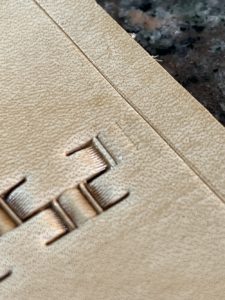
Here’s the impression of the tipped stamp.  Don’t worry that there is a pretty large gap between the partial stamp impression and the border.  We’ll fill that in with a border stamp later.


Step 10:
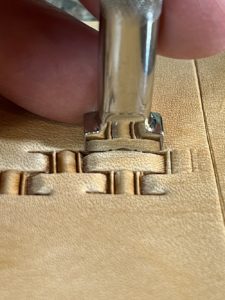
Now that I have my baseline across the project, I start stamping the area to one side of it. To do this I’m going to reverse the direction I’m adding new stamps.  I now will be stamping from right to left (I’m right handed but you are left handed you will most likely reverse this) I start by lining up the legs of stamp inside the two stamps that are already on the leather.  Note that I’ve rotated the project about 90 degrees and this is how I view the project in these two views.  This way I can most clearly see where the stamp sits in the existing impressions.
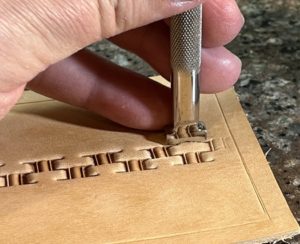
Here is another key trick I use to keep things straight and neat.  In the closeup picture you can see I’ve lined the stamp up with equal amounts of extra space on either side of the stamp.  This is where having that small gap between the stamps pays off.  From now on whenever you make an impression always try to keep the extra space on either side of the stamp equal, or stated another way keep the stamp centered between the two existing impressions.  Also try to keep the stamp running in a straight line with the existing impressions.  If you do these two things each time you stamp a new impression, it will help average out any slight errors we’ve made already and keep the stamp impressions form crowding each other.  Paying attention to these two key details will go a long way to improving your basket stamping.


Step 11:
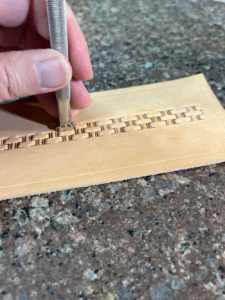
This shows several impressions I’ve made as I follow along my existing row of stamps, working from right to left.  On each one I try to center the stamp between the two existing stamps and keep the stamp aligned with the existing stamps.   This stamping will go faster than the initial row.


Step 12:
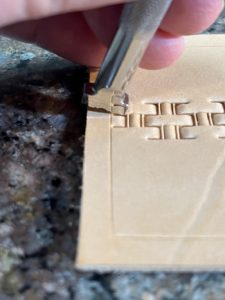
I’ve reached the end of the line again and again the stamp is running over the border.  Just like before I tilt the stamp so I only make a partial impression.  The second picture shows I only get an impression of the legs of the basket weave, but that leg impression is what I’ll use to line up the next row.
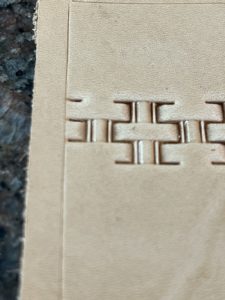
 

Step 13:
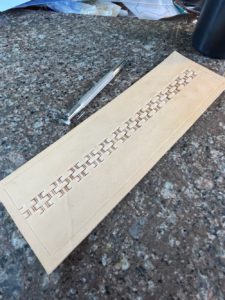
Here’s where we are at this point.  We stamped a straight line across the project from left to right and then stamped one row of stamps back across from right to left.  For the next row I’ll go back to the right and stamp another new row, tilting the stamp up at each end as necessary.  I’ll keep doing that until I have filled up that side of the project and it looks something like…


Step 14:
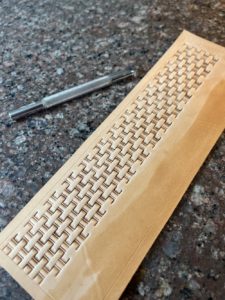
Here I’ve added all the full rows I can on one side of the project and I’m bumping up against the border.  For each stamp I’ve followed my process of making sure each new impression is centered between the two existing stamps and I check to make sure I’m keeping the stamp aligned straight with the existing rows.  Fortunately it has come out pretty even with the border.


Step 15:
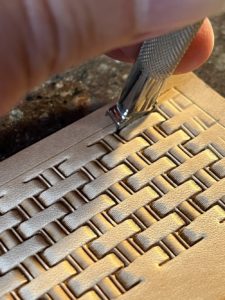
Now I am working on stamping as close to the border as possible by tilting the stamp towards me and making partial impressions.  I still make sure to place the stamp centered between the two existing impressions and keep the stamp straight with the other impressions.  I just want to be careful to leave as few marks as possible in the border area.
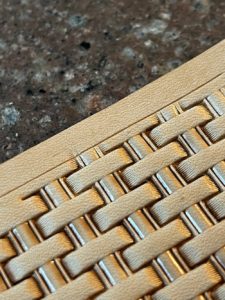
This closeup shows the partial stamp impressions and if you look carefully you’ll see I left a slight impression of one of the legs in the border.  You can get rid of this by using a modeling spoon to gently rub the mark out.
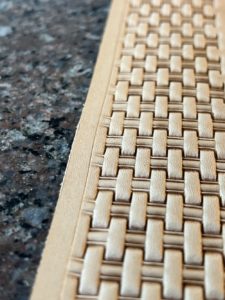
 

Step 16:
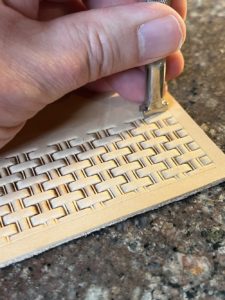
Now I flip the whole project around and repeat the process on the other side.  Again I start on the right and add impressions moving toward the left.
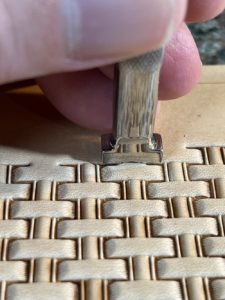
Just like before I center the stamp between the two impressions and keep the side of the stamp aligned straight with the existing impressions.


Step 17:
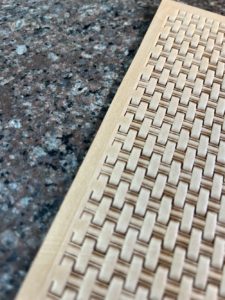
The other side is filled with impressions just like we did on the other side.


Step 18:
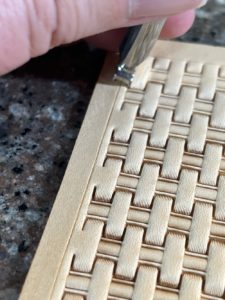
This time the whole stamp impressions came out pretty close to the border.  I could probably get by without stamping any more but I’m going to go ahead and stamp partial impressions along the border by tilting the tool.  I always try to get my stamps as close to the border as possible.

Step 18:
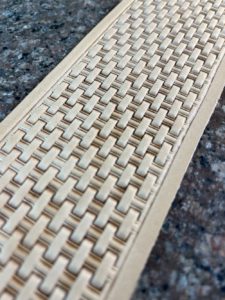
The basket stamping part is finished.  Now to finish things up I bevel the border all around the edges of the basket stamped area.  

Step 19:
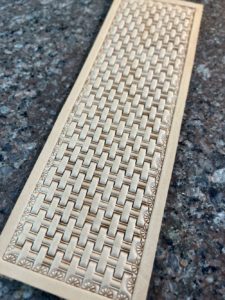
Finally, pick a border stamp and stamp it around all the edges.

That is all the steps I go through,  Yes there are a lot of details to keep track of and at first things go pretty slowly but after a little practice doing these steps becomes routine and it goes much quicker and 
Jazz Up Your Wardrobe with Leather Money Clips!

Money Clips are an old idea.  Historians say that the original idea for the money clip dates back to 323 BCE in ancient Mesopotamia where a clip was used to keep track of notes that described amounts of grain.  These notes could be traded as a form of currency based in grain.  The idea for holding the notes with a clip of some kind spread to other cultures and we’ve had variations on the money clip idea ever since.

Leather money clip with cash.

The kind of money clip I specialize in is a kind of hybrid money clip and wallet combination. The clip for holding the bank notes is attached to a minimalist leather wallet that can hold several credit cards and an ID. But just because the wallet is minimalist doesn’t mean that it can’t have style or flair! Money clips like this can be made to show off any personality or style. From Celtic knots to sports teams, monograms or fantasy themes, money clips like this can be customized to almost any interest.

Carved leather money clip wallet with Celtic knot design
Money clip with Celtic knot design

Custom Leather Money Clips

I make many kinds of leather money clips and I’m happy to customize them to whatever fits your interests. From special artwork to monograms to inlays, I strive to bring a customer’s imagination into reality.

Leather money clip with oak leaf carving
Leather money clip with oak leaf carving designs.

Not only can the artwork be made to your specification, but I can customize the money clip with your choice of interior or exterior pockets. Interior pockets can be decorated too, and even special sizes are an option. Just let me know what you are interested in.

If you have a special gift in mind for someone I can make that gift a reality. Custom designs based on your ideas are our specialty! Contact us to start making your special gift.