One question I am frequently asked is how to improve your leather carving skills. People who are just starting out wonder if there is some magic technique that can make your carving stand out. The answer is that there is nothing magical about it. It’s just a matter of practice!
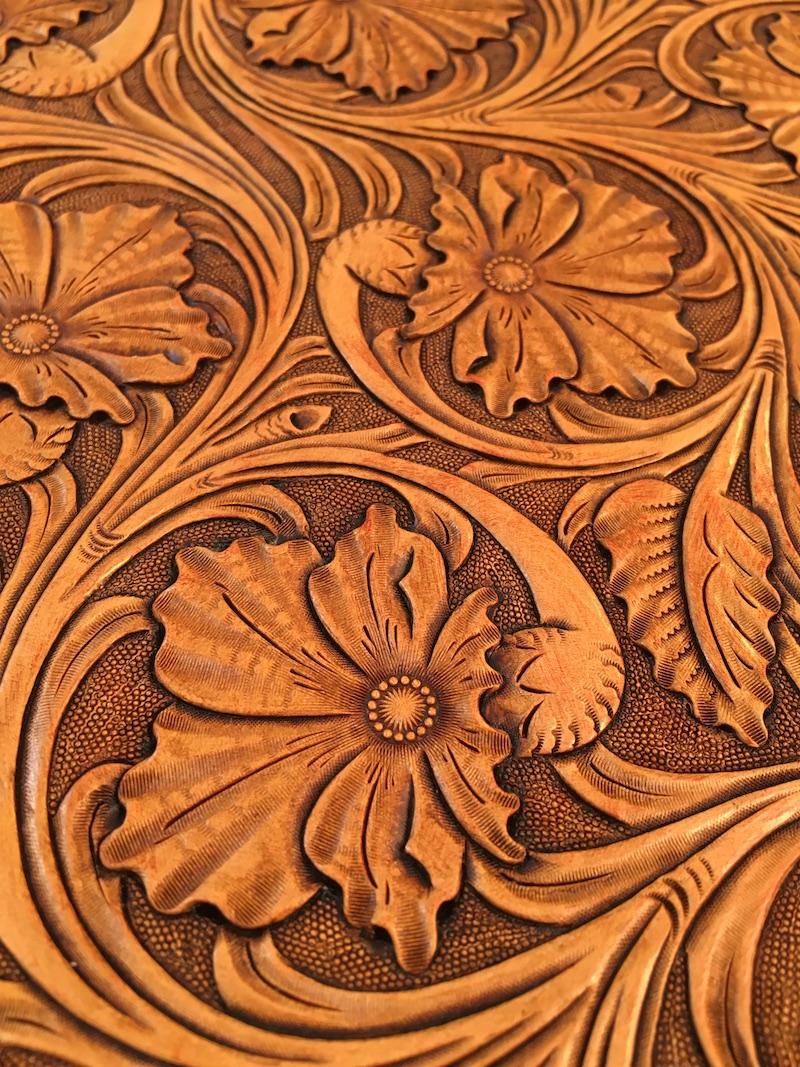
Floral carving in leather.
It turns out you don’t need to sell your soul to the devil or perform any magical rites. You also don’t need to possess any superhuman strengths or skills. An average person can improve their carving skills and become really good with one simple technique: Focused Practice.
Focused Practice
Focused practice is concentrating on one aspect of your leatherwork and repeating it again and again with the goal of improving your work each time. In this case it’s working on your carving skills and self-critiquing your work each time. This was a tip given to me by one of my mentors, noted saddle maker and Hollywood holster reproduction specialist Dusty Johnson. Dusty was a great guy with years and years of experience and he really helped me out when I was starting off.
He made the suggestion that in order to make my leather carving skills better I should take a particular small carving design and repeatedly carve it. So I make this same suggestion to you: Find a small simple design. In my case I found a Tandy Craftaid (something like this) and carved it repeatedly. Dusty recommended carving it five times and after each attempt, take a step back and take a good look at what you have made. Note the parts that you like about it. Note the things that you don’t like so much. Think about those parts and decide what you can do to improve those. Then try the same design again. After you have finished that one critique it again.
Practice pieces
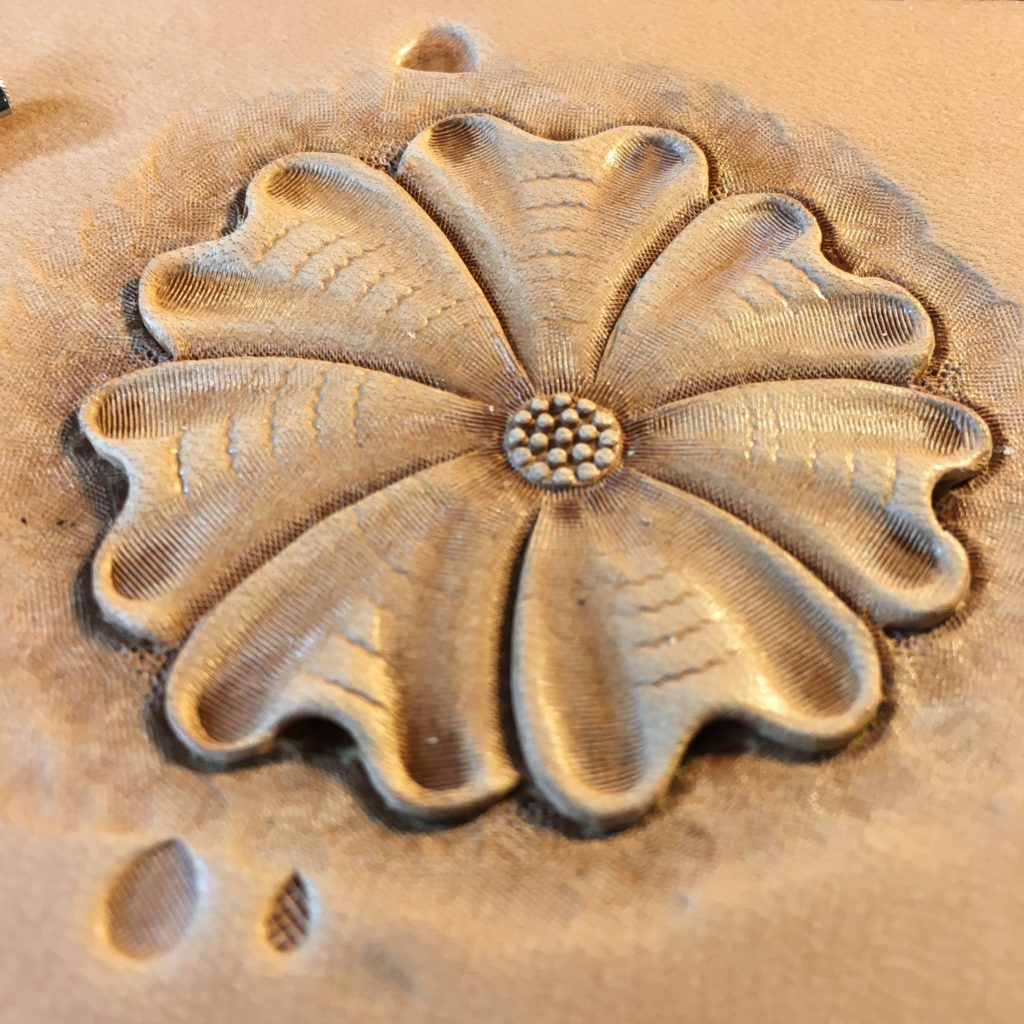
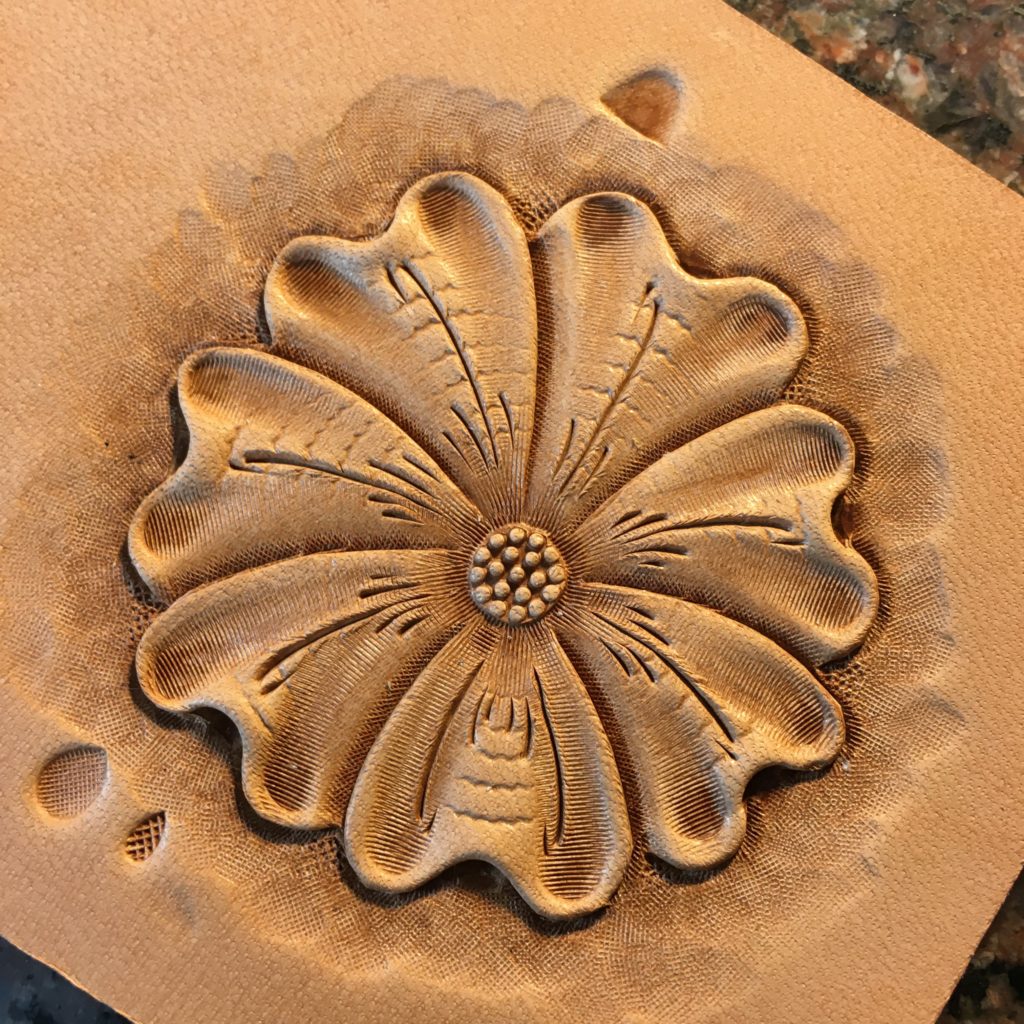
The image above shows the fourth and fifth versions of the floral design I carved back then. They look pretty rough to me these days but I carved these over fifteen years ago! At the time these did represent a significant improvement in my leather carving skills, but over the years I’ve put a lot more effort into my skills and it shows.
Improving your leather carving skills
If you try this exercise I guarantee that by the time you finish the fifth piece if you place it next to your first attempt you are going to see some improvement. You will probably see a lot of improvement! Try it again with a different design. The more you do this the more improvement you will see. This is the core of focused practice. Concentrating on one part of your skills and working on them again and again to improve them. And you don’t have to be repeating a practice piece to make this technique work. Every time you carve something in leather, critique it afterwards to see what you liked and didn’t like and try to improve the stuff you didn’t like next time. This sort of honest critique will quickly improve your skills.
There are a lot of different types of leather and many terms that can be confusing even to those who normally work with the stuff. Here is a short list of some of the more common terms you will find on this website or in the industry. This list doesn’t cover all the types and terms used in the industry but it does cover many of the common ones.
Carved Leather Purse
Cordovan
Back leather from horses tanned with special processes to make it withstand water and wear well.
Full Grain Leather
The grain side of the leather is not sanded or otherwise treated to hide scars or marks.
Chrome Tanned Leather
Leather that has be tanned with chromium salts. This kind of leather often has a blue-green center and is somewhat water repellant. It is one of the most common types of leather consumers see on a day to day basis. Almost all your clothing leathers are made by this technique.
Suede
Leather cut from the back side of a hide of full grain leather and is often brushed or abraded to give it a velvety surface.
Napa
Usually an aniline dyed calfskin, sheepskin or goatskin. Usually a very soft leather. These types of leather are used when exceptional softness and a luxury feeling are needed.
Nubuck
An aniline dyed leather that has been sanded or buffed on the grain side. Sensitive to dirt and hard to clean.
Elk
Soft and durable leather made from Elk hides.
Deer
Soft and durable leather made from deer hides. Generally does not come from wild animals but instead from animals raised in captivity.
Kangaroo
A durable and soft leather commonly used in braiding items like whips. Also useful in high wear items.
Ostrich
Made from ostrich hides and frequently used in fashion items. The leather has distinctive surface with raised bumps where the feathers used to attach. Sometimes this also refers to leather made from the legs of the ostrich which has a bumpy or almost scaly look.
Rawhide
Untanned leather that is scrapped, soaked and treated with lime to make it stiff and brittle when dry. Used in some leather products for its toughness.
Split Leather
This is the bottom of a full grain hide that has been cut off with a long sharp knife. This can be used to make suede or it can be stained and finished to look like full grain leather as a low cost alternative to a full grain hide.
Vegetable Tanned Leather
This leather is tanned using plant extracts that give it special properties that allow it to be carved or stamped. The process is lengthy and sometimes takes months. This is the kind of leather I use for all the carved or stamped items I make. It’s also the kind used to make western saddles.
Alligator Leather
Leather made from the skins of alligators. Recognizable by the large scales and can be easily mistaken for Crocodile leather.
Crocodile Leather
Very similar to alligator leather except crocodile hides can often have knobby projections from the surface.
Crust Leather
Crust is a term used for leather that has been tanned but has not had dyes or finishes applied.
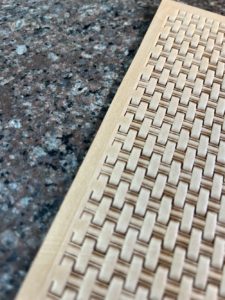
Basket weave leather stamping is really intimidating to many people but it doesn’t have to be difficult. I have been working on a way to explain the techniques I use in my basket stamping (and really any stamping with a basket weave or geometric stamp) and I’ve come up with this tutorial as a starting point.I decided to begin with the simplest form of basket stamping where you are stamping in a straight line across the leather.Later I’ll write up a tutorial on angled basket weave stamping, which is more complicated but what I use most of the time.
Step 1:
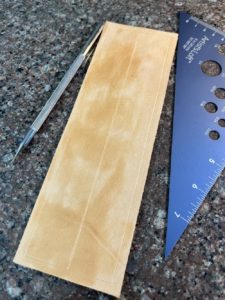
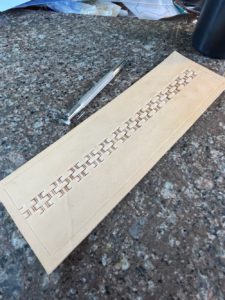
Here is the cased leather I’ll be using for this tutorial.It’s a money clip wallet back and I’m going to place a straight line of basket weave stamping down the length of it.
NOTE: I am right handed so all the descriptions and directions are what works for me.If you are left handed most likely you will do everything in the opposite direction from what I’m writing here.
I start out by making a faint line across the middle of the leather.This will be my guide line for the first row of stamps. Note that I made this line very bold for this picture.Normally I would try to make this a faint mark but in this case the stamp will always be placed over the line so no part of the guideline will be left once I’ve stamped the whole piece.
I’ve also marked the border on the piece because later I will need to make sure I don’t stamp past the border lines.
Step 2:
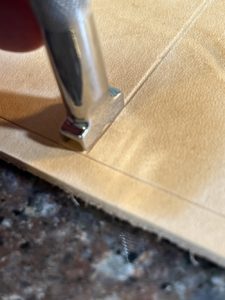
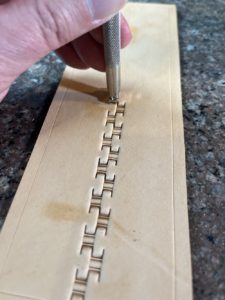
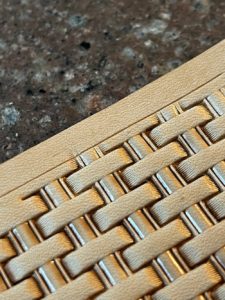
I start by placing the basket stamp with one side right on the line and with the back edge right up against the border.Take your time and line this up carefully.This first row is the base for all the stamping on the rest of the project and any problems here will lead to more problems across the rest of the project.
Step 3:
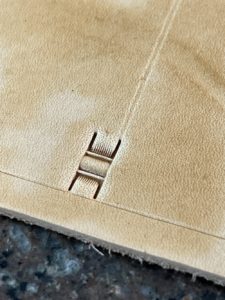
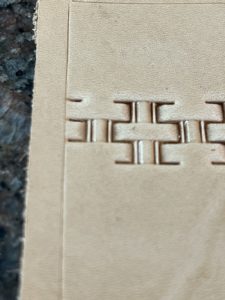
Here is the first stamp impression.Note the legs of the basket stamp are right on the line I marked on the leather.You want to keep the stamp aligned straight with the guide line as much as possible.
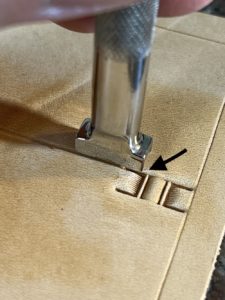
Step 4:
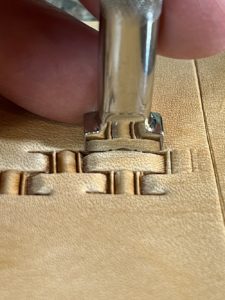
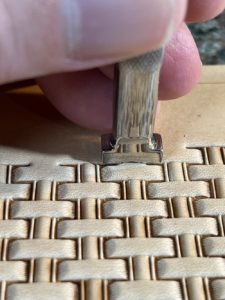
Time for the next stamp impression.Move the tool so you are making an impression with the other side of the stamp on the guideline as shown in the picture.The next impression will still be along the guideline but with the back leg of the basket stamp overlapping the first impression.The leg of the second impression should drop in perfectly to the leg of the first impression.As long as the side of the stamp is lined up along the guide line, you will keep your stamps going in a straight line.
Here is main secret to how I stamp and keep the whole project straight and uniform.Note the black arrow in the picture pointing at where the back of the stamp is sitting.There is a slight gap between the back of the stamp and the center bar in the first stamp impression.This is very intentional and it’s about the width of the leg of the stamp.This extra space is a bit of play we will keep between all of the impressions.As things get a bit off or crooked, this amount of play will allow us to adjust and keep things from getting far off.If we stamped the impression right against the center bar there would be no room for error in the stamps around it and eventually you would end up with stamps crowding each other and the overall project would be crooked.
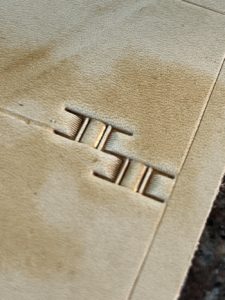
Step 5:
Here is the second impression.It’s on the other side of the guide line but still has its legs lined up with the guideline.Again, take you time making each of these first impressions and make sure they line up.The time and patience you show here at the start will pay off in the end.
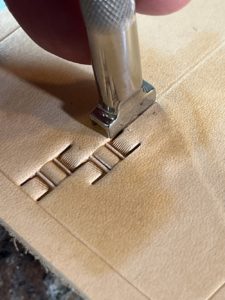
Step 6:
Now it’s time to repeat back on the other side of the line.Again place the legs of the stamp in the last impression and make sure you have the same small gap between the back leg of the stamp and the center bar of the last impression.It’s important to try and be as consistent with each impression as possible and to try and keep that slight gap the same for each impression.Again your patience will be rewarded.
Also note that while I’m stamping this first row this is basically my view.I’m always looking from the side to see how well it lines up with the guide line.Once I finish this first row I’ll change how I look at the leather but for now I want to focus on making sure each impression lines up along the line and has the right spacing.
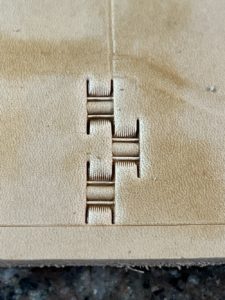
Step 6A:
First three impressions made.About a few hundred to go.
Step 7:
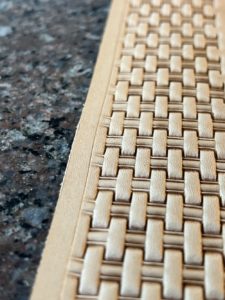
This view shows more stamps running along the line as I continue to work my way across the piece of leather.Again, keep the legs of the stamp on the guideline and try to make the space consistent between each impression.
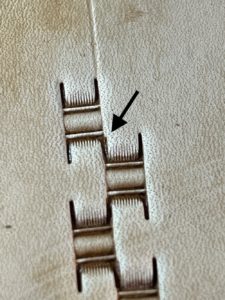
Step 8:
This pictures shows how even when you are trying to carefully line things up slight accidents will still happen.The black arrow is pointing to where the previous impression was slightly off the line and you can see it is not quite lining up with the next impression.We are all human so slight errors like this are UNAVOIDABLE.This slight error causes the row next to it to be slightly off.As you expand the stamping the errors like this compound which is why we tend to start off nicely but end up with our basket stamping being all over the place by the time we finish.It’s that slight gap between the back of the stamp and the center bar that allows us the freedom to correct this kind of problem as we go along.
Step 9:
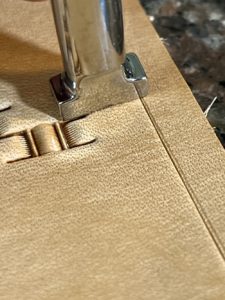
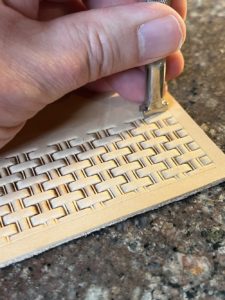
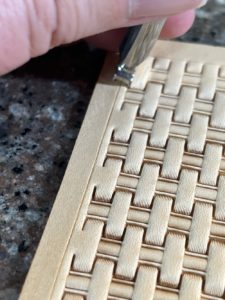
Once we reach the other side most of the time the stamp isn’t going to line up with the border.In this case I tip the tool on end so I’m just making a partial impression.I line up the legs just as before but tilt it up slightly so that when I strike the tool I only make an impression inside my border.
The second picture here shows the tilt from the side and I’ve exaggerated how much I tip it, but you do need to tip it more than you think.If you don’t you’ll end up accidentally making faint marks on the other side of the border.
Step 9A:
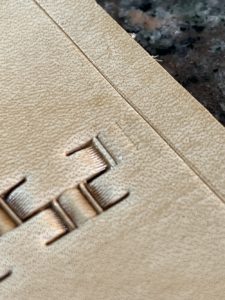
Here’s the impression of the tipped stamp.Don’t worry that there is a pretty large gap between the partial stamp impression and the border.We’ll fill that in with a border stamp later.
Step 10:
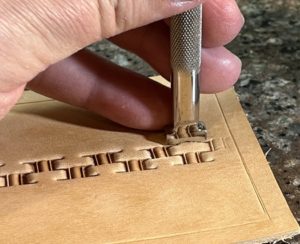
Now that I have my baseline across the project, I start stamping the area to one side of it. To do this I’m going to reverse the direction I’m adding new stamps.I now will be stamping from right to left (I’m right handed but you are left handed you will most likely reverse this) I start by lining up the legs of stamp inside the two stamps that are already on the leather.Note that I’ve rotated the project about 90 degrees and this is how I view the project in these two views.This way I can most clearly see where the stamp sits in the existing impressions.
Here is another key trick I use to keep things straight and neat. In the closeup picture you can see I’ve lined the stamp up with equal amounts of extra space on either side of the stamp.This is where having that small gap between the stamps pays off.From now on whenever you make an impression always try to keep the extra space on either side of the stamp equal, or stated another way keep the stamp centered between the two existing impressions.Also try to keep the stamp running in a straight line with the existing impressions.If you do these two things each time you stamp a new impression, it will help average out any slight errors we’ve made already and keep the stamp impressions form crowding each other.Paying attention to these two key details will go a long way to improving your basket stamping.
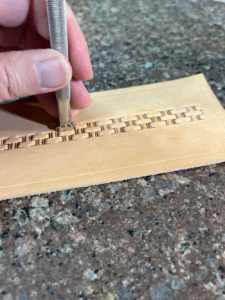
Step 11:
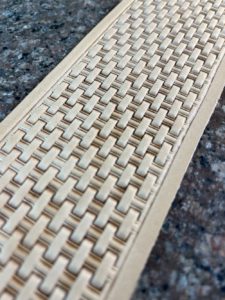
This shows several impressions I’ve made as I follow along my existing row of stamps, working from right to left.On each one I try to center the stamp between the two existing stamps and keep the stamp aligned with the existing stamps. This stamping will go faster than the initial row.
Step 12:
I’ve reached the end of the line again and again the stamp is running over the border.Just like before I tilt the stamp so I only make a partial impression.The second picture shows I only get an impression of the legs of the basket weave, but that leg impression is what I’ll use to line up the next row.
Step 13:
Here’s where we are at this point.We stamped a straight line across the project from left to right and then stamped one row of stamps back across from right to left.For the next row I’ll go back to the right and stamp another new row, tilting the stamp up at each end as necessary.I’ll keep doing that until I have filled up that side of the project and it looks something like…
Step 14:
Here I’ve added all the full rows I can on one side of the project and I’m bumping up against the border.For each stamp I’ve followed my process of making sure each new impression is centered between the two existing stamps and I check to make sure I’m keeping the stamp aligned straight with the existing rows.Fortunately it has come out pretty even with the border.
Step 15:
Now I am working on stamping as close to the border as possible by tilting the stamp towards me and making partial impressions.I still make sure to place the stamp centered between the two existing impressions and keep the stamp straight with the other impressions.I just want to be careful to leave as few marks as possible in the border area.
This closeup shows the partial stamp impressions and if you look carefully you’ll see I left a slight impression of one of the legs in the border.You can get rid of this by using a modeling spoon to gently rub the mark out.
Step 16:
Now I flip the whole project around and repeat the process on the other side.Again I start on the right and add impressions moving toward the left.
Just like before I center the stamp between the two impressions and keep the side of the stamp aligned straight with the existing impressions.
Step 17:
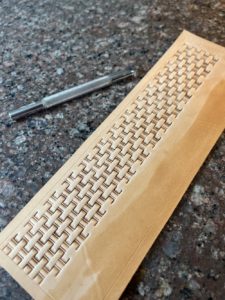
The other side is filled with impressions just like we did on the other side.
Step 18:
This time the whole stamp impressions came out pretty close to the border.I could probably get by without stamping any more but I’m going to go ahead and stamp partial impressions along the border by tilting the tool.I always try to get my stamps as close to the border as possible.
Step 18:
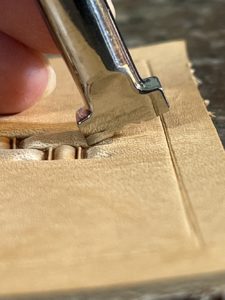
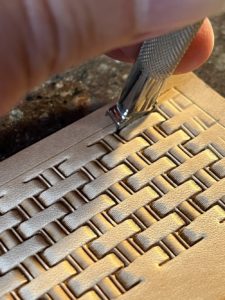
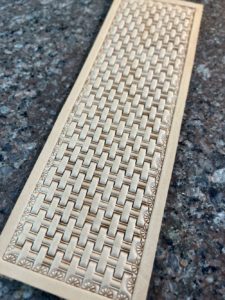
The basket stamping part is finished.Now to finish things up I bevel the border all around the edges of the basket stamped area.
Step 19:
Finally, pick a border stamp and stamp it around all the edges.
That is all the steps I go through,Yes there are a lot of details to keep track of and at first things go pretty slowly but after a little practice doing these steps becomes routine and it goes much quicker and
This is a step by step process showing how I take a blank piece of leather and create a floral carving on it. In this particular case it is a simple flower but the same techniques work for any kind of carving in leather.
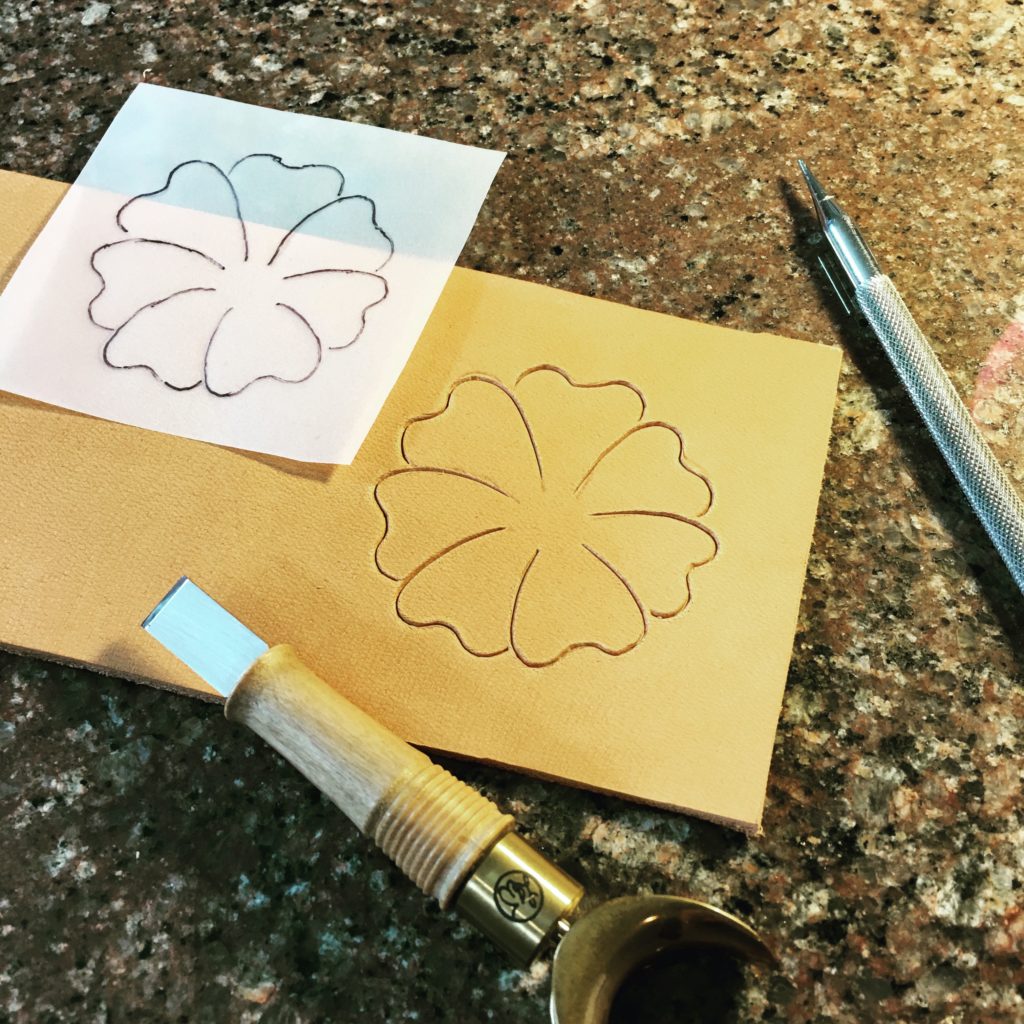
This picture shows a piece of leather to be carved and some of the tools to get started including a swivel knife.
For this leather carving tutorial I’m just going to carve and tool a simple flower with seven petals. The picture above shows the piece of leather with the flower outline already carved into it with my swivel knife. I’ll go step by step over each tooling step that I make to get the final flower. Feel free to grab a small piece of vegtan leather and follow along. Though it looks like there are a lot of steps and details here, it really doesn’t take too long to do each of these. Stay with me through this whole post and I guarantee you will pick up something useful!
A note on tools: It’s more than likely you won’t have all of the tools that I show here. For the most part I’m staying away from very specialized tools as much as possible but for doing traditional floral carving there are a couple of fairly specialized tools that are used to get very specific effects (like a center shader.) If you don’t have all these tools don’t worry. Where possible I’ll point out alternate tools you could use. In almost every case these tools are available at your local brick and mortar leather shop or online at your favorite tool maker. It’s sometimes possible to find these tools used from reputable online sources for very reasonable costs.
Leather Carving Tutorial: Step by Step
Step 1: Trace the flower outline onto your leather and carve it with your swivel knife. The picture at the beginning of this leather carving tutorial shows this step. I transfer my carvings to tracing paper but I’ve also taken the paper drawing and traced it directly to the damp leather by putting a layer of kitchen plastic wrap over the leather to protect my paper. Also, this first picture shows the design carved in with the swivel knife.
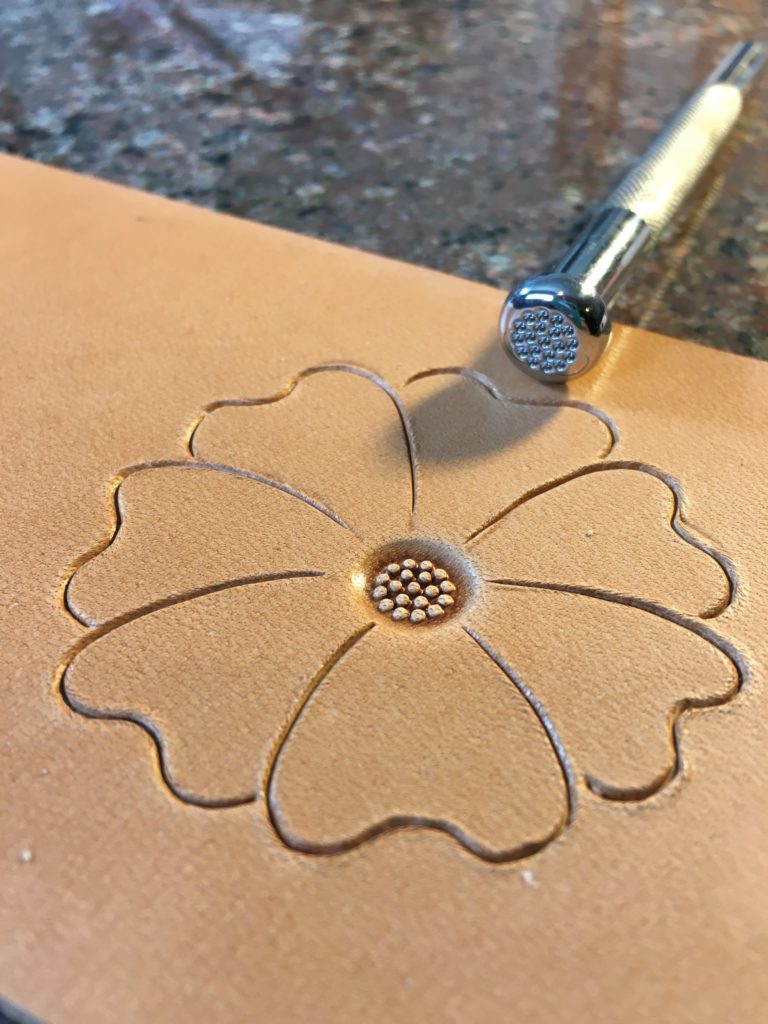
Step 2: Work from the foreground to the background! There are a lot of good reasons for this but the main one is to keep from having to redo any areas you have already tooled.
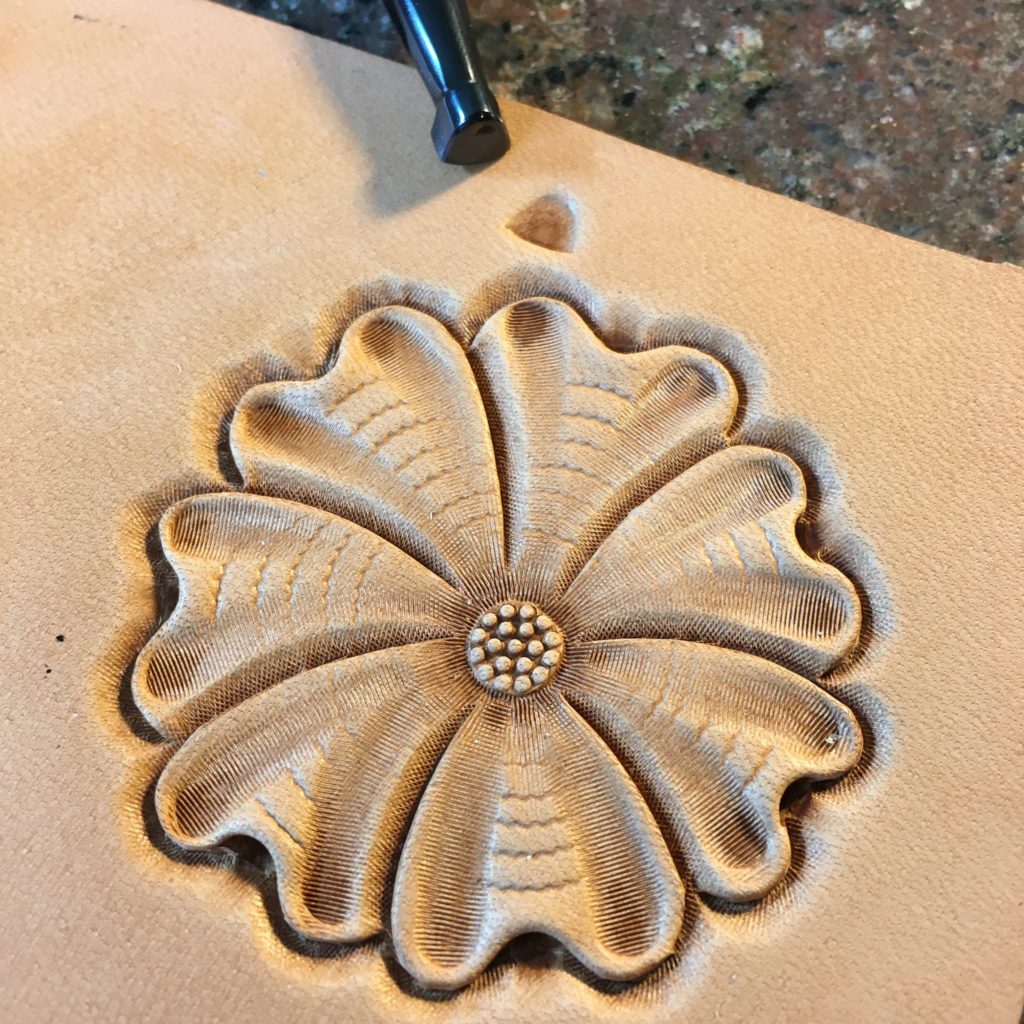
Flower Center stamped.
When looking at a flower like this, we treat the center as the closest part to the viewer and stamp that first. It also helps to guide the beveling of the flower petals that will come next. We want the impression that the petals (or more correctly their edges) come down to the flower center.
My flower center in this case is a stamp, but you can do something similar if you have a seeder and can stamp the seeds in a small circular area. In one of the later tutorials we’ll actually use a seeder to make a more complex flower center.
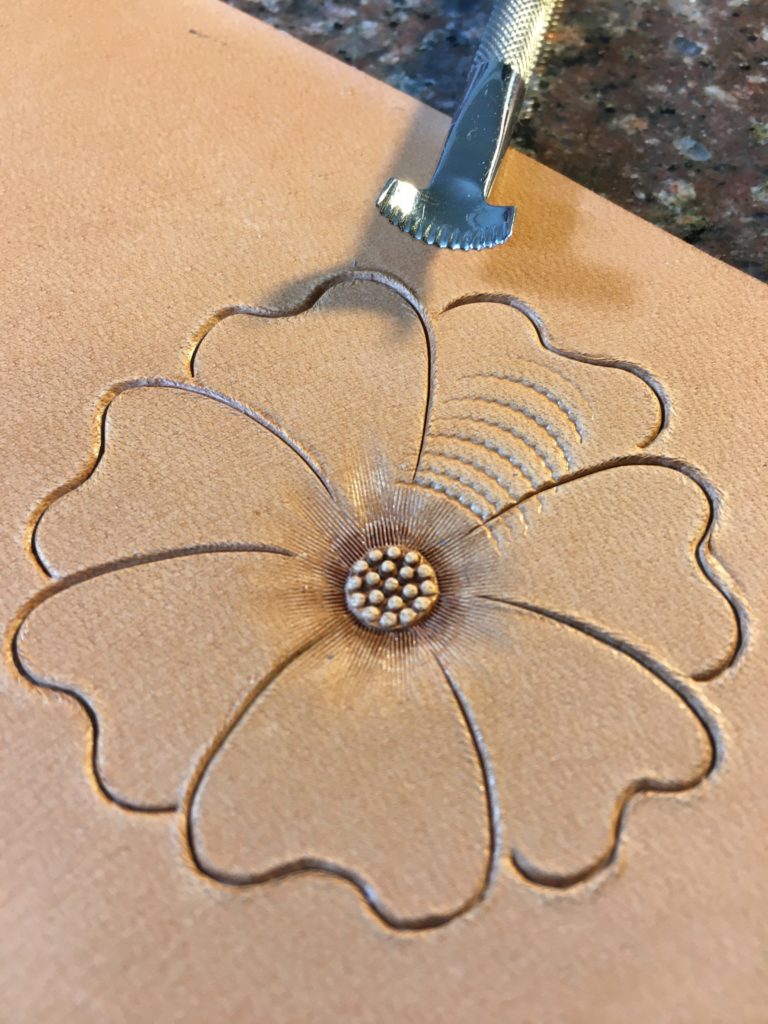
Step 3: Center shading. This was one of the first ‘Sheridan Style’ tools I got once I could get more professional tools. When I saw how this tool changes the look of the flower center I had to have one.
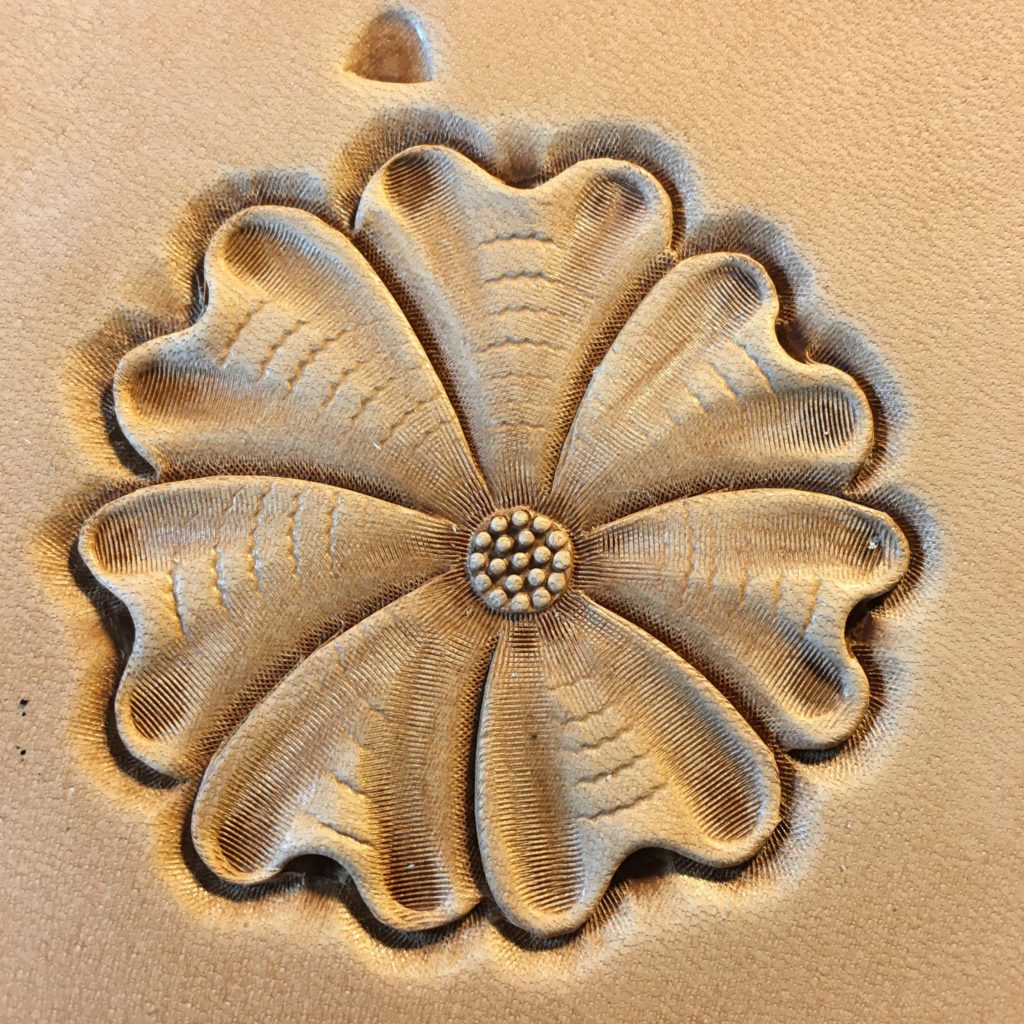
Center Shader used on the flower center.
It’s a lined tool designed to work around the flower center stamp and matte it down, making it look like a cone shape. It really enhances the depth the flower center has and makes it look like center is deep down in the center of a real flower. You can’t really tell from the picture but this stamp has a slightly curved heel to help it fit around the center stamp and press the leather down right up to the edge of the center. The lines on the stamp help to enhance the illusion of depth and will capture antique later (if you antique the piece.)
If you don’t have a center shader, a small beveler used carefully around the center can get a similar effect.
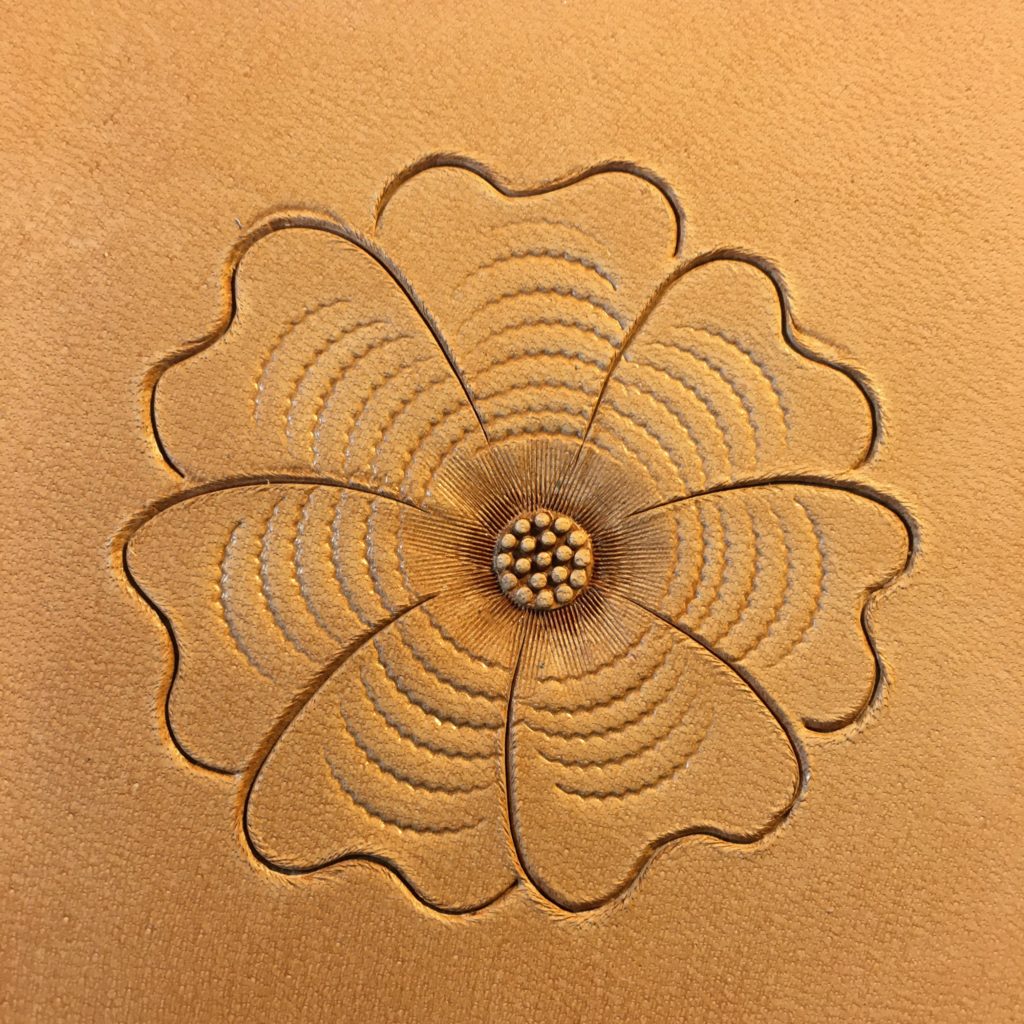
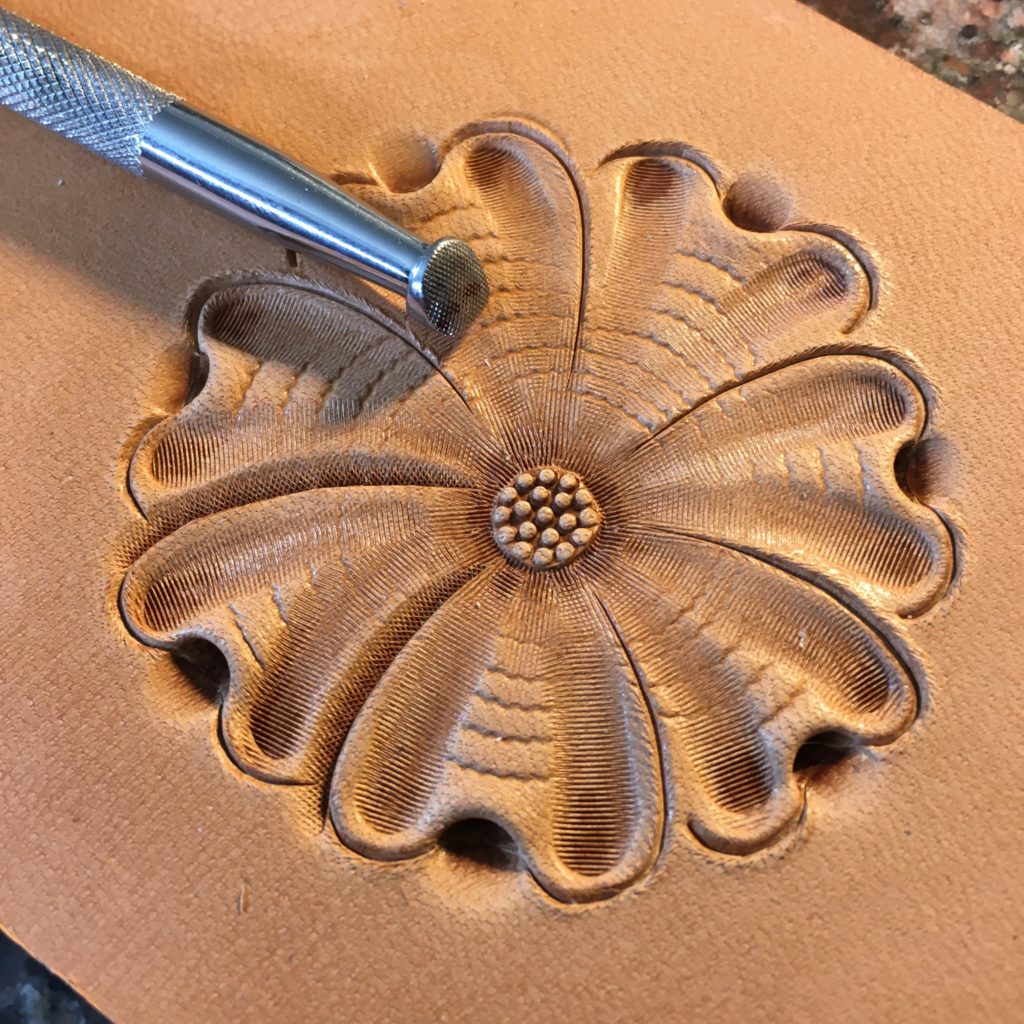
Step 4: Using a veiner on the petals. Floral carvers do this to add a visual texture to the petals as well as enhance the appearance of roundness and depth in the flower.
Using the veiner on flower petals.
You can use either a veiner or a camouflage tool for this. Originally the camouflage tool was the tool of choice for this but as Sheridan Style developed using a veiner for this job became more common. It’s a matter or your preference and style as to which you prefer. I usually use a small veiner like the one shown here.
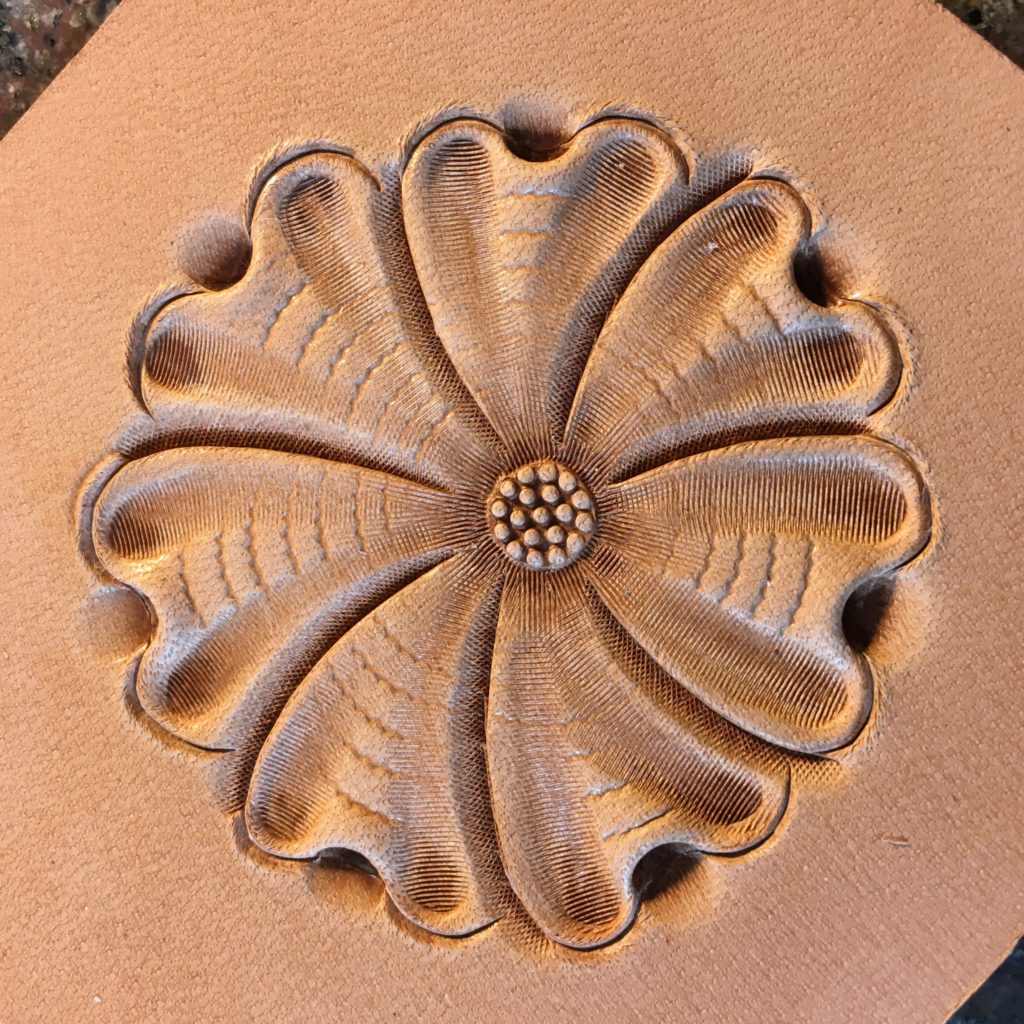
Step 4A: Petals after all the veiner lines have been stamped. I usually try to have my veiner marks line up around each petal though I’m not very precise about this.
All petals lined with veiner.
Also, I try to put the marks a little closer together near the center and have them gradually space farther apart as I get closer to the edge. I think this enhances the visual illusion that you are looking at a 3D cone shape that gradually opens up and flattens out as you get close to the petal tips.
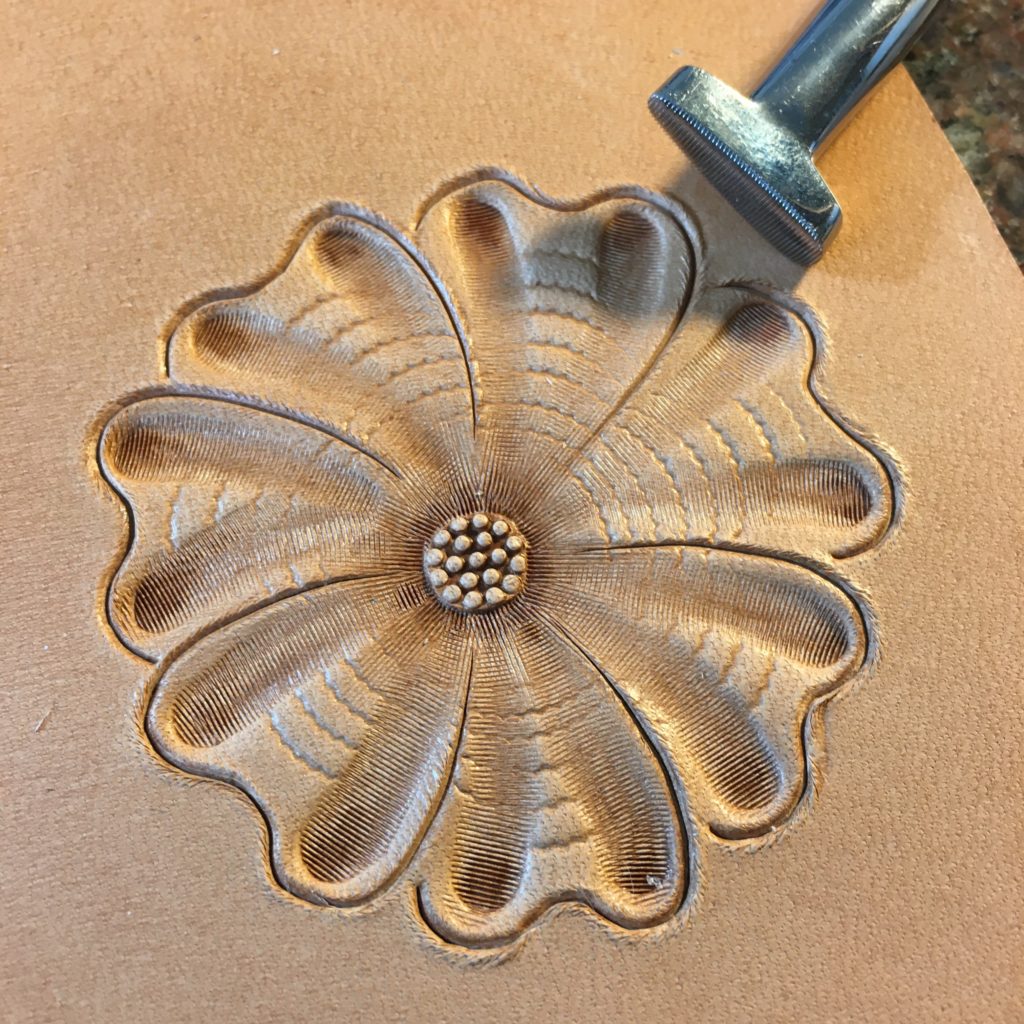
Step 5: Thumbprint or pear shader on the petal tips. This is one of the steps that is very stylized for floral carving and doesn’t really represent a feature in a real flower. We do it to give texture to the petals and more visual impact.
Thumprint tool shading flower petals
This tool goes by several names. Typically in Tandy Craftool catalogs it is referred to as a Pear Shader. Most Sheridan Style carvers will call this a thumbprint, and the two do have some differences. Pear Shaders are actually ‘pear’ or teardrop shaped and often smooth. Thumbprints are usually longer, shaped more like a loaf of French bread and they are usually lined. Thumbprints also are designed so that the inner end is narrower that the outer end, giving the user two sizes of thumbprint in one tool. That is a nice benefit!
This particular tool is a thumbprint. Notice how I start at the outer edge of the petal and walk it back toward the center, hitting it a little lighter as I go.
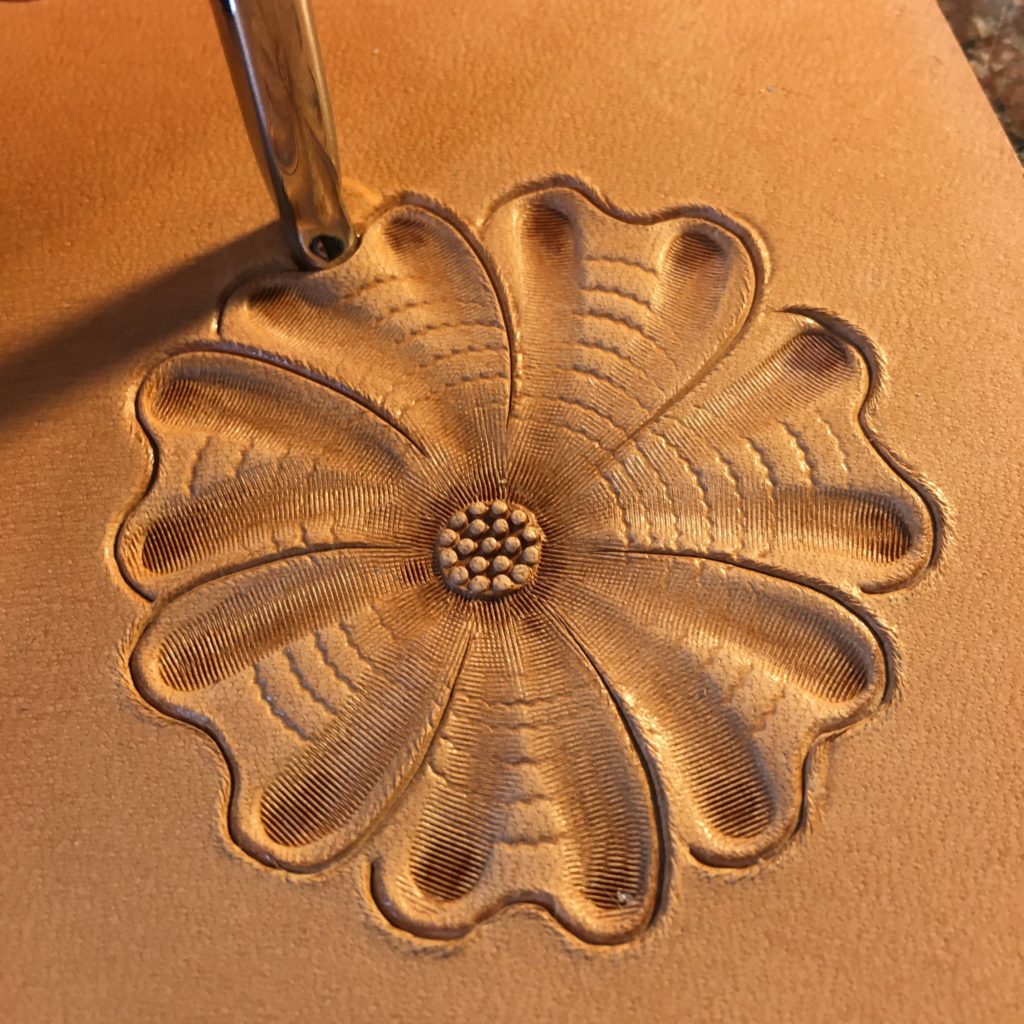
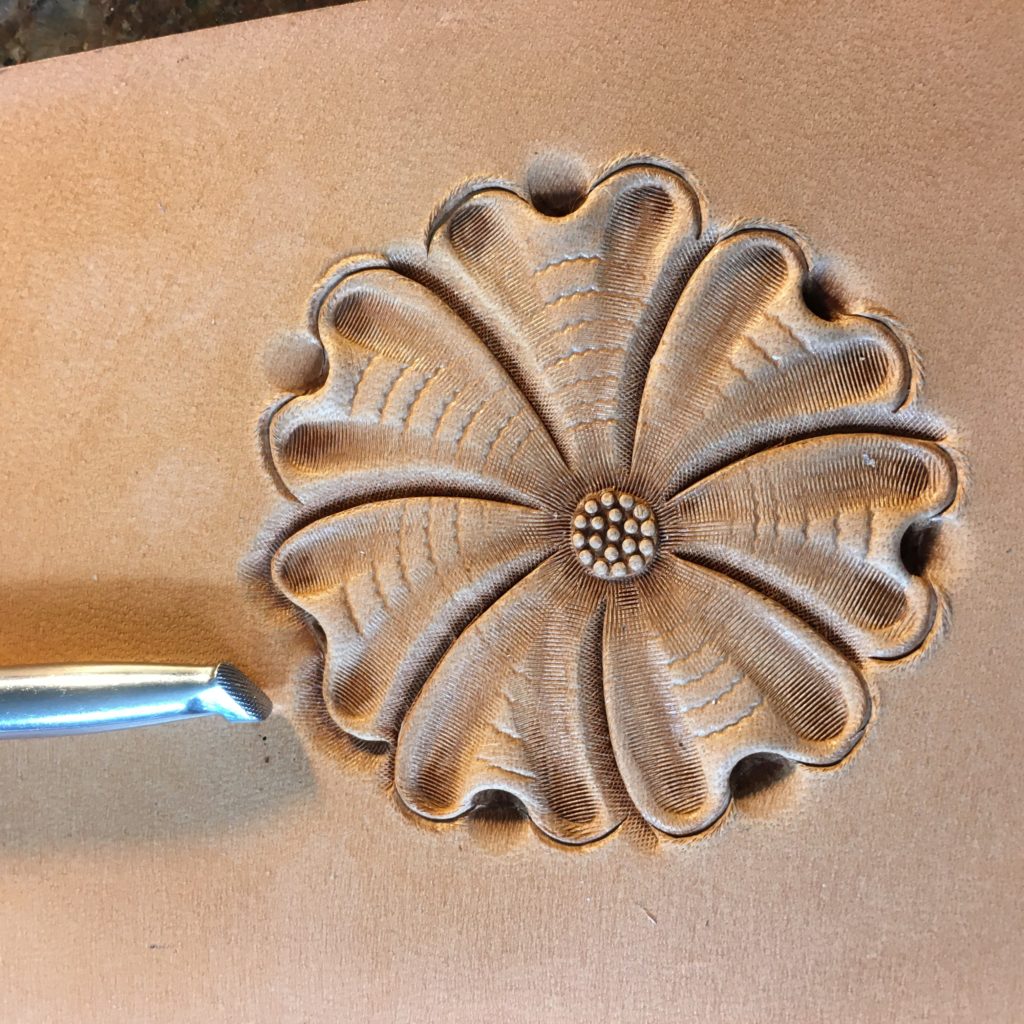
Step 6: The undercut or undershot beveler. This tool makes it easy to bevel those round concave areas on the flower petal. Also, because of the way it is shaped, it pushes the leather up above the cut line, giving a lift to that part of the petal. That is why these tools are often called ‘petal lifters.’ This was another one of those floral carving tools that I had to have once I saw how it was used. To me this was the key tool that made professional carver’s work stand out.
Petal lifter for the petal edges
I’ll use this tool inside the slight inward curve on each flower petal to lift that part of the tip up. Compared to the areas on either side of the lifted area where I’ve already used the thumbprint, that center part of the petal will really look like it’s standing up above the leather surface.
Showing how the tool fits at the petal’s edge
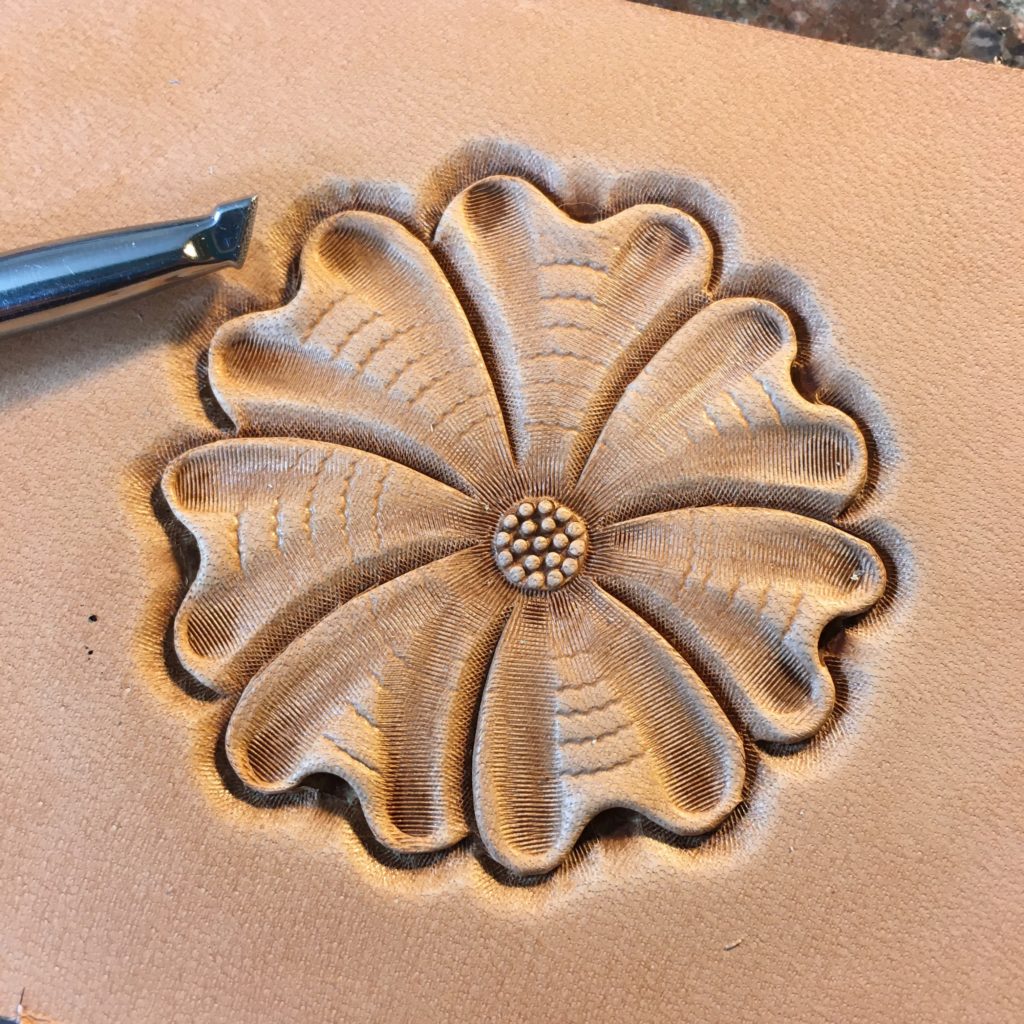
Step 6A: After stamping in all the scalloped areas of the petals. I do this as the first step in the beveling process.
All petals lifted
Step 7: Beveling the petals. First I focus on the long cuts to the flower center. I use a wider beveller for this because you get smoother beveling when you can use a wide beveller. The smaller the width of your tool the easier it gets to have uneven beveling and to leave undesirable tool marks. You always want to use the widest tool you can. The beveller in this picture is a ¼ inch wide.
Starting the petal beveling
Flower center beveled all around.
Step 8: Beveling around the petal tips. To do the more rounded petal tips my larger beveler is too big to easily do the job, so I switch to a 1/8 wide beveller. This makes it easier to go around the curves but you do have to take more care to use an even amount of force so you get an even and smooth beveling line.
A smaller beveler is used for the flower tips.
Step 8A: Petal beveling complete! The flower is almost done at this point.
Beveling complete!
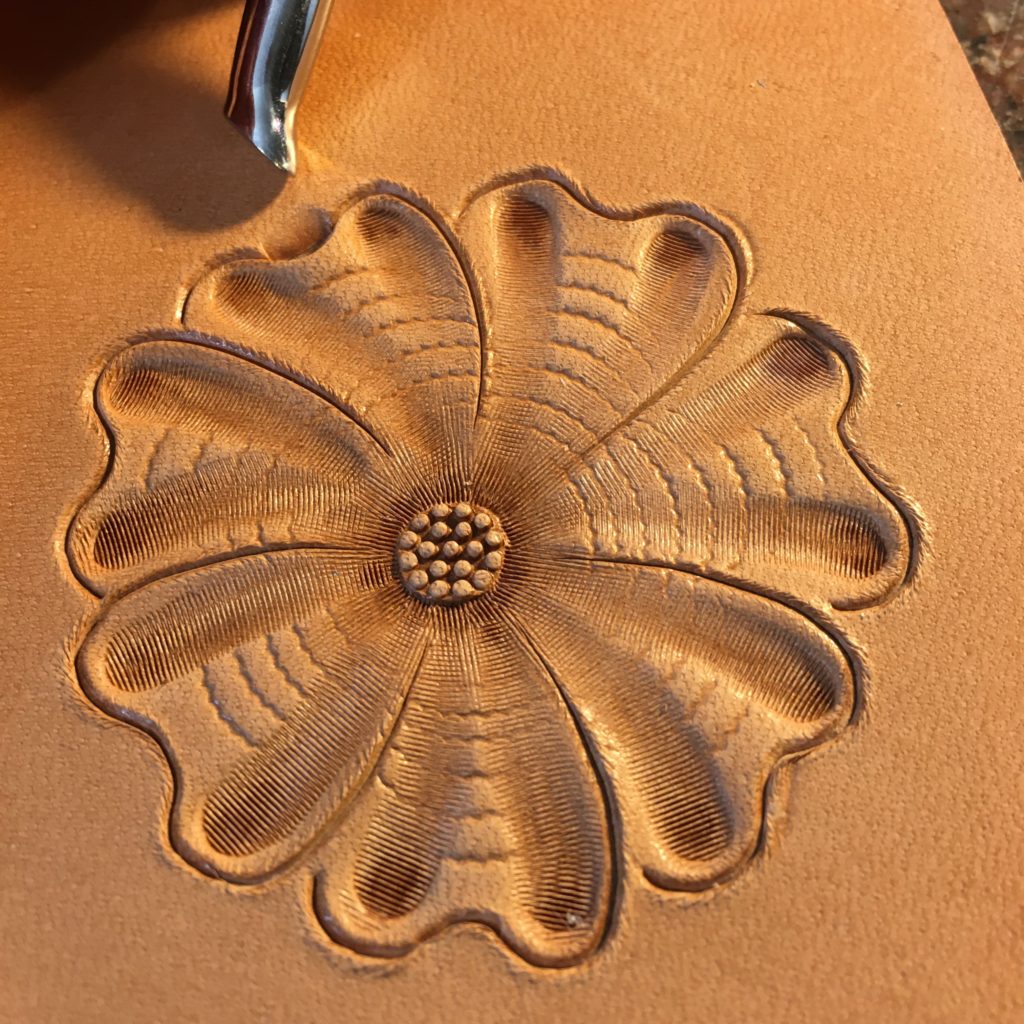
Step 9: Matting down the beveling ridges. Notice that there is a very pronounced ridge on the flower petals where I beveled the petal edges that lead down to the flower center. I want to smooth out that ridge so the petals look more flat and I’m going to use the figure beveller at the top of the picture to do it.
A figure beveler to knock down the beveling ridges
Figure bevellers were specifically designed to matte down leather in figure carving and are great at removing ridges like this. I stamped an impression of the tool next to it so you could clearly see the shape of the tool. If you don’t have one of these tools a modeling spoon will do the same job for you. Really any smooth rounded tool could be used like a modeling spoon to smooth the leather out.
Step 9A: Everything smoothed down. The petals now have a much smoother and more natural looking surface.
Beveling ridges smoothed out.
Step 10: The same kind of ridge exists around the outer edge of the flower thanks to our beveller and the carving will look better if we matte that down too. Since this will be the background of the flower, we usually want this surface to be textured to make the flower stand out from it. The texturing will capture antique when you antique your piece making it much darker than the flower, but even if you don’t antique your work the texture itself will separate the background from the floral carving.
Backgrounding the flower.
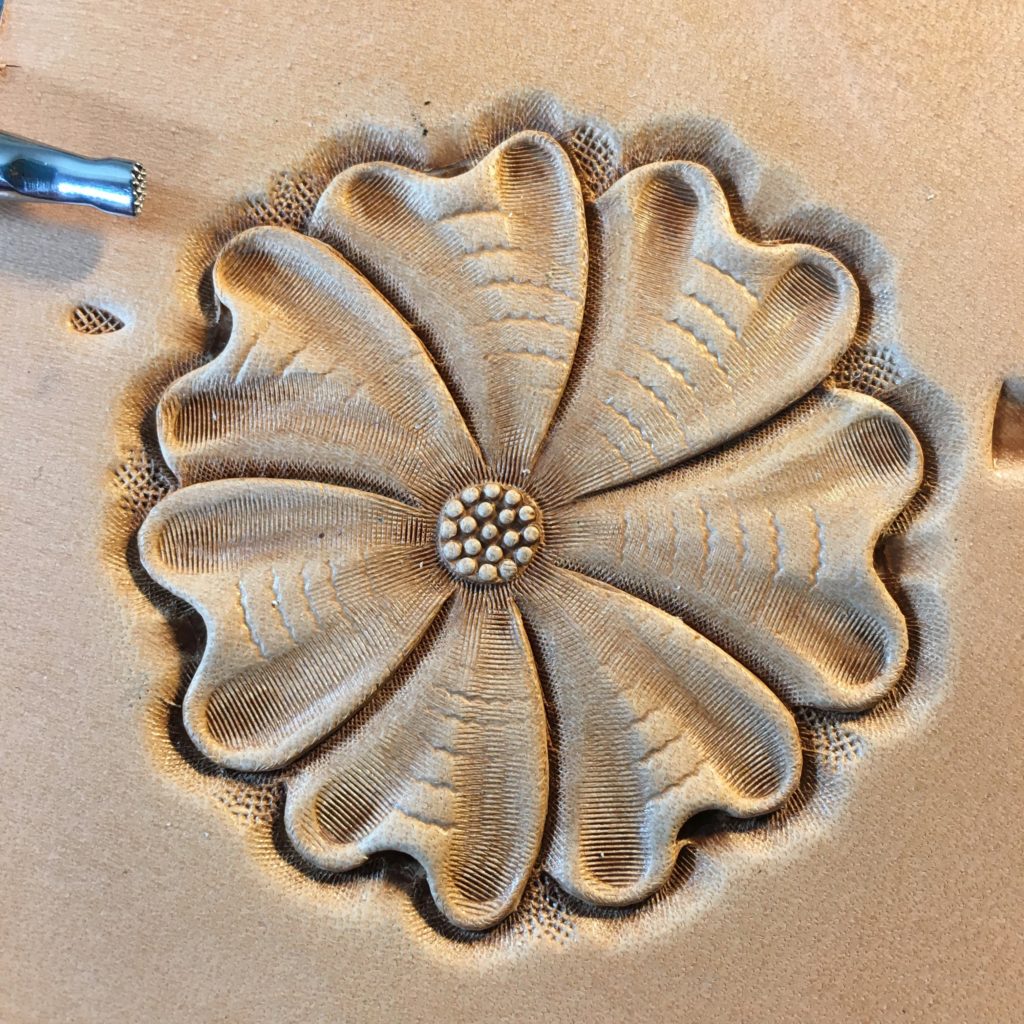
First, I’m going to start with a small pointed checkered backgrounder to matte down the small pointed areas between the petals. For this carving I’m going to use a checkered backgrounding tool. You can see an impression of the mark this backgrounder leaves next to the tool. It is true that some floral carving experts will say that the only ‘professional’ backgrounding tool for floral work is a bargrounder but I say use whatever you are comfortable with. I’ll have an example using bargrounders in a later tutorial.
Step 11: Once I matte down the tight spaces I’ll switch to a larger tool so I can cover more area. I stamped the larger tool next to the smaller one for comparison and I’ve started matting down the area along the top of the flower so you could see the difference.
Expanding the backgrounded area.
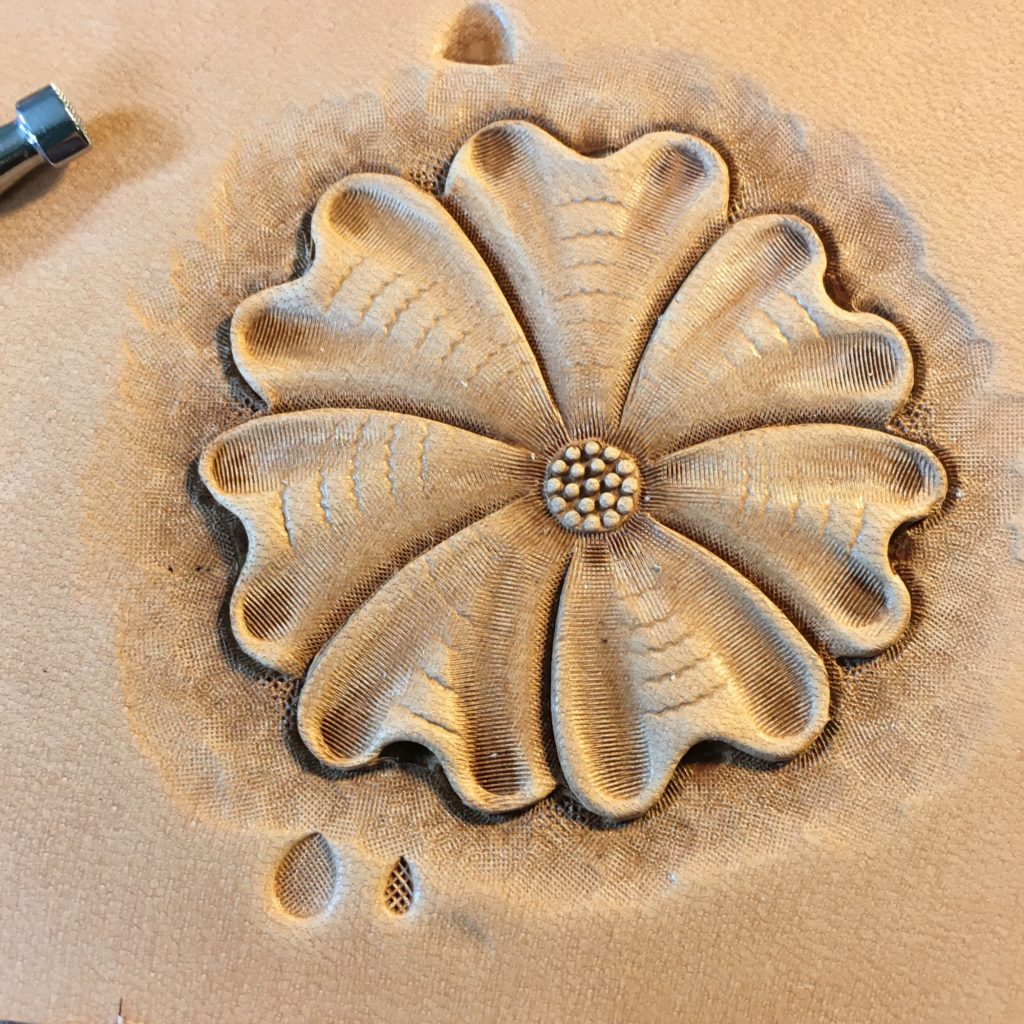
Step 11A: Here I’ve matted all the way around the flower. Please note for this leather caring tutorial I wasn’t taking the time to do my best to matte this area down evenly and fade the edge out as smoothly as I could. As a result, the matting on this background looks choppy. If this was something I was making for a customer I would spend more time making the matting look smooth.
Backgrounding completed.
Note how the backgrounding makes the flower stand out, like it’s actually above or separate from the leather. Because of the texturing in the background if you antique this leather it will make the flower stand out even more.
Closer view of the backgrounding around the flower.
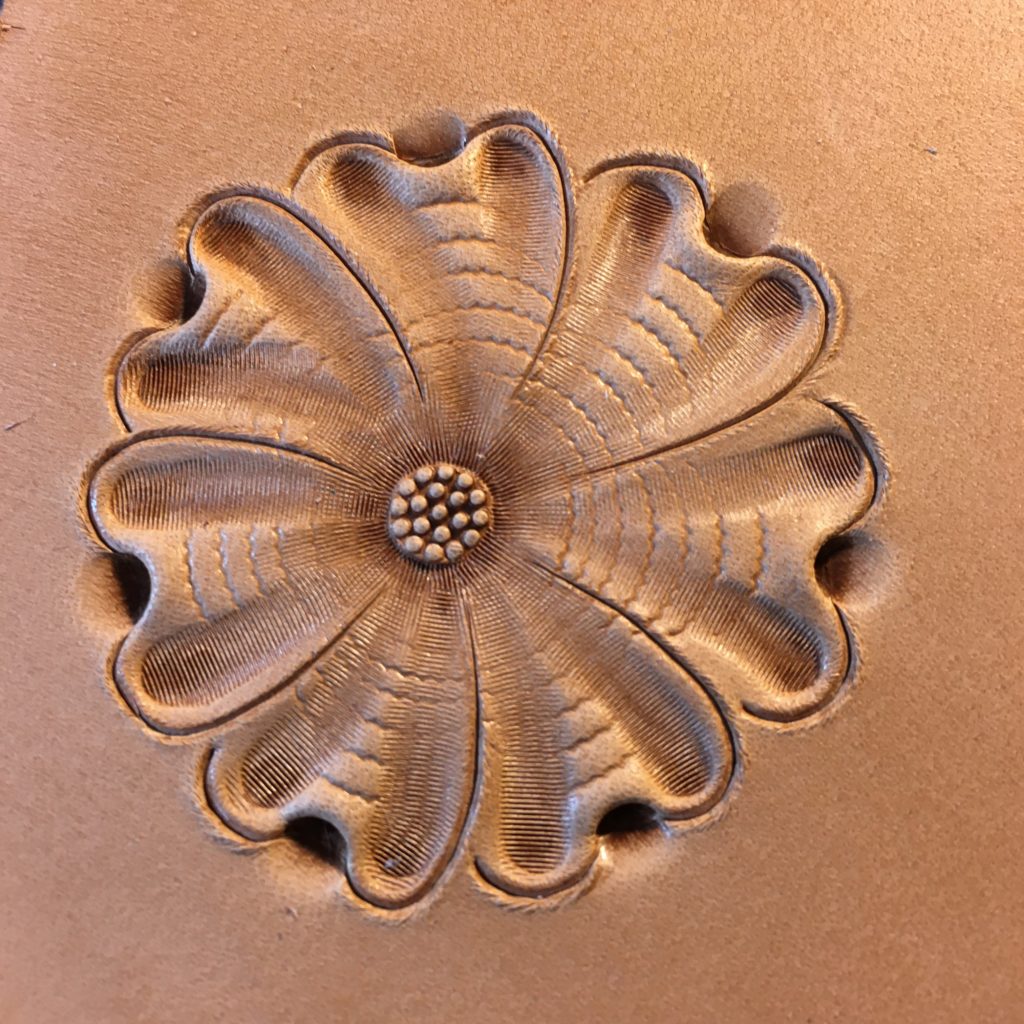
Step 12: Decorative cuts. Typically this is the last step in the project. I usually finish all the carving before I come back and do this step. Decorative or ‘dress’ cuts are intended to give extra detail to the flower and are another stylized effect for floral carving that doesn’t quite match a part on a real flower. I for one think the flower looks much better with the cuts than without.
Decorative cuts on the flower petals.
There are lots of different styles and ways to do these cuts. Each carver usually find one that he likes and can do well and sticks with them. I’ve never felt I was very good with these cuts and I stick to these basic ones most of the time.
While leather is made from the hides of cows, the way it’s processed is different depending on the type of leather to be made.
Most leather is made for use in clothing and it’s tanned using chrome salts. This is a fairly quick and cost effective process that makes most of the kinds of leather you run into in your daily lives.
The kind of leather used for the carving my artwork is made in a different way. It is called vegetable tanned leather (or veg tan for short) and it goes through a much longer process. Vegetable tanned leather gets its name from the fact that plant parts like bark are used to do the tanning. This process gives the leather much different properties than the kinds of leather used for shoes or clothing.
Floral carving in leather.
” Vegetable tanned leather gets its name from the fact that plant parts like bark are used to do the tanning.”
The video at left is a tour of the Hermann Oak Tannery in St Louis Missouri. This tannery has been making leather since 1881 and is one of the premier leather tanneries in the US today. The vegetable tanned leather they produce is the preferred choice of many US saddle makers and other leather workers. This video is a fascinating tour showing all the processes for making leather from raw hides to finished leather.
Thanks to Weaver Leather for posting this informative video!
It’s a brand new year and a time to look back at the custom leatherwork of the past year. This past Christmas season was a very busy one here at C and B Leather and we had lots of custom orders for our customers. This is just a sample of some of the special items we made for our clients.
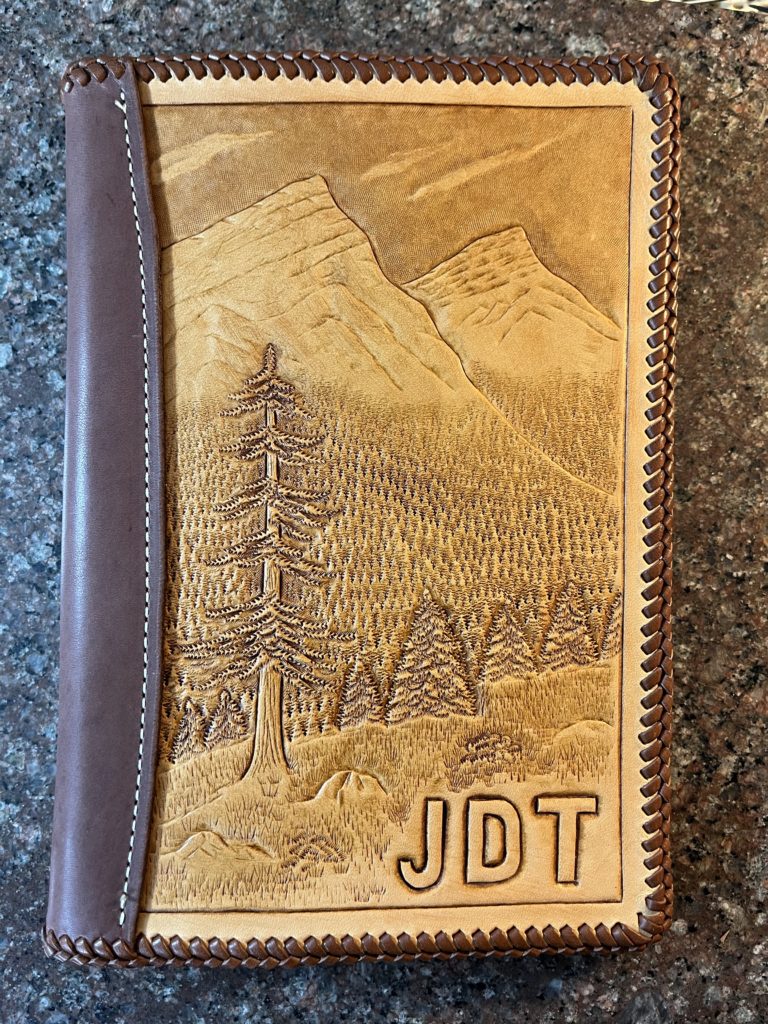
A 5×8 leather notebook with a mountain carving.
This customer wanted a small notebook with a mountain scene and her husband’s initials on it. The artwork was tailored to the kinds of scenery they can see near their home in Montana. I make several different sizes and styles of these notebooks and the carvings on them are always made to customer request. Notebooks like these are intended to be something the new owner will get a lifetime of service out of, and each one is unique to it’s new owner.
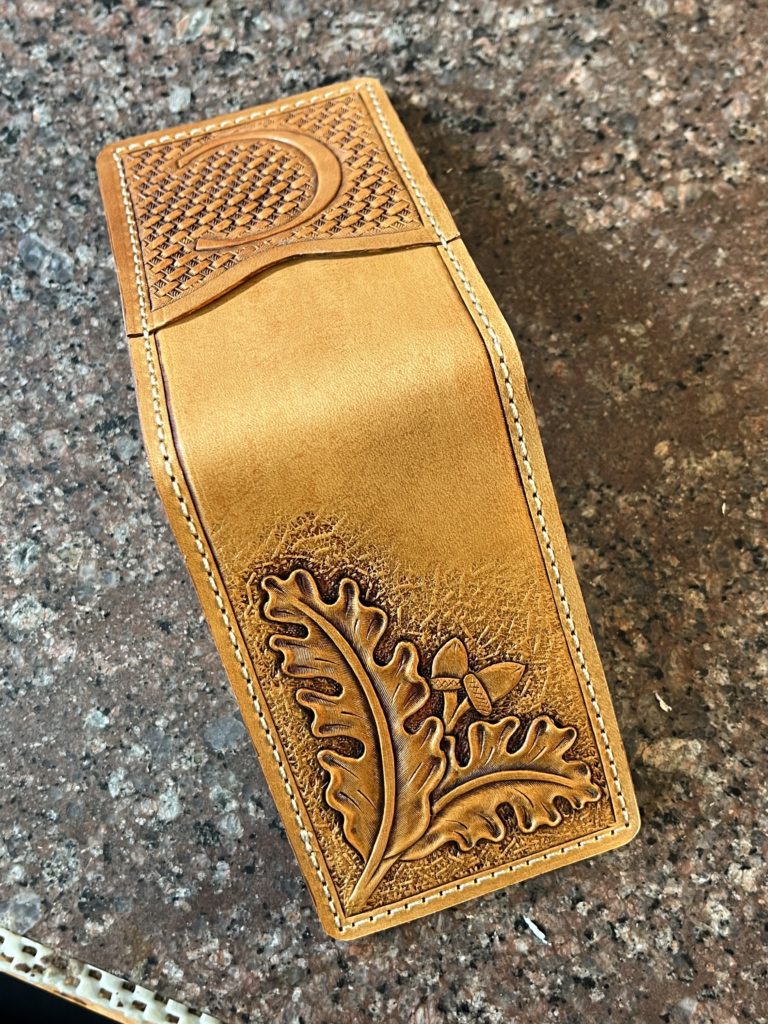
Custom Oak Leaf money clip with the customer’s initial carved on the pocket.
When the person this money clip was made for received it on Christmas morning I’m told he immediately through his old store bought wallet in the trash! Apparently he absolutely loved this new money clip wallet that was personalized just for him.
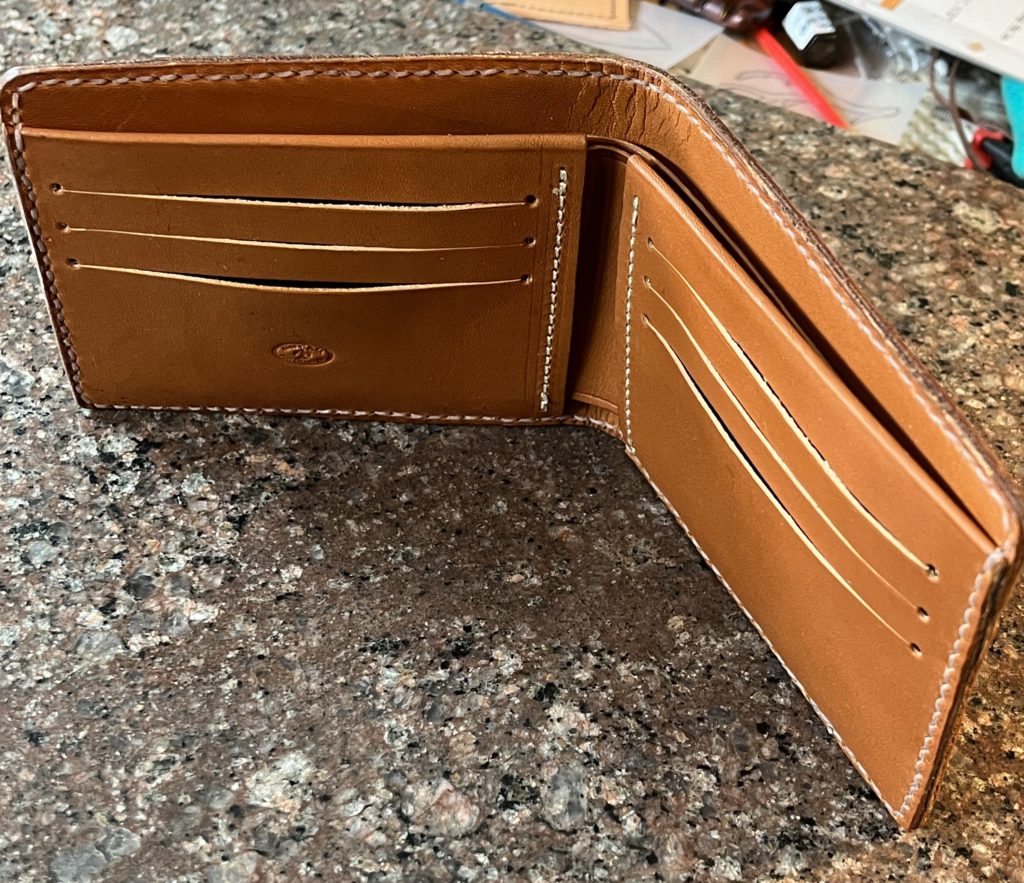
Hand made leather bifold wallet.
We make a variety of different kinds of wallets for both men and women. All our wallets can be customized with different kinds of designs.
Custom Leatherwork is our Specialty!
Making bespoke items is our specialty. If you have an idea for a personal gift for a loved one or yourself, contact us to talk about your ideas. Leather notebooks or wallets like these make excellent gifts that will last for many years and are absolutely unique. Very often these will become heirloom items that can be passed down to the next generation. Click on the ‘Contact’ menu at the top of the page to get things started!
Last night here in Fort Collins, CO we got our first taste of winter. Thunderstorms with small hail and then light rain and falling temperatures. This morning many cars and decks were covered in ice. Just to the north of us in Wyoming they got blizzard conditions last night and this morning. It was in the 80’s here just a couple of days ago.
A wintery day in Fort Collins, CO
Note: This picture wasn’t from today. I had to dig through my photos to find a good snow picture to use. Hopefully we’ll get some heavy snows like this during the winter to cut down on our drought!
Custom Leather Christmas Orders
All of these changes in the weather has us thinking about the upcoming holidays. Its actually not all that long until Christmas. If you are thinking about a custom leather order as a holiday gift for a loved one or for yourself you need to get the order in soon. We’ll be closing the books on new orders in the next few weeks. Most custom orders take several weeks to make so I won’t be taking any new orders after November 15 for Christmas delivery. If we get a lot of Christmas orders in the next few weeks this date may have to move up so if you have something in mind you would like to have made, make sure to contact me as soon as possible!
Custom leather Christmas orders are always a big part of our business here. We are always getting requests for custom leather items in the last few days before Christmas and we always have to disappoint those people because it takes more than a couple of days to make quality leather goods. Please don’t be disappointed this year. Contact us now to get your order in!
We make a variety of leather wallets, clutch purses, notebooks and custom knife sheaths and we would be thrilled to make a special item for you!
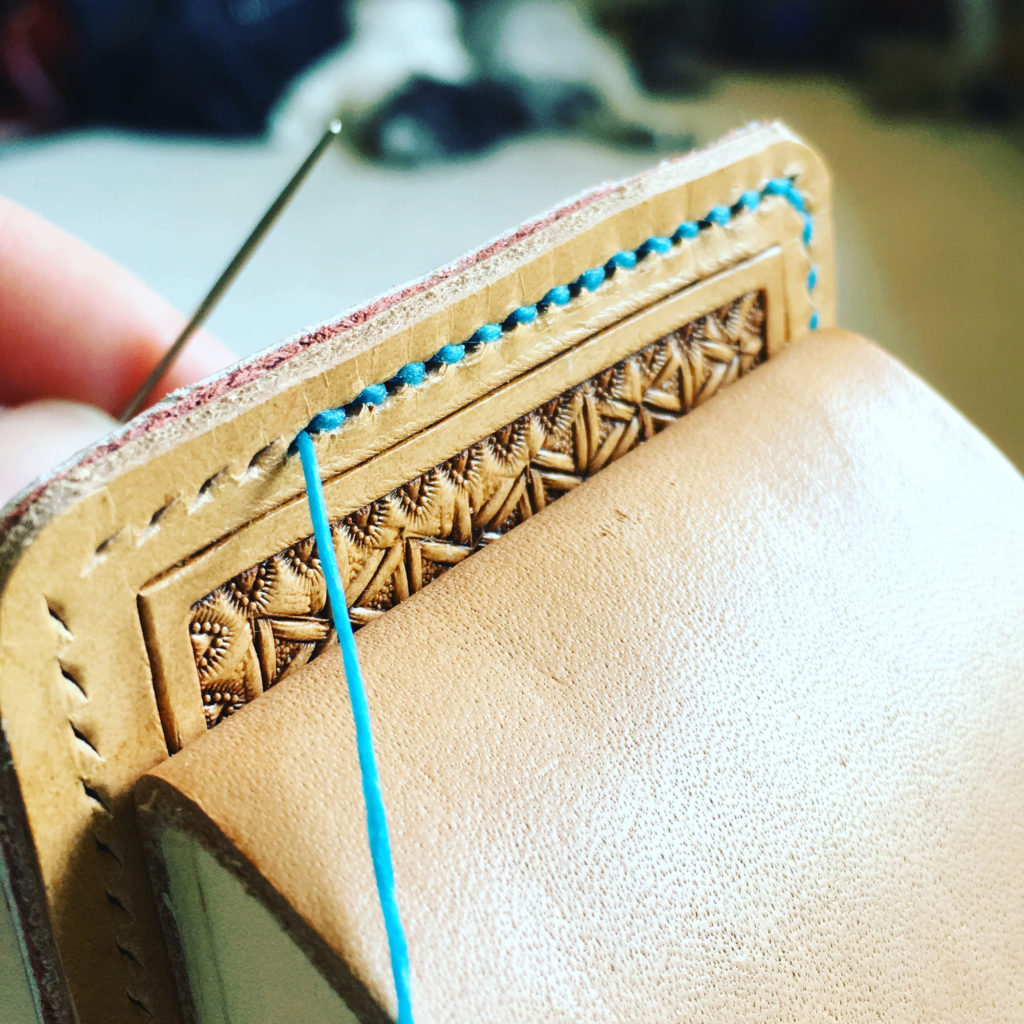
Hand Stitching a Leather Wallet with a traditional saddle stitch.
Did you know that August 15th is apparently National Leather Craft Day? Apparently back in 2018 this day was established as a day that “honors the rich heritage, artistry, and skill of leathercrafting.” Certainly no argument from me there. Working with leather is a wide ranging subject and there are so many things you can do with it. My main focus of carving leather is just a small part of what people all over the country do to work with leather on a daily basis.
According to the website National Day Calendar this holiday was created:
National Leathercraft Day recognizes the dedication and creativity of leather workers. Passionately, their inspiration comes alive through their designs and time-honored traditions. When a leatherworker designs a piece, expect outstanding quality and skill.
www.nationaldaycalendar.com
According to the site you can try taking a class to learn leathercraft or you can order a handcrafted item from your favorite leather worker. In case you want to order anything from me, you can check out my Etsy shop at: https://www.etsy.com/shop/CandBLeather
Carving or embossing leather is an art that is as old as man’s use of animal hides. It was probably something that mankind learned to do as soon as they learned how to tan leather. Leather carving as an art form has been embraced by almost all cultures in Earth’s history, each providing their own unique cultural spins.
Carved Leather Purse by C and B Leather
The image of the purse above is one that we made that uses the Western floral carving style that was developed by saddle makers in the US. Though this is a common leather carving style seen these days in the US, it’s not the only style we’ve made.
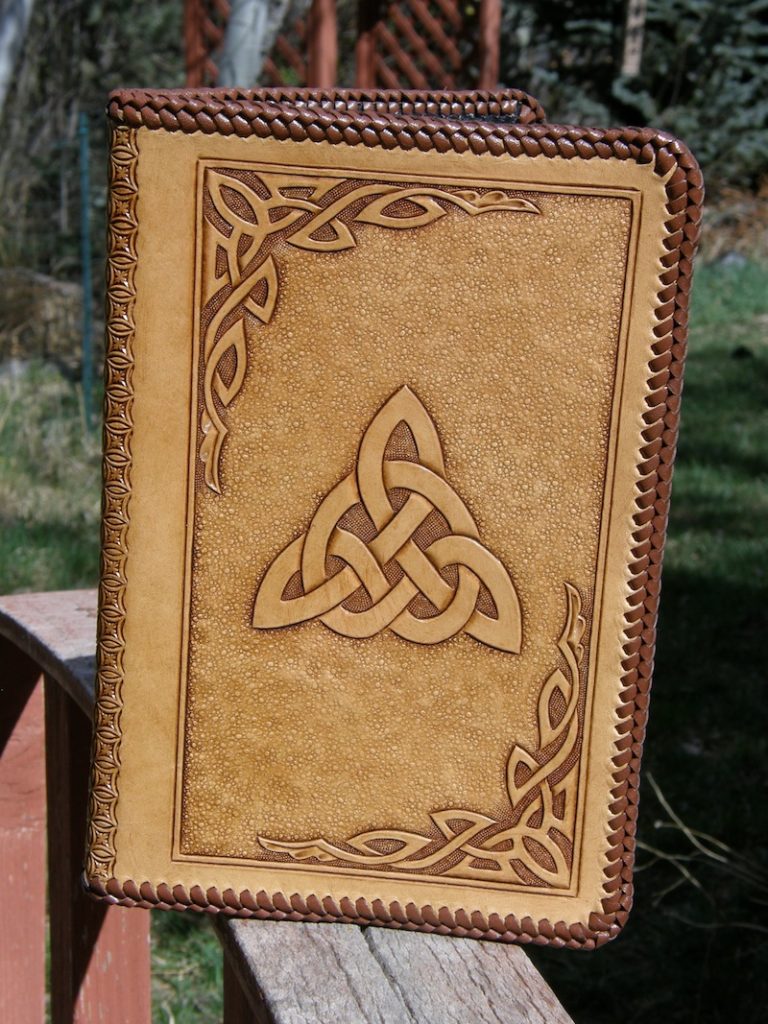
Celtic Trinity Knot Notebook by C and B Leather.
This notebook has a traditional Celtic Trinity Knot design flanked by other Celtic Knot designs in the corners. Celtic knot designs in leather, as well as in stone, wood or on paper, have been a popular art form for many centuries, and still hold their allure today in leather art. Celtic designs are very popular to this day and we are often requested to make customer leather items that use Celtic knots or images.
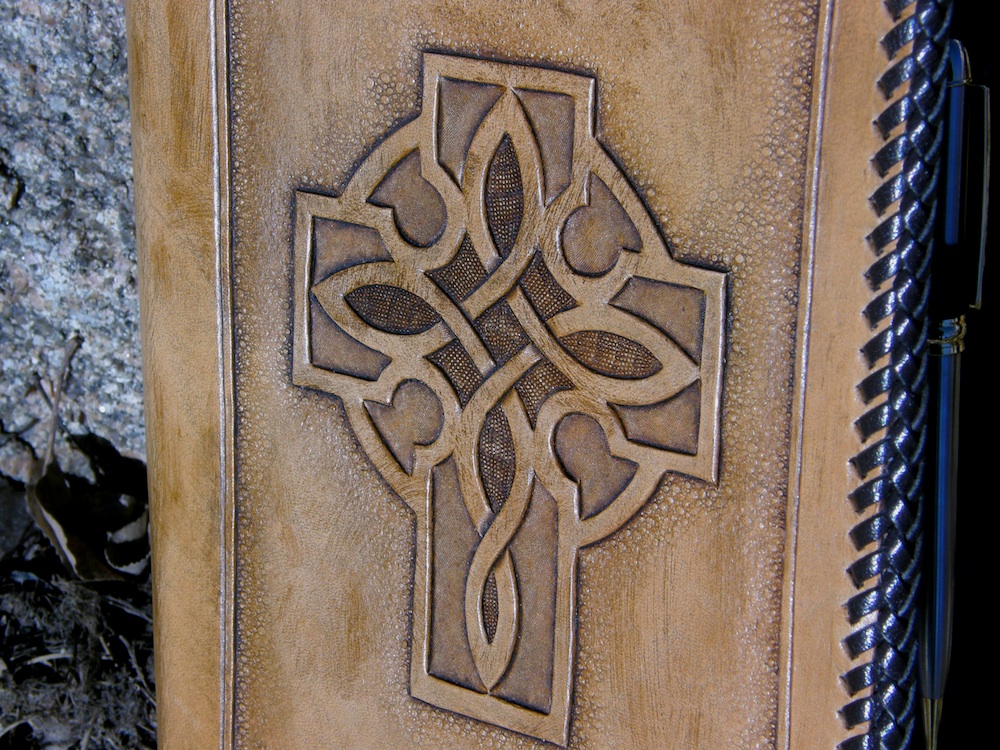
Carved Celtic Cross notebook by C and B Leather
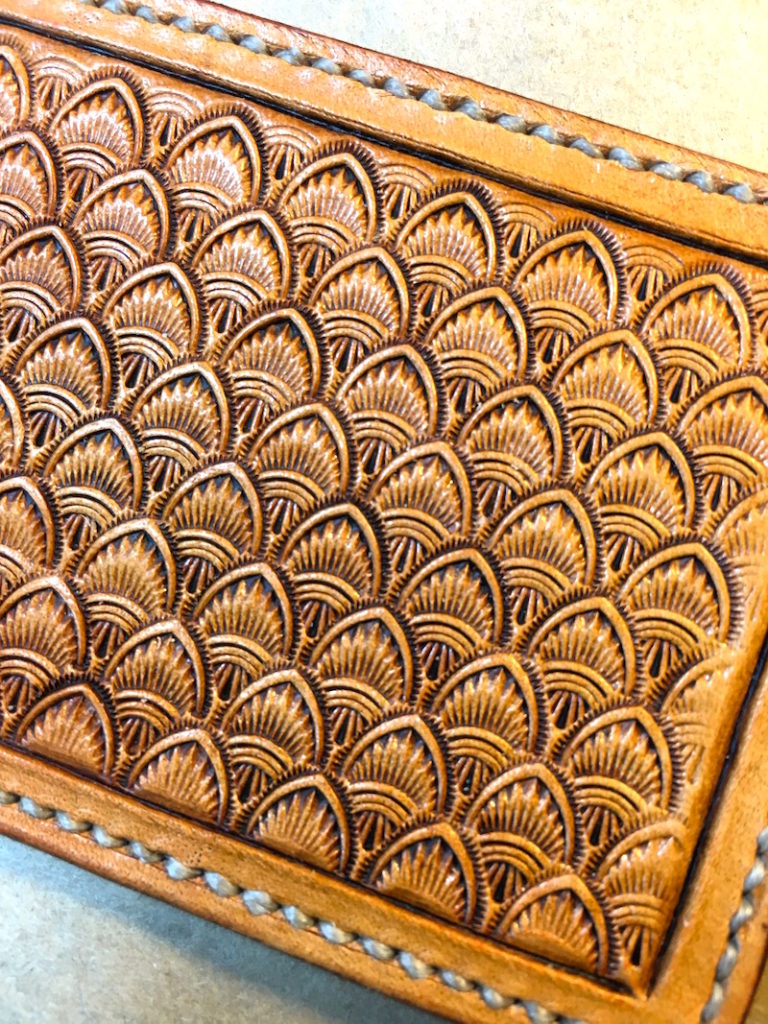
One of the most common forms of making leather into art is by stamping a design into it. Geometric designs can be simple lines to complex geometric forms. Most often they are stamped into the leather with a single tool that is used to make multiple impressions across the surface of the leather.
Shell stamped design in a small wallet.
This particular design on a minimalist leather wallet was achieved with two separate tools being used together across the wallet’s outer surface. It’s a complex task that takes a lot of skill to execute well.
Custom leather work is what we do at C and B Leather and bringing your artwork ideas to life is our goal with every project.
If you have found this site and are reading this post, you are most likely one of the first people to visit our new website.Welcome and I hope you will be a frequent visitor or future customer!
Who we are
C and B Leather is owned by Bob and Crystal Blea.I’m Bob and I do the leather carving and stamping you see here.My wife Crystal introduced me to leather carving as an art form after we got married.Before that time I had no idea that it was possible to carve or stamp designs into leather.My artistic background up to that point had been in painting, primarily oils.Though I had seen designs in leather before I hadn’t thought about how people made them.After discovering leather carving as an art, I started learning all I could.I worked on developing my skills and I was fortunate to have a friend who was a saddle maker.Dusty Johnson was a well known saddle maker who also made replicas of western gun belts from Hollywood western movies and he was my first teacher, showing me the basics.I will always be grateful to him for that.Eventually I was able to learn from some of the masters of leather carving like Bob Park, Robert Beard, Chan Geer and one of my most influential mentors, Jesse Smith, a master leather carver and saddle maker.I am eternally grateful to all these people for the knowledge they have shared with me.
I am also extremely grateful to my wife Crystal.Without her I never would have started on this journey.While she doesn’t do any of the carving these days, she still helps out with lacing, the jewelry items and making sure my design choices make sense.She’s also my expert when it comes to purses and handbags.I owe her much as she is the seed that all of this came from.
What we make
We produce a line of money clips, wallets, purses and notebooks. Occasionally we make jewelry items that combine carved leather with metals. Most items are custom made to your specifications. Often I carve western floral style designs developed by saddle makers in the Western US, but that isn’t the only style I carve in.I frequently carve Celtic designs, animals and even landscapes in leather.
What you will find on this blog
Over the coming posts I plan to talk about the techniques we use to construct the handcrafted leather items we make.You will see posts about items we are making in our shop, the tools we use and the skills they require.Because I’m also a big history buff, I plan to talk about the history of the art form.I plan to talk about where the art came from and some of the people who developed the forms and skills we use today.I’ve also come across quite a few characters in the leather trade and I hope to introduce you to a few of them.